This would give a definite clue how to start and stop itAlso maybe add a On/Off button that sets a minimum amount for the PST = On,
and sets to Zero = Off.
Yafaray4tS v0.9.0
-
trueBlue

- Captain
- Posts: 5548
- Joined: 06 Jul 2009, 22:50
- Type the number ten into the box: 10
Re: Yafaray4tS v0.9.0
Did not like this idea?
-
clintonman

- Captain
- Posts: 5659
- Joined: 21 May 2009, 21:08
- Type the number ten into the box: 0
- Location: California
Re: Yafaray4tS v0.9.0
If you want to do it I have no objection.trueBlue wrote: 17 Jul 2018, 20:45 Did not like this idea?
This would give a definite clue how to start and stop itAlso maybe add a On/Off button that sets a minimum amount for the PST = On,
and sets to Zero = Off.
-
clintonman
- Captain
- Posts: 5659
- Joined: 21 May 2009, 21:08
- Type the number ten into the box: 0
- Location: California
Re: Yafaray4tS v0.9.0
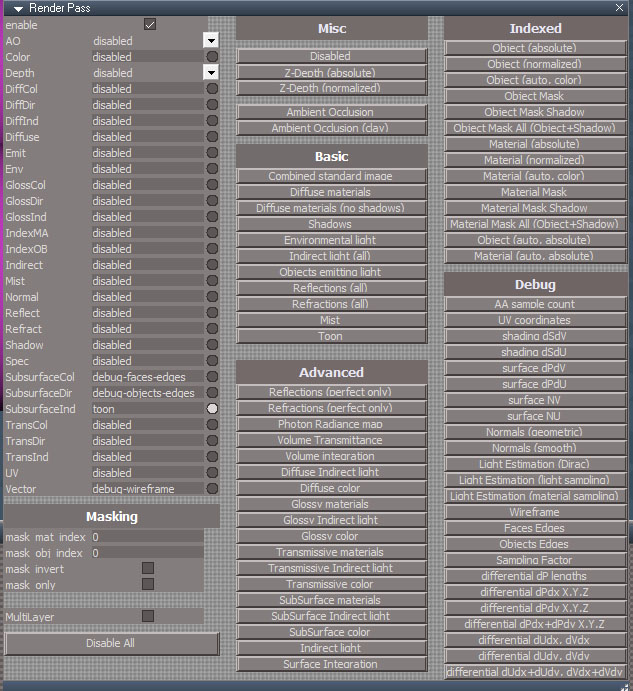
Render passes so far. Section on left is the pass channels, right side is the passes available to use in the channels.
Still a few more controls to add for toon effects and edge attributes.
Toon pass effect
edge effects pass
![toon_test [pass toon].jpg](download/file4581.jpg "toon_test [pass toon].jpg (52.2 KiB) Viewed 4531 times")
![toon_test [pass debug-faces-edges].jpg](download/file6a4a.jpg "toon_test [pass debug-faces-edges].jpg (198.5 KiB) Viewed 4531 times")
-
trueBlue
- Captain
- Posts: 5548
- Joined: 06 Jul 2009, 22:50
- Type the number ten into the box: 10
Re: Yafaray4tS v0.9.0
Wow! I think you broke a trueSpace76 record for the biggest panel in it's history! 
That should make it easier.
Do you have a suggestion for a minimum value for the Save Time?
Here is a couple pdfs of the install and toolbar to look at.
Removed due to update
That should make it easier.
Do you have a suggestion for a minimum value for the Save Time?
Here is a couple pdfs of the install and toolbar to look at.
Removed due to update
-
clintonman
- Captain
- Posts: 5659
- Joined: 21 May 2009, 21:08
- Type the number ten into the box: 0
- Location: California
Re: Yafaray4tS v0.9.0
Yep,trueBlue wrote: 17 Jul 2018, 21:43 Wow! I think you broke a trueSpace76 record for the biggest panel in it's history!
...

Nope, have to do test renders to see what works.trueBlue wrote: 17 Jul 2018, 21:43 ...
Do you have a suggestion for a minimum value for the Save Time?
...
-
clintonman
- Captain
- Posts: 5659
- Joined: 21 May 2009, 21:08
- Type the number ten into the box: 0
- Location: California
Re: Yafaray4tS v0.9.0
PDFs look good. I need to check the Blender install, it may be a little different.
-
clintonman
- Captain
- Posts: 5659
- Joined: 21 May 2009, 21:08
- Type the number ten into the box: 0
- Location: California
Re: Yafaray4tS v0.9.0
Checked and Blender looks ok soclintonman wrote: 17 Jul 2018, 22:05 PDFs look good. I need to check the Blender install, it may be a little different.
 on the pdfs.
-
clintonman
- Captain
- Posts: 5659
- Joined: 21 May 2009, 21:08
- Type the number ten into the box: 0
- Location: California
Re: Yafaray4tS v0.9.0
RC17
new mega render pass panel
"New Render Passes: Basic Toon effect, Object Edges and Faces Edge"
scrubber control for partial save timer
Render pass panel usage:
ambient occlusion and z-depth have simple dropdown selection
right click a channel on the left to assign the default pass to that channel
or
1. select one of the channels on the left using the radio buttons
2. click on one of the buttons on the right to assign that pass to the selected channel
new mega render pass panel

scrubber control for partial save timer
Render pass panel usage:
ambient occlusion and z-depth have simple dropdown selection
right click a channel on the left to assign the default pass to that channel
or
1. select one of the channels on the left using the radio buttons
2. click on one of the buttons on the right to assign that pass to the selected channel
- Attachments
-
- YafaRay4tSv090-RC-17.zip
- (6.83 MiB) Downloaded 271 times
-
clintonman
- Captain
- Posts: 5659
- Joined: 21 May 2009, 21:08
- Type the number ten into the box: 0
- Location: California
Re: Yafaray4tS v0.9.0
Attached is a list of render passes in html format.
- Attachments
-
- passes.zip
- (2.05 KiB) Downloaded 267 times
-
trueBlue
- Captain
- Posts: 5548
- Joined: 06 Jul 2009, 22:50
- Type the number ten into the box: 10
Re: Yafaray4tS v0.9.0
Using the Bucket Rendering new scrubber's values is causing the PST timer to stay on and not work as expected. IE: Rendering... stuck meassage.
-
clintonman
- Captain
- Posts: 5659
- Joined: 21 May 2009, 21:08
- Type the number ten into the box: 0
- Location: California
Re: Yafaray4tS v0.9.0
How complex is the scene you are rendering. What value did you set for the timer. Did the render complete or is the only problem the stuck message? While rendering did you see it as it updated or only the final image? do you have more than one instance of truespace running? Did you try restarting the computer?trueBlue wrote: 18 Jul 2018, 19:11 Using the Bucket Rendering new scrubber's values is causing the PST timer to stay on and not work as expected. IE: Rendering... stuck meassage.
No way to reproduce without more information.
Edit: also forgot to ask is it patched or no patched, full or std version?
-
trueBlue
- Captain
- Posts: 5548
- Joined: 06 Jul 2009, 22:50
- Type the number ten into the box: 10
Re: Yafaray4tS v0.9.0
I think it was user error again by entering wrong values in Time Save.
I had at one point two consoles running in the background and the PST timer was not shutting off.
Enclosed is an update.
Changes:
Tile Size's edit control
Change on update
Time Save
Changed the Edit box to zero decimals.
Add a Off/On button
Edited the Render Pass panel
Edited the Render Pass's Window Frame
Changed the YafaRay4tS toolbar Volume button's help Text
Edited the YafaRay4tSv090 Installation Instructions.txt to match the YafaRay4tS Help file.
New YafaRay4tS Help.chm
Please take a look and help me with the ? marks.
And or any other changes needed.
There is a blank Procedurals.htm page at the end of the help file. Was not sure it will be needed or not.
I think I made a mistake with the Yafaray Settings RMB Command.RsObj by adding an exclamation to the
if(!Node.Exists("/Yafaray Folder")){ line.
My thought was that the YafaRay4tS.RsObj should not be replaced, given that if a user had a scene with their settings in place, it would be a problem. So the way it is now, if there is no YafaRay4tS.RsObj in the scene, it will not be created. Thats not good either! Please take a look.
Removed due to update
I had at one point two consoles running in the background and the PST timer was not shutting off.
Enclosed is an update.
Changes:
Tile Size's edit control
Change on update
Time Save
Changed the Edit box to zero decimals.
Add a Off/On button
Edited the Render Pass panel
Edited the Render Pass's Window Frame
Changed the YafaRay4tS toolbar Volume button's help Text
Edited the YafaRay4tSv090 Installation Instructions.txt to match the YafaRay4tS Help file.
New YafaRay4tS Help.chm
Please take a look and help me with the ? marks.
And or any other changes needed.
There is a blank Procedurals.htm page at the end of the help file. Was not sure it will be needed or not.
I think I made a mistake with the Yafaray Settings RMB Command.RsObj by adding an exclamation to the
if(!Node.Exists("/Yafaray Folder")){ line.
Code: Select all
	if(Node.Exists("/Offline renderers/Yafaray")) {
		var myenum = System.CreateDO("Common Data Package/String Enum Data");
		myenum = Node.Value("/Offline renderers", "Renderer");
		var str = myenum.GetSelectedString();
		myenum.SetSelectedString("Yafaray");
		Node.Value("/Offline renderers", "Renderer") = myenum;
	}
	if (Node.Exists(Space.CurrentScene()+"/YafaRay4tS")){
	} else {
		if(!Node.Exists("/Yafaray Folder")){
			Node.Copy("/Yafaray Folder/YafaRay4tS", Space.CurrentScene());
		}
	}
UserInterface.OpenToolPanelViewEx2("" , "" ,Space.CurrentScene()+"/YafaRay4tS", 6, 1, 0)Removed due to update
-
clintonman
- Captain
- Posts: 5659
- Joined: 21 May 2009, 21:08
- Type the number ten into the box: 0
- Location: California
Re: Yafaray4tS v0.9.0
I get an error when I press the save settings button.
- Attachments
-

- SaveSettingsError.jpg (48.6 KiB) Viewed 4184 times
-
trueBlue
- Captain
- Posts: 5548
- Joined: 06 Jul 2009, 22:50
- Type the number ten into the box: 10
Re: Yafaray4tS v0.9.0
I do too! IDK? I did not touch any scripts except as noted.
-
trueBlue
- Captain
- Posts: 5548
- Joined: 06 Jul 2009, 22:50
- Type the number ten into the box: 10
Re: Yafaray4tS v0.9.0
I rebuilt it and no errors with this one. It is in the original post.
-
clintonman
- Captain
- Posts: 5659
- Joined: 21 May 2009, 21:08
- Type the number ten into the box: 0
- Location: California
Re: Yafaray4tS v0.9.0
Found the reason. trueSpace had it as not true or false, solution is just to manually set a value true then back to false.
-
trueBlue
- Captain
- Posts: 5548
- Joined: 06 Jul 2009, 22:50
- Type the number ten into the box: 10
Re: Yafaray4tS v0.9.0
So after taking a look at the Save Settings script, would that work for the Yafaray Settings RMB Command.RsObj?
-
trueBlue
- Captain
- Posts: 5548
- Joined: 06 Jul 2009, 22:50
- Type the number ten into the box: 10
Re: Yafaray4tS v0.9.0
This new update 'RC 18' fixed another issue I that I missed.clintonman wrote: 19 Jul 2018, 20:48 Found the reason. trueSpace had it as not true or false, solution is just to manually set a value true then back to false.
I did not change the Volume buttons Help text on the other one inside.
-
clintonman
- Captain
- Posts: 5659
- Joined: 21 May 2009, 21:08
- Type the number ten into the box: 0
- Location: California
Re: Yafaray4tS v0.9.0
That code will not do anything. It exists inside the YafaRay4tS node. If it doesn't exist then it won't run. If it does exist thentrueBlue wrote: 19 Jul 2018, 18:26 ...
Code: Select all
	...
	if (Node.Exists(Space.CurrentScene()+"/YafaRay4tS")){
	} else {
		if(!Node.Exists("/Yafaray Folder")){
			Node.Copy("/Yafaray Folder/YafaRay4tS", Space.CurrentScene());
		}
	}
	...
Code: Select all
if (Node.Exists(Space.CurrentScene()+"/YafaRay4tS")-
clintonman
- Captain
- Posts: 5659
- Joined: 21 May 2009, 21:08
- Type the number ten into the box: 0
- Location: California
Re: Yafaray4tS v0.9.0
I don't understand.trueBlue wrote: 19 Jul 2018, 20:50 So after taking a look at the Save Settings script, would that work for the Yafaray Settings RMB Command.RsObj?
-
trueBlue
- Captain
- Posts: 5548
- Joined: 06 Jul 2009, 22:50
- Type the number ten into the box: 10
Re: Yafaray4tS v0.9.0
My thought was that the YafaRay4tS.RsObj in the scene should not be replaced.
The user could lose all of their settings.
Looking at your Save Settings script it looks like you are copying all of the Attributes from the one in the scene to the backup?
Verses deleting and replacing the one in the scene?
The user could lose all of their settings.
Looking at your Save Settings script it looks like you are copying all of the Attributes from the one in the scene to the backup?
Verses deleting and replacing the one in the scene?
-
clintonman
- Captain
- Posts: 5659
- Joined: 21 May 2009, 21:08
- Type the number ten into the box: 0
- Location: California
Re: Yafaray4tS v0.9.0
That's right. So are you saying you want to use the RMB to copy settings from the scene to the backup? or maybe if you just define for me what the RMB is supposed to do.trueBlue wrote: 19 Jul 2018, 21:20 My thought was that the YafaRay4tS.RsObj in the scene should not be replaced.
The user could lose all of their settings.
Looking at your Save Settings script it looks like you are copying all of the Attributes from the one in the scene to the backup?
Verses deleting and replacing the one in the scene?
-
trueBlue
- Captain
- Posts: 5548
- Joined: 06 Jul 2009, 22:50
- Type the number ten into the box: 10
Re: Yafaray4tS v0.9.0
Okay I tested again with Vray and YafaRay4tS loaded.
I restored the Yafaray Settings RMB Command.RsObj by putting the exclamation back in.
It does not replace and or change the setting in the existing YafaRay4tS.RsObj in the scene.
So my concerns are squashed.
The Yafaray Settings RMB Command.RsObj Switches to yafary as the renderer.
I added more code to also load the YafaRay4tS.RsObj into the scene.
I also uploaded RC-18 with the changes mentioned above.
I restored the Yafaray Settings RMB Command.RsObj by putting the exclamation back in.
It does not replace and or change the setting in the existing YafaRay4tS.RsObj in the scene.
So my concerns are squashed.
The Yafaray Settings RMB Command.RsObj Switches to yafary as the renderer.
I added more code to also load the YafaRay4tS.RsObj into the scene.
I also uploaded RC-18 with the changes mentioned above.
Code: Select all
// Switch to Yafaray
	if(Node.Exists("/Offline renderers/Yafaray")) {
		var myenum = System.CreateDO("Common Data Package/String Enum Data");
		myenum = Node.Value("/Offline renderers", "Renderer");
		var str = myenum.GetSelectedString();
		myenum.SetSelectedString("Yafaray");
		Node.Value("/Offline renderers", "Renderer") = myenum;
	}
	if (Node.Exists(Space.CurrentScene()+"/YafaRay4tS")){
	} else {
		if(Node.Exists("/Yafaray Folder")){
			Node.Copy("/Yafaray Folder/YafaRay4tS", Space.CurrentScene());
		}
	}
	UserInterface.OpenToolPanelViewEx2("" , "" ,Space.CurrentScene()+"/YafaRay4tS", 6, 1, 0)

// Load YafaRay4tS
	if(Node.Exists("/Offline renderers/Yafaray")) {

	}
	if (Node.Exists(Space.CurrentScene()+"/YafaRay4tS")){
	} else {
		if(Node.Exists("/Yafaray Folder")){
			Node.Copy("/Yafaray Folder/YafaRay4tS", Space.CurrentScene());
		}
	}
UserInterface.OpenToolPanelViewEx2("" , "" ,Space.CurrentScene()+"/YafaRay4tS", 6, 1, 0)-
clintonman
- Captain
- Posts: 5659
- Joined: 21 May 2009, 21:08
- Type the number ten into the box: 0
- Location: California
Re: Yafaray4tS v0.9.0
Some notes for the docs
All ? entries answered if I could find the answer.
Export XML - creates an xml file without actually rendering
Render XML - renders the custom xml file or the last xml file that was generated
-------------------------------
Render Settings
Input Color Space - ?
LinearRGB - ?
sRGB - ?
XYZ - ?
-------------------------------
Background
Casts Shadows - background light casts shadows
Image HDRI/IBL
Smart Blur - "* Added SmartIBL functionality to reduce noise when using World HDRI textures for lighting. The functionality adds a new parameter "SmartIBL blur" that blurs the World texture used for lighting without affecting the world texture used for reflections, etc. High values can cause slowdowns at render process start."
Sun Sky
Sun Casts Shadows - sun sky casts a shadow
Night - "This feature renders the scene at night, with the Sun acting as the Moon."
Caustic Photons -
Diffuse Photons - "* Ability to enable/disable Caustic and/or Diffuse Photons generation in the Photon Map integrator."
Samples - " Samples for both the Sun and the Skylight. The more samples the less noise and the better glossy reflections, but the more render time as well."
Color Space - ?
Exposure - ?
Brightness - "Sky Brightness: Independent brightness control for background sky colors; it does not affect amount of cast light."
Altitude - "With this setting, we can give the camera a different altitude relative to the background center. If Altitude increases, the background horizon lowers. This option can be useful to render objects from a camera which is above the ground level, while still getting a correct position of the background horizon."
------------------------------------
Animation
Set From Timeline - set render start and end based on the animation view start and stop frames
Set From Keyframes - set render start and end based on the keyframes in a scene or the keyframes on the selected object in object render mode
-----------------------------------
Direct Lighting
Photon Map Processing - "* Ability to Save/Load/Reuse photon maps: this should greatly improve render speeds in scenes where only camera moves. See: http://yafaray.org/node/460. WARNING: When loading/reusing Photon Map files, the User is responsible to ensure they match the scene. If the User loads inadequate photon maps, the render results could be totally wrong or even have crashes. USE WITH CARE."
'Generate only', "Generate the Photon Maps in each render (default and RECOMMENDED)"),
'Generate and save', "Generate the Photon Maps and save them to files so they can be reloaded later"),
"Load the Photon Maps from files. USE WITH CARE, only for scenes where ONLY the camera changes, like fly-through scenes"),
'Reuse previous', "Reuse previously generated Photon Maps from memory. USE WITH CARE, only for scenes where ONLY the camera changes, like fly-through scenes")
--------------------------------------
Photon Mapping
Search - "User can specify a desired number of photons. It guarantees that there are K photons in the measurement. The more photons are used, the smoother the estimation will be. If too many are used, the estimation will tend to be blurry, while too few gives a splotchy appearance (low frequency noise). Interpolating 50 to 150 photons is often a good choice."
Photon Map Processing - see above
----------------------
Pathtracing
Min Bounces - The relevant parameter will be "russian_roulette_min_bounces".
- If this parameter is set to 0, russian roulette will be enabled.
- If set to the same value specified in depth (max bounces), russian roulette will be disabled
- If set to a value between 0 and max bounces, then russian roulette will only start be applied after this number of bounces, so we can get decent sampling in dark areas for example and get a good speedup with less noise.
- Lower values of this parameter will result in faster (but somewhat noisier) renders.
--------------------------
SPPM Lighting
SPPM Passes - ?
Bounces - ?
PM IRE -"initial radius estimation"
-----------------------------------------
YafaRay4tS Lights
Caustic - "allow light to shoot caustic photons"
Diffuse - "allow light to shoot diffuse photons"
IES Data File - "Illuminating Engineering Society, which has defined a file format for describing the distribution of light from a light source."
Generate IES Preview - make the ies light effect visible in the 3d viewport
-----------------------------------------
YafaRay Glossy
Diffuse Color - Diffuse color.
Diffuse Reflection - "Diffuse Reflection value is just a diffuse color multiplying factor."
- Specular -
Glossy Color - Glossy color multiplier
Glossy Reflection - "Glossy reflection parameter, apart from controlling the reflection strength, should be understood as a blend factor between the diffuse and the glossy color. The more reflective, the less diffuse."
Specular Exponent - "controls blur of the glossy reflection; the higher the exponent, the sharper the reflection. Use values between 1 and 200 for plastics and higher values for metallic surfaces. Glossy reflection produces caustics."
Use Anisotropic Specular - "which means that reflection is not equal in all directions"
"the exponent value is divided into vertical and horizontal components. By using a different value for each component., the reflection will take an anisotropic oval shape."
U Exponent - horizontal exponent value
V Exponent - vertical exponent value
Receive Shadows - surface will have shadows cast upon it
Visibility - invisible is not visible in the render, reflections and shadows remain
Additional depth - add to the render settings ray depth for this material - "* Ability to set a per-material raytracing depth, for example to speed up scenes with glass."
---------------------------------------------
"Coated Glossy is basically a glossy material (see the previous section) with some kind of reflective coating layer on top. IOR is the setting that controls reflectivity of the coating top layer. This reflective layer can produce caustics. It is a good material for car paint."
---------------------------------------------
YafaRay Glass
- Real Glass -
IOR - Index of Refraction. Controls the strength of the Fresnel effect.
Use Absorption - Enables Absorption.
Absorption Color - Absorption color.
Absorption Distance - ?
Dispersion- "causes the spatial separation of a white light into components of different wavelengths (different colors)."
- Fake Glass -
Filter Color - "Color is uniform regardless of glass section. The amount of transmitted light is also constant. You can use this setting instead of absorption if the glass section is uniform, for instance.
You need to use this setting to tint transparent shadows when Fake Shadows & Transparent Shadows are enabled. "
Mirror Color - color of reflections
"Transmit Filter is a related setting which blends Absorption and Filtering. When Transmit Filter equals 1, Filtering is shown. When Transmit Filter equals 0, Absorption is shown (if enabled)."
Export as Normal - define as normal map instead of a bump map
D3D Preview - Creates a bump/normal map preview for the D3D view.
The D3D Preview has no effect on the YafaRay render.
Alpha strength - D3D display - 3d viewport control of transparency, no effect on render
--------------------------------------------------------
YafaRay Light Material
Power- brightness multiplier
Samples- ?
------------------------------------------------
YafaRay Blend
Blend - controls the amount of the 2 materials in the final material
Update Material Lists - populate the material selection list with the blend materials available in the scene
Material List 1 - select first blend material
Material List 2 - select second blend material
Make Preview- d3d viewport preview for the blend material
--------------------------------------------------------
YafaRay Texture Map
Gamma - image map gamma value
Attribute Name - output value used by texturing system
Use the File browse dialog button.
None - remove the texture map
Image - texture map based on image file
Clouds - procedural noise based texture
Marble - procedural noise based texture
Wood - procedural noise based texture
Voronoi - procedural noise based texture
Switch - activate the texture or if already active switch to input controls panel
Blend- amount to mix blend color and material color
Color - color for blending and procedural texture color
X Offset - mapping u offset
Y Offset - mapping v offset
Z Offset - has no effect?
X Scale - mapping u scale
Y Scale - mapping v scale
Z Scale - has no effect?
-----------------------------------------
Clouds
Useful for soft bump mapping of irregular surfaces.
Soft / Hard noise: Noise strength.
Noise Size: sets scaling for noise.
NoiseDepth: Depth of calculation, the higher the more detail for noise.
Color - color noise
-----------------
Marble
Useful for marble.
Sharpness (soft, sharp, sharper): Noise definition.
Shape (sin, saw, tri): band type.
Soft / Hard noise: Noise strength.
Size: sets scaling for noise.
Depth: Depth of calculation, the higher the more detail for noise.
Turbulence: amount of turbulence for bands.
----------------------------
Wood
Useful for basic bands and noise with a structure.
Bands / BandNoise: the procedural is arranged in bands.
Rings / RingNoise: the procedural is arranged in rings.
Shape (sin, saw, tri): band type.
Soft / Hard Noise: Noise strength.
Size: sets scaling for noise.
Turbulence: amount of turbulence for bands or rings.
------------------------------------
Voronoi
Voronoi is a procedural type with a cellular look. Very flexible. Useful for organic surfaces.
Distance Metric: shape of the cells.
Coloring: color of the cells.
Intensity: overall intensity of texture.
Size: cell size.
Feature Weights (1, 2, 3, 4): defines distances between each cell.
All ? entries answered if I could find the answer.
Export XML - creates an xml file without actually rendering
Render XML - renders the custom xml file or the last xml file that was generated
-------------------------------
Render Settings
Input Color Space - ?
LinearRGB - ?
sRGB - ?
XYZ - ?
-------------------------------
Background
Casts Shadows - background light casts shadows
Image HDRI/IBL
Smart Blur - "* Added SmartIBL functionality to reduce noise when using World HDRI textures for lighting. The functionality adds a new parameter "SmartIBL blur" that blurs the World texture used for lighting without affecting the world texture used for reflections, etc. High values can cause slowdowns at render process start."
Sun Sky
Sun Casts Shadows - sun sky casts a shadow
Night - "This feature renders the scene at night, with the Sun acting as the Moon."
Caustic Photons -
Diffuse Photons - "* Ability to enable/disable Caustic and/or Diffuse Photons generation in the Photon Map integrator."
Samples - " Samples for both the Sun and the Skylight. The more samples the less noise and the better glossy reflections, but the more render time as well."
Color Space - ?
Exposure - ?
Brightness - "Sky Brightness: Independent brightness control for background sky colors; it does not affect amount of cast light."
Altitude - "With this setting, we can give the camera a different altitude relative to the background center. If Altitude increases, the background horizon lowers. This option can be useful to render objects from a camera which is above the ground level, while still getting a correct position of the background horizon."
------------------------------------
Animation
Set From Timeline - set render start and end based on the animation view start and stop frames
Set From Keyframes - set render start and end based on the keyframes in a scene or the keyframes on the selected object in object render mode
-----------------------------------
Direct Lighting
Photon Map Processing - "* Ability to Save/Load/Reuse photon maps: this should greatly improve render speeds in scenes where only camera moves. See: http://yafaray.org/node/460. WARNING: When loading/reusing Photon Map files, the User is responsible to ensure they match the scene. If the User loads inadequate photon maps, the render results could be totally wrong or even have crashes. USE WITH CARE."
'Generate only', "Generate the Photon Maps in each render (default and RECOMMENDED)"),
'Generate and save', "Generate the Photon Maps and save them to files so they can be reloaded later"),
"Load the Photon Maps from files. USE WITH CARE, only for scenes where ONLY the camera changes, like fly-through scenes"),
'Reuse previous', "Reuse previously generated Photon Maps from memory. USE WITH CARE, only for scenes where ONLY the camera changes, like fly-through scenes")
--------------------------------------
Photon Mapping
Search - "User can specify a desired number of photons. It guarantees that there are K photons in the measurement. The more photons are used, the smoother the estimation will be. If too many are used, the estimation will tend to be blurry, while too few gives a splotchy appearance (low frequency noise). Interpolating 50 to 150 photons is often a good choice."
Photon Map Processing - see above
----------------------
Pathtracing
Min Bounces - The relevant parameter will be "russian_roulette_min_bounces".
- If this parameter is set to 0, russian roulette will be enabled.
- If set to the same value specified in depth (max bounces), russian roulette will be disabled
- If set to a value between 0 and max bounces, then russian roulette will only start be applied after this number of bounces, so we can get decent sampling in dark areas for example and get a good speedup with less noise.
- Lower values of this parameter will result in faster (but somewhat noisier) renders.
--------------------------
SPPM Lighting
SPPM Passes - ?
Bounces - ?
PM IRE -"initial radius estimation"
-----------------------------------------
YafaRay4tS Lights
Caustic - "allow light to shoot caustic photons"
Diffuse - "allow light to shoot diffuse photons"
IES Data File - "Illuminating Engineering Society, which has defined a file format for describing the distribution of light from a light source."
Generate IES Preview - make the ies light effect visible in the 3d viewport
-----------------------------------------
YafaRay Glossy
Diffuse Color - Diffuse color.
Diffuse Reflection - "Diffuse Reflection value is just a diffuse color multiplying factor."
- Specular -
Glossy Color - Glossy color multiplier
Glossy Reflection - "Glossy reflection parameter, apart from controlling the reflection strength, should be understood as a blend factor between the diffuse and the glossy color. The more reflective, the less diffuse."
Specular Exponent - "controls blur of the glossy reflection; the higher the exponent, the sharper the reflection. Use values between 1 and 200 for plastics and higher values for metallic surfaces. Glossy reflection produces caustics."
Use Anisotropic Specular - "which means that reflection is not equal in all directions"
"the exponent value is divided into vertical and horizontal components. By using a different value for each component., the reflection will take an anisotropic oval shape."
U Exponent - horizontal exponent value
V Exponent - vertical exponent value
Receive Shadows - surface will have shadows cast upon it
Visibility - invisible is not visible in the render, reflections and shadows remain
Additional depth - add to the render settings ray depth for this material - "* Ability to set a per-material raytracing depth, for example to speed up scenes with glass."
---------------------------------------------
"Coated Glossy is basically a glossy material (see the previous section) with some kind of reflective coating layer on top. IOR is the setting that controls reflectivity of the coating top layer. This reflective layer can produce caustics. It is a good material for car paint."
---------------------------------------------
YafaRay Glass
- Real Glass -
IOR - Index of Refraction. Controls the strength of the Fresnel effect.
Use Absorption - Enables Absorption.
Absorption Color - Absorption color.
Absorption Distance - ?
Dispersion- "causes the spatial separation of a white light into components of different wavelengths (different colors)."
- Fake Glass -
Filter Color - "Color is uniform regardless of glass section. The amount of transmitted light is also constant. You can use this setting instead of absorption if the glass section is uniform, for instance.
You need to use this setting to tint transparent shadows when Fake Shadows & Transparent Shadows are enabled. "
Mirror Color - color of reflections
"Transmit Filter is a related setting which blends Absorption and Filtering. When Transmit Filter equals 1, Filtering is shown. When Transmit Filter equals 0, Absorption is shown (if enabled)."
Export as Normal - define as normal map instead of a bump map
D3D Preview - Creates a bump/normal map preview for the D3D view.
The D3D Preview has no effect on the YafaRay render.
Alpha strength - D3D display - 3d viewport control of transparency, no effect on render
--------------------------------------------------------
YafaRay Light Material
Power- brightness multiplier
Samples- ?
------------------------------------------------
YafaRay Blend
Blend - controls the amount of the 2 materials in the final material
Update Material Lists - populate the material selection list with the blend materials available in the scene
Material List 1 - select first blend material
Material List 2 - select second blend material
Make Preview- d3d viewport preview for the blend material
--------------------------------------------------------
YafaRay Texture Map
Gamma - image map gamma value
Attribute Name - output value used by texturing system
Use the File browse dialog button.
None - remove the texture map
Image - texture map based on image file
Clouds - procedural noise based texture
Marble - procedural noise based texture
Wood - procedural noise based texture
Voronoi - procedural noise based texture
Switch - activate the texture or if already active switch to input controls panel
Blend- amount to mix blend color and material color
Color - color for blending and procedural texture color
X Offset - mapping u offset
Y Offset - mapping v offset
Z Offset - has no effect?
X Scale - mapping u scale
Y Scale - mapping v scale
Z Scale - has no effect?
-----------------------------------------
Clouds
Useful for soft bump mapping of irregular surfaces.
Soft / Hard noise: Noise strength.
Noise Size: sets scaling for noise.
NoiseDepth: Depth of calculation, the higher the more detail for noise.
Color - color noise
-----------------
Marble
Useful for marble.
Sharpness (soft, sharp, sharper): Noise definition.
Shape (sin, saw, tri): band type.
Soft / Hard noise: Noise strength.
Size: sets scaling for noise.
Depth: Depth of calculation, the higher the more detail for noise.
Turbulence: amount of turbulence for bands.
----------------------------
Wood
Useful for basic bands and noise with a structure.
Bands / BandNoise: the procedural is arranged in bands.
Rings / RingNoise: the procedural is arranged in rings.
Shape (sin, saw, tri): band type.
Soft / Hard Noise: Noise strength.
Size: sets scaling for noise.
Turbulence: amount of turbulence for bands or rings.
------------------------------------
Voronoi
Voronoi is a procedural type with a cellular look. Very flexible. Useful for organic surfaces.
Distance Metric: shape of the cells.
Coloring: color of the cells.
Intensity: overall intensity of texture.
Size: cell size.
Feature Weights (1, 2, 3, 4): defines distances between each cell.
-
trueBlue
- Captain
- Posts: 5548
- Joined: 06 Jul 2009, 22:50
- Type the number ten into the box: 10
Re: Yafaray4tS v0.9.0
Thanks for the help.
Photon Map Processing
How do you Load/Save a Photon Map in YafaRay4tS?
If we can not find an explanation on the remaining question marks, I am going to remove them from the help file.
Photon Map Processing
How do you Load/Save a Photon Map in YafaRay4tS?
If we can not find an explanation on the remaining question marks, I am going to remove them from the help file.
-
clintonman
- Captain
- Posts: 5659
- Joined: 21 May 2009, 21:08
- Type the number ten into the box: 0
- Location: California
Re: Yafaray4tS v0.9.0
I assume you save then loadtrueBlue wrote: 20 Jul 2018, 14:17 Thanks for the help.
Photon Map Processing
How do you Load/Save a Photon Map in YafaRay4tS?
If we can not find an explanation on the remaining question marks, I am going to remove them from the help file.
"'Generate and save', "Generate the Photon Maps and save them to files so they can be reloaded later"),
"Load the Photon Maps from files. USE WITH CARE, only for scenes where ONLY the camera changes, like fly-through scenes"),"
-
trueBlue
- Captain
- Posts: 5548
- Joined: 06 Jul 2009, 22:50
- Type the number ten into the box: 10
Re: Yafaray4tS v0.9.0
Thanks!
Trying to redefine the info in the AA and General Settings from the XML Scene specs.
This what I have so far:
-- Anti-Aliasing Settings –
Filter - 3 Anti-Aliasing reconstruction filters to use when resampling.
- Gaussian - Slight blurring.
- Mitchell-Netravali - Improves sharpness of the edges.
- Box - Equal weighting of all samples.
Min Sample - Number of samples to use on first Anti-Aliasing pass.
Pixel Width - Width of Anti-Aliasing pixel filter. [0-8]
Passes - Maximum number of Anti-Aliasing passes.
Inc Sample - Number of samples for additional Anti-Aliasing passes.
Threshold - Color threshold for additional Anti-Aliasing samples in next pass.
-- General Settings –
Ray Depth - Amount of times that rays can be reflected in specular surfaces or pass through transparent surfaces.
Transparent Shadow depth - Amount of transparent surfaces that shadow rays can get through to find light sources.
Gamma In - The default gamma value for all colors, lights and textures.
This value is used to convert these values to linear color space used by the Yafaray renderer.
Gamma Out - The gamma value target for the rendered image.
CPU Threads - Number of CPU threads used by YafaRay.
This number should be equal to the number of CPUs in your computer or minus one if you find that using all the CPUs bogs down your computer.
Normal Shadows / Transparent Shadows - Switches from Normal to Transparent Shadows.
Save Alpha - Exports an alpha file in addition to the RGB output file.
Z - Channel - Enable the Depth Channel in the output file.
Clamp RGB - Color depth is reduced to a low dynamic range before Anti-Aliasing filtering.
Seems to me that the info on Gamma In and Gamma Out is incorrect.
-- General Settings --
Gamma In - The default gamma value for all colors, lights and textures.
This value is used to convert these values to linear color space used by the Yafaray renderer.
Gamma Out - The gamma value target for the rendered image.
Blender user guide
Output Gamma.
Gamma correction performed on render output to match gamma of the color space the image is inserted in, usually 2.2 for sRGB or linear for HDR. This setting is by default set not to perform gamma correction (gamma output = 1) in order to pass renders in linear space to the Blender Compositor. More information here.
Input Gamma.
Inverse gamma correction performed on render input, which are textures, shader colors and light colors, so the render engine can work internally using the linear space. Gamma input value should equal that of the color space the input is working on, usually 2.2 for the sRGB
Also is the Linear Workflow in YafaRay the same in YafaRay4tS?
http://www.yafaray.org/documentation/us ... utworkflow
Trying to define sRGB Color Space and the workflow for YafaRay4tS
Also If I enable Draw Parameter, is the Custom String just for entering Comments in the yaf_test_log.html file?
Trying to redefine the info in the AA and General Settings from the XML Scene specs.
This what I have so far:
-- Anti-Aliasing Settings –
Filter - 3 Anti-Aliasing reconstruction filters to use when resampling.
- Gaussian - Slight blurring.
- Mitchell-Netravali - Improves sharpness of the edges.
- Box - Equal weighting of all samples.
Min Sample - Number of samples to use on first Anti-Aliasing pass.
Pixel Width - Width of Anti-Aliasing pixel filter. [0-8]
Passes - Maximum number of Anti-Aliasing passes.
Inc Sample - Number of samples for additional Anti-Aliasing passes.
Threshold - Color threshold for additional Anti-Aliasing samples in next pass.
-- General Settings –
Ray Depth - Amount of times that rays can be reflected in specular surfaces or pass through transparent surfaces.
Transparent Shadow depth - Amount of transparent surfaces that shadow rays can get through to find light sources.
Gamma In - The default gamma value for all colors, lights and textures.
This value is used to convert these values to linear color space used by the Yafaray renderer.
Gamma Out - The gamma value target for the rendered image.
CPU Threads - Number of CPU threads used by YafaRay.
This number should be equal to the number of CPUs in your computer or minus one if you find that using all the CPUs bogs down your computer.
Normal Shadows / Transparent Shadows - Switches from Normal to Transparent Shadows.
Save Alpha - Exports an alpha file in addition to the RGB output file.
Z - Channel - Enable the Depth Channel in the output file.
Clamp RGB - Color depth is reduced to a low dynamic range before Anti-Aliasing filtering.
Seems to me that the info on Gamma In and Gamma Out is incorrect.
-- General Settings --
Gamma In - The default gamma value for all colors, lights and textures.
This value is used to convert these values to linear color space used by the Yafaray renderer.
Gamma Out - The gamma value target for the rendered image.
Blender user guide
Output Gamma.
Gamma correction performed on render output to match gamma of the color space the image is inserted in, usually 2.2 for sRGB or linear for HDR. This setting is by default set not to perform gamma correction (gamma output = 1) in order to pass renders in linear space to the Blender Compositor. More information here.
Input Gamma.
Inverse gamma correction performed on render input, which are textures, shader colors and light colors, so the render engine can work internally using the linear space. Gamma input value should equal that of the color space the input is working on, usually 2.2 for the sRGB
Also is the Linear Workflow in YafaRay the same in YafaRay4tS?
http://www.yafaray.org/documentation/us ... utworkflow
Trying to define sRGB Color Space and the workflow for YafaRay4tS
Also If I enable Draw Parameter, is the Custom String just for entering Comments in the yaf_test_log.html file?
-
trueBlue
- Captain
- Posts: 5548
- Joined: 06 Jul 2009, 22:50
- Type the number ten into the box: 10
Re: Yafaray4tS v0.9.0
Found a way to Close TGA Viewer and Delete the Yaf_render.cmd file
Edit: Ugh, deleting the Yaf_render.cmd is not compatible with the viewers in Animations.
RenderFnSet
Close_TGA_Viewer.RsObj script
Can not figure out how to do the same with the Internal Viewer and OptDetector Viewer.
Also discovered by accident that you can use the Custom Viewer to open an Image editor with the rendered image. I have TGA files associated with GIMP. So I entered
C:\trueSpace761\tS\Image Folder\yaf_test.tga
in the path for the Custom Viewer.
Edit: Ugh, deleting the Yaf_render.cmd is not compatible with the viewers in Animations.
RenderFnSet
Code: Select all
Line 188 = Activity.Run(System.ThisOwner() + "/Close_TGA_Viewer")
Line 192 = File.WriteLine('Del ' + '"' + CMD_Filename + '"') //External Viewer
Line 197 = File.WriteLine('"' + Yaf_CustomViewer + '" "' + Yaf_RenderFilename + '"') || File.WriteLine('Del ' + '"' + CMD_Filename + '"')
Code: Select all
var WMI = GetObject("winmgmts:");
var TGA = WMI.execquery("select * from Win32_process where Name='TGA_Viewer.exe'");
var EP = new Enumerator(TGA);
for(;!EP.atEnd(); EP.moveNext()){
var P = EP.item();
P.Terminate();
}
Can not figure out how to do the same with the Internal Viewer and OptDetector Viewer.
Also discovered by accident that you can use the Custom Viewer to open an Image editor with the rendered image. I have TGA files associated with GIMP. So I entered
C:\trueSpace761\tS\Image Folder\yaf_test.tga
in the path for the Custom Viewer.
-
clintonman
- Captain
- Posts: 5659
- Joined: 21 May 2009, 21:08
- Type the number ten into the box: 0
- Location: California
Re: Yafaray4tS v0.9.0
Yes.trueBlue wrote: 21 Jul 2018, 12:45 ...
Also If I enable Draw Parameter, is the Custom String just for entering Comments in the yaf_test_log.html file?
-
trueBlue
- Captain
- Posts: 5548
- Joined: 06 Jul 2009, 22:50
- Type the number ten into the box: 10
Re: Yafaray4tS v0.9.0
1.) If Use OptDetector Viewer is enabled and Use Internal Viewer is not enabled, the OptDetector Viewer does not work. Any chance this can be fixed?
2.) I notice that the DEFAULT settings for the following items are different from the YafaRay XML scene parameters, recommended defaults.
Background - Image
ibl_samples [8] (preferred) number of samples for direct lighting
Direct Lighting
raydepth [5] (preferred) maximum depth for recursive raytracing
Almost finished with the YafaRay4tS Help file.
I have searched in vein trying to figure out the Input Color Space's options in YafaRay4tS. I do note that in one of the previous YafaRay releases just before 3.3.0, notes that the Input Color Space was changed with regards to sRGB vs linear RGB and there is zero information on the XYZ.
Quote YafaRay developer:
Input Color Space - ?
LinearRGB - ?
sRGB - ?
XYZ - ?
Any suggestions on what to say in the help file?
Also need your help with the following items:
...........
Texture Map
1.) Shouldn't the color be white for use of Alpha in images?
User Guide - Texture Input:
...........
YafaRy4tS Help
Background
Color Space - ?
CIE (D50) - ?
CIE (E) - ?
sRGB (D50) - ?
sRGB (D65) - ?
Exposure - ?
Texture Map
Z Offset - Not used?
Z Scale - Not used?
Procedurals
Several questions
Blend
Steps to create 3 blended materials.
In a little bit I will upload RC - 19 with the new YafaRay4tS Help file and a few updated items.
2.) I notice that the DEFAULT settings for the following items are different from the YafaRay XML scene parameters, recommended defaults.
Background - Image
ibl_samples [8] (preferred) number of samples for direct lighting
Direct Lighting
raydepth [5] (preferred) maximum depth for recursive raytracing
Almost finished with the YafaRay4tS Help file.
I have searched in vein trying to figure out the Input Color Space's options in YafaRay4tS. I do note that in one of the previous YafaRay releases just before 3.3.0, notes that the Input Color Space was changed with regards to sRGB vs linear RGB and there is zero information on the XYZ.
Quote YafaRay developer:
DefaultFrom now on the user will be responsible for selecting correct ColorSpaces for all textures, including bump map, normal map, etc. For example for Non-RGB / Stencil / Bump / Normal maps, etc, textures are typically already linear and the user should select "linearRGB" in the texture properties, but if the user (by mistake) keeps the default sRGB for them, YafaRay will (incorrectly) apply the sRGB->LinearRGB conversion causing the values to be incorrect. However, I've added a "fail safe" so for any "float" textures, bump maps, normal maps, etc, when getting colors after interpolatio YafaRay will to a "inverse" color conversion to the original Color Space. This way, even a mistake in user's color space selection in bump maps, normal maps, etc, will not cause any significant problems in the image as they will be converted back to their original color space. However, in this case rendering will be slower and potential artifacts can appear due to interpolation taking place in the wrong color space. For optimal results, the user must select correctly the color space for all textures.
Input Color Space - ?
LinearRGB - ?
sRGB - ?
XYZ - ?
Any suggestions on what to say in the help file?
Also need your help with the following items:
...........
Texture Map
1.) Shouldn't the color be white for use of Alpha in images?
User Guide - Texture Input:
2.) Remove the Z attributes (See below) since they are not being used?YafaRay 8-bits supported formats are tga, jpeg and png. YafaRay also supports 16-bits tiff, exr and hdr.
Input Color Space: Use sRBG for 8-bits formats and Raw for high dynamic range formats.
UseAlpha: Renders the texture alpha channel as transparent (if it exists), white otherwise. Enabled by default.
...........
YafaRy4tS Help
Background
Color Space - ?
CIE (D50) - ?
CIE (E) - ?
sRGB (D50) - ?
sRGB (D65) - ?
Exposure - ?
Texture Map
Z Offset - Not used?
Z Scale - Not used?
Procedurals
Several questions
Blend
Steps to create 3 blended materials.
In a little bit I will upload RC - 19 with the new YafaRay4tS Help file and a few updated items.
-
trueBlue
- Captain
- Posts: 5548
- Joined: 06 Jul 2009, 22:50
- Type the number ten into the box: 10
Re: Yafaray4tS v0.9.0
RC 19
Added an Image Folder with images to the Installer.
Note: I discovered that the installer does not delete the Yafaray4tS libraries, it only replaces the included items in the installation folder. So I changed the Yes/No/Cancel message to reflect that.
Fixed typo in Render Object button's LMB command
Tile Size's edit control
Change on update
Time Save
Changed the Edit box to zero decimals.
Add a Off/On button
Edited the Render Pass panel
Edited the Render Pass's Window Frame
Changed the YafaRay4tS toolbar Volume button's help Text
New YafaRay4tS Help.chm
Internet links changed to open in new window to avoid Internet Explorer errors.
Few more attributes need to be defined...
Install_Instructions.pdf 'replaces Installation Instructions.txt'
YafaRay4tS Setup - Background -> D3D Preview objects
Changes to Sphere objects
Yaw = 90 'image seam moved to the side'
Spherical UV projection
Show Backfaces 'image shows correctly from the inside'
Note: Background Image Sphere throws an ERROR FOUND: Image not found.
Workaround: Add image to Background - Image HDRI/IBL before rendering.
Close TGA Viewer
RenderFnSet
Add:
Line 187 = Activity.Run(System.ThisOwner() + "/Close_TGA_Viewer")
Add - Close_TGA_Viewer.RsObj to YafaRay4tS.RsObj
Yafaray Settings RMB Command
Removed due to update
Added an Image Folder with images to the Installer.
Note: I discovered that the installer does not delete the Yafaray4tS libraries, it only replaces the included items in the installation folder. So I changed the Yes/No/Cancel message to reflect that.
Fixed typo in Render Object button's LMB command
Tile Size's edit control
Change on update
Time Save
Changed the Edit box to zero decimals.
Add a Off/On button
Edited the Render Pass panel
Edited the Render Pass's Window Frame
Changed the YafaRay4tS toolbar Volume button's help Text
New YafaRay4tS Help.chm
Internet links changed to open in new window to avoid Internet Explorer errors.
Few more attributes need to be defined...
Install_Instructions.pdf 'replaces Installation Instructions.txt'
YafaRay4tS Setup - Background -> D3D Preview objects
Changes to Sphere objects
Yaw = 90 'image seam moved to the side'
Spherical UV projection
Show Backfaces 'image shows correctly from the inside'
Note: Background Image Sphere throws an ERROR FOUND: Image not found.
Workaround: Add image to Background - Image HDRI/IBL before rendering.
Close TGA Viewer
RenderFnSet
Add:
Line 187 = Activity.Run(System.ThisOwner() + "/Close_TGA_Viewer")
Add - Close_TGA_Viewer.RsObj to YafaRay4tS.RsObj
Code: Select all
var WMI = GetObject("winmgmts:");
var TGA = WMI.execquery("select * from Win32_process where Name='TGA_Viewer.exe'");
var EP = new Enumerator(TGA);
for(;!EP.atEnd(); EP.moveNext()){
var P = EP.item();
P.Terminate();
}Code: Select all
// Switch to Yafaray
	if(Node.Exists("/Offline renderers/Yafaray")) {
		var myenum = System.CreateDO("Common Data Package/String Enum Data");
		myenum = Node.Value("/Offline renderers", "Renderer");
		var str = myenum.GetSelectedString();
		myenum.SetSelectedString("Yafaray");
		Node.Value("/Offline renderers", "Renderer") = myenum;
	}
	if (Node.Exists(Space.CurrentScene()+"/YafaRay4tS")){
	} else {
		if(Node.Exists("/Yafaray Folder")){
			Node.Copy("/Yafaray Folder/YafaRay4tS", Space.CurrentScene());
		}
	}
	UserInterface.OpenToolPanelViewEx2("" , "" ,Space.CurrentScene()+"/YafaRay4tS", 6, 1, 0)

// Load YafaRay4tS
	if(Node.Exists("/Offline renderers/Yafaray")) {

	}
	if (Node.Exists(Space.CurrentScene()+"/YafaRay4tS")){
	} else {
		if(Node.Exists("/Yafaray Folder")){
			Node.Copy("/Yafaray Folder/YafaRay4tS", Space.CurrentScene());
		}
	}
UserInterface.OpenToolPanelViewEx2("" , "" ,Space.CurrentScene()+"/YafaRay4tS", 6, 1, 0)-
clintonman
- Captain
- Posts: 5659
- Joined: 21 May 2009, 21:08
- Type the number ten into the box: 0
- Location: California
Re: Yafaray4tS v0.9.0
I don't think the XML parameters are up to date. It has render threads >0 but value of -1 means use all threads, no mention of render passes. As is now the defaults are setup to match what Blender shows for it's defaults.trueBlue wrote: 24 Jul 2018, 16:48 ...
2.) I notice that the DEFAULT settings for the following items are different from the YafaRay XML scene parameters, recommended defaults.
Background - Image
ibl_samples [8] (preferred) number of samples for direct lighting
Direct Lighting
raydepth [5] (preferred) maximum depth for recursive raytracing
...
-
clintonman
- Captain
- Posts: 5659
- Joined: 21 May 2009, 21:08
- Type the number ten into the box: 0
- Location: California
Re: Yafaray4tS v0.9.0
trueBlue wrote: 24 Jul 2018, 16:48 ...
Almost finished with the YafaRay4tS Help file.
I have searched in vein trying to figure out the Input Color Space's options in YafaRay4tS. I do note that in one of the previous YafaRay releases just before 3.3.0, notes that the Input Color Space was changed with regards to sRGB vs linear RGB and there is zero information on the XYZ.
Quote YafaRay developer:DefaultFrom now on the user will be responsible for selecting correct ColorSpaces for all textures, including bump map, normal map, etc. For example for Non-RGB / Stencil / Bump / Normal maps, etc, textures are typically already linear and the user should select "linearRGB" in the texture properties, but if the user (by mistake) keeps the default sRGB for them, YafaRay will (incorrectly) apply the sRGB->LinearRGB conversion causing the values to be incorrect. However, I've added a "fail safe" so for any "float" textures, bump maps, normal maps, etc, when getting colors after interpolatio YafaRay will to a "inverse" color conversion to the original Color Space. This way, even a mistake in user's color space selection in bump maps, normal maps, etc, will not cause any significant problems in the image as they will be converted back to their original color space. However, in this case rendering will be slower and potential artifacts can appear due to interpolation taking place in the wrong color space. For optimal results, the user must select correctly the color space for all textures.
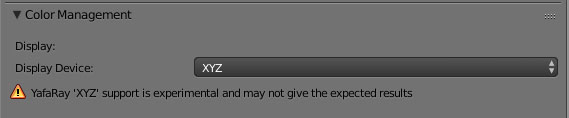
Input Color Space - ?
LinearRGB - ?
sRGB - ?
XYZ - ?
Any suggestions on what to say in the help file?
...
-
clintonman
- Captain
- Posts: 5659
- Joined: 21 May 2009, 21:08
- Type the number ten into the box: 0
- Location: California
Re: Yafaray4tS v0.9.0
I don't know what you mean here. Quote doesn't have anything to do with user setting a color. If there's no alpha it renders as white.trueBlue wrote: 24 Jul 2018, 16:48 ...
Also need your help with the following items:
...........
Texture Map
1.) Shouldn't the color be white for use of Alpha in images?
User Guide - Texture Input:...YafaRay 8-bits supported formats are tga, jpeg and png. YafaRay also supports 16-bits tiff, exr and hdr.
Input Color Space: Use sRBG for 8-bits formats and Raw for high dynamic range formats.
UseAlpha: Renders the texture alpha channel as transparent (if it exists), white otherwise. Enabled by default.
-
clintonman
- Captain
- Posts: 5659
- Joined: 21 May 2009, 21:08
- Type the number ten into the box: 0
- Location: California
Re: Yafaray4tS v0.9.0
Color space is used in the Darktides Sunsky and is not documented anywhere I can find.trueBlue wrote: 24 Jul 2018, 16:48 ...
Background
Color Space - ?
CIE (D50) - ?
CIE (E) - ?
sRGB (D50) - ?
sRGB (D65) - ?
Exposure - ?
Texture Map
Z Offset - Not used?
Z Scale - Not used?
...
ZOffset and ZScale might be used, I don't know. It may be only valid with non-UV mapped textures, but like I said don't know.
-
clintonman
- Captain
- Posts: 5659
- Joined: 21 May 2009, 21:08
- Type the number ten into the box: 0
- Location: California
Re: Yafaray4tS v0.9.0
A Blend material is a combination of 2 pre-existing materials.trueBlue wrote: 24 Jul 2018, 16:48 ...
Blend
Steps to create 3 blended materials.
...
http://www.yafaray.org/documentation/us ... n#blendmap
-
trueBlue
- Captain
- Posts: 5548
- Joined: 06 Jul 2009, 22:50
- Type the number ten into the box: 10
Re: Yafaray4tS v0.9.0
Thanks but I was hoping for simple steps on how to use your Blend material.clintonman wrote: 25 Jul 2018, 05:05A Blend material is a combination of 2 pre-existing materials.trueBlue wrote: 24 Jul 2018, 16:48 ...
Blend
Steps to create 3 blended materials.
...
http://www.yafaray.org/documentation/us ... n#blendmap
I asked for 'Steps to create 3 blended materials', because your Blend Material Collection object looks like it supports 25 materials.
So what is not clear is how to use your Blend material with the required Blend Material Collection object.
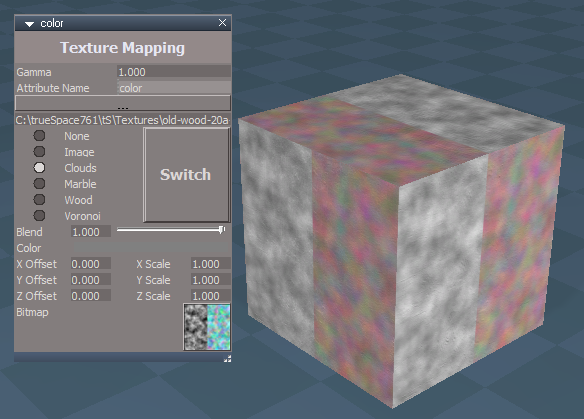
Also when Color is checked for your Image Cloud.
-
clintonman
- Captain
- Posts: 5659
- Joined: 21 May 2009, 21:08
- Type the number ten into the box: 0
- Location: California
Re: Yafaray4tS v0.9.0
OK, but still don't understand the number 3, why 3?trueBlue wrote: 25 Jul 2018, 16:05Thanks but I was hoping for simple steps on how to use your Blend material.clintonman wrote: 25 Jul 2018, 05:05A Blend material is a combination of 2 pre-existing materials.trueBlue wrote: 24 Jul 2018, 16:48 ...
Blend
Steps to create 3 blended materials.
...
http://www.yafaray.org/documentation/us ... n#blendmap
I asked for 'Steps to create 3 blended materials', because your Blend Material Collection object looks like it supports 25 materials.
So what is not clear is how to use your Blend material with the required Blend Material Collection object.
Also when Color is checked for your Image Cloud.
Odd coloring for the Image Cloud.PNG
-
trueBlue
- Captain
- Posts: 5548
- Joined: 06 Jul 2009, 22:50
- Type the number ten into the box: 10
Re: Yafaray4tS v0.9.0
I do not understand either. 
 What are the steps on applying a material in this collection and how do you apply the material to the Blend material?
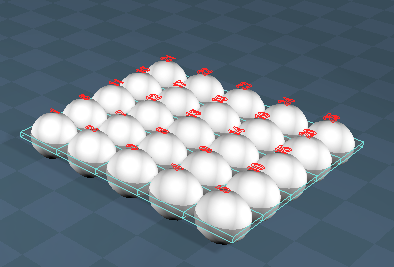
- 2 dozen eggs.PNG (65.22 KiB) Viewed 4159 times
-
clintonman
- Captain
- Posts: 5659
- Joined: 21 May 2009, 21:08
- Type the number ten into the box: 0
- Location: California
Re: Yafaray4tS v0.9.0
trueBlue wrote: 25 Jul 2018, 16:21 ...
2 dozen eggs.PNG
...

-
trueBlue
- Captain
- Posts: 5548
- Joined: 06 Jul 2009, 22:50
- Type the number ten into the box: 10
Re: Yafaray4tS v0.9.0
Found another issue.
Paint object with Blend material (Without setting it up properly)
Render
Image is saved with zero bytes.
Paint object with Blend material (Without setting it up properly)
Render
Image is saved with zero bytes.
-
clintonman
- Captain
- Posts: 5659
- Joined: 21 May 2009, 21:08
- Type the number ten into the box: 0
- Location: California
Re: Yafaray4tS v0.9.0
If you want me to take a look a complete set of steps to reproduce the problem would make it much easier.trueBlue wrote: 25 Jul 2018, 17:15 Found another issue.
Paint object with Blend material (Without setting it up properly)
Render
Image is saved with zero bytes.
-
trueBlue
- Captain
- Posts: 5548
- Joined: 06 Jul 2009, 22:50
- Type the number ten into the box: 10
Re: Yafaray4tS v0.9.0
Those were the steps that I used.
However, I rebooted my computer and tried again and it worked as expected.
Until I started using the Render Object icons.
Which I am now discovering anaother issue.
The YafaRay4tS toolbar Render Object seems to be rendering twice.
If nothing is selected, I get two identical errors.
If an object is selected, the Internal display flashes twice.
I suspect that when you switch back and forth with the differnt Object Render modes, something is getting messed up.
I also see that neither Render Object mode in the Default aspect are enabled after switching to one or the other and rendering.
When I use tS Render Object icon is where I got the rendered image with zero bytes.
I also note that it does not render twice.
Can not really narrow this down to when or how this happens because sometimes it works right and sometimes it does not.
So something with the combination of switching Object Render modes, Render Object icons, and using the Blend material without any material applied.
Now it seems like the Object Render mode is stuck in the experimental mode. Selecting the default mode is not working like it should. IE It is working like the the experimental mode.
Do not know what to say Clinton. I did confirm in the console that YafaRay did not recognized the Blend material several times and rendered an image with zero bytes.
YafaRay4tS toolbar Render Object LMB command
OfflineRender.OpenView('',0,0);if (Node.Exists('/Scripts/Commands/RenderObject')){Activity.Run('/Scripts/Commands/RenderObject');}if (!Node.Exists('/Scripts/Commands/RenderrObject')){OfflineRender.RenderObject('')}
tS Render Object LMB command
OfflineRender.OpenView('',0,0);Activity.Run('/Scripts/Commands/RenderObject');
Looks like the typo snuck back in with the
YafaRay4tS toolbar Render Object LMB command
RenderrObject <----- two r(s)
However, I rebooted my computer and tried again and it worked as expected.
Until I started using the Render Object icons.
Which I am now discovering anaother issue.
The YafaRay4tS toolbar Render Object seems to be rendering twice.
If nothing is selected, I get two identical errors.
If an object is selected, the Internal display flashes twice.
I suspect that when you switch back and forth with the differnt Object Render modes, something is getting messed up.
I also see that neither Render Object mode in the Default aspect are enabled after switching to one or the other and rendering.
When I use tS Render Object icon is where I got the rendered image with zero bytes.
I also note that it does not render twice.
Can not really narrow this down to when or how this happens because sometimes it works right and sometimes it does not.
So something with the combination of switching Object Render modes, Render Object icons, and using the Blend material without any material applied.
Now it seems like the Object Render mode is stuck in the experimental mode. Selecting the default mode is not working like it should. IE It is working like the the experimental mode.
Do not know what to say Clinton. I did confirm in the console that YafaRay did not recognized the Blend material several times and rendered an image with zero bytes.
YafaRay4tS toolbar Render Object LMB command
OfflineRender.OpenView('',0,0);if (Node.Exists('/Scripts/Commands/RenderObject')){Activity.Run('/Scripts/Commands/RenderObject');}if (!Node.Exists('/Scripts/Commands/RenderrObject')){OfflineRender.RenderObject('')}
tS Render Object LMB command
OfflineRender.OpenView('',0,0);Activity.Run('/Scripts/Commands/RenderObject');
Looks like the typo snuck back in with the
YafaRay4tS toolbar Render Object LMB command
RenderrObject <----- two r(s)
-
clintonman
- Captain
- Posts: 5659
- Joined: 21 May 2009, 21:08
- Type the number ten into the box: 0
- Location: California
Re: Yafaray4tS v0.9.0
Yep, that happens sometimes especially if you're testing different versions of tS or even switch computers.trueBlue wrote: 25 Jul 2018, 19:28 ...
Looks like the typo snuck back in with the
YafaRay4tS toolbar Render Object LMB command
RenderrObject <----- two r(s)
What I mean by steps is a play by play of everything you did.
1. started a new scene
2. right clicked this toolbar for yafaray
3. added yafaray lights
4. added a cube and assigned blend material to it
5. pressed the render button
after pressing render I expected this to happen but that happened instead
No details translates to ok let me try this...nope don't see the problem, let me try this instead...nope let me try this instead...again..............1 or 2 hours later ok now I see the problem! or I give up I don't see a problem so it never gets fixed.
-
trueBlue
- Captain
- Posts: 5548
- Joined: 06 Jul 2009, 22:50
- Type the number ten into the box: 10
Re: Yafaray4tS v0.9.0
Fixed the typo in the Render Object button.
Re uploaded RC -19 in the previous post.
Here is a scene that shows that YafaRay does not recognize the Blend material when there is no materials applied.
Check the console.
Removed due to update
Re uploaded RC -19 in the previous post.
Here is a scene that shows that YafaRay does not recognize the Blend material when there is no materials applied.
Check the console.
Removed due to update
-
clintonman
- Captain
- Posts: 5659
- Joined: 21 May 2009, 21:08
- Type the number ten into the box: 0
- Location: California
Re: Yafaray4tS v0.9.0
Fix - update system trace error message to the new error handling systemtrueBlue wrote: 25 Jul 2018, 20:36 Fixed the typo in the Render Object button.
Re uploaded RC -19 in the previous post.
Here is a scene that shows that YafaRay does not recognize the Blend material when there is no materials applied.
Check the console.
YafaRay4tS/MaterialsFnSet around line 1382
Code: Select all
function ExportBlendMaterial(MaterialNode) {
	var Errors = Node.AccessFnSet(System.ThisOwner() + '/ErrorsFnSet');
	if(!Node.Exists(Space.CurrentScene() + "/Blend Material Collection")) {
		//System.Trace("Error: Blend Material Collection not found. Skipping material export.");
		Errors.Add("Blend Material Collection not found. Skipping material export.");
		return;
	}
-
trueBlue
- Captain
- Posts: 5548
- Joined: 06 Jul 2009, 22:50
- Type the number ten into the box: 10
Re: Yafaray4tS v0.9.0
BlendMaterial scene.RsScn
I followed the directions and I do have the textures.
Possibly the Prep YafaRay Scene script?
At one point I noticed the xml file on my Desktop.
I replace the YafaRay4tS with a new one.
It renders correctly though. 
Wonder if you were to use a InputBitmap from the Components - Inputs and compilers library instead of the path dependent file dialog that you are using, would solve this issue? Instead of using the file dialog a user Ctrl + LMB selects the Bitmap control to select an image. This is the way all of the compiled D3D material are, as I understand it. Or is the path to the image needed by YafaRay?
Here is one without the errors.
I went inside the objects and changed the paths.
I change the color and enabled transparent shadows.
Had to replace the YafaRay4tS again as I discovered the errors stay with it regardless if they were corrected.
Removed due to update
I followed the directions and I do have the textures.
Possibly the Prep YafaRay Scene script?
At one point I noticed the xml file on my Desktop.
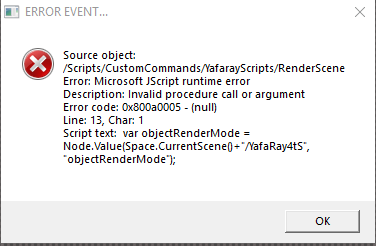
- BMS error.PNG (11.67 KiB) Viewed 4472 times
I replace the YafaRay4tS with a new one.
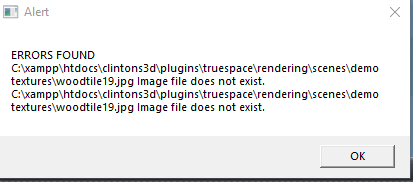
- BMS2 error.PNG (7.64 KiB) Viewed 4470 times
Wonder if you were to use a InputBitmap from the Components - Inputs and compilers library instead of the path dependent file dialog that you are using, would solve this issue? Instead of using the file dialog a user Ctrl + LMB selects the Bitmap control to select an image. This is the way all of the compiled D3D material are, as I understand it. Or is the path to the image needed by YafaRay?
Here is one without the errors.
I went inside the objects and changed the paths.
I change the color and enabled transparent shadows.
Had to replace the YafaRay4tS again as I discovered the errors stay with it regardless if they were corrected.
Removed due to update
-
clintonman
- Captain
- Posts: 5659
- Joined: 21 May 2009, 21:08
- Type the number ten into the box: 0
- Location: California
Re: Yafaray4tS v0.9.0
Possibly the Prep YafaRay Scene script ...what? Not sure what the question is.trueBlue wrote: 25 Jul 2018, 23:21 BlendMaterial scene.RsScn
I followed the directions and I do have the textures.
Possibly the Prep YafaRay Scene script?
...
-
clintonman
- Captain
- Posts: 5659
- Joined: 21 May 2009, 21:08
- Type the number ten into the box: 0
- Location: California
Re: Yafaray4tS v0.9.0
Yes, YafaRay needs the path to any images used.trueBlue wrote: 25 Jul 2018, 23:21 ... Or is the path to the image needed by YafaRay?
...
-
clintonman
- Captain
- Posts: 5659
- Joined: 21 May 2009, 21:08
- Type the number ten into the box: 0
- Location: California
Re: Yafaray4tS v0.9.0
Did you run the "Prep YafaRay Scene"? and if so did it give any errors or any messages? That screenshot makes it look like it was never run.trueBlue wrote: 25 Jul 2018, 23:21
BMS2 error.PNG
...
-
trueBlue
- Captain
- Posts: 5548
- Joined: 06 Jul 2009, 22:50
- Type the number ten into the box: 10
Re: Yafaray4tS v0.9.0
I followed the directions.
I ran the Prep YafaRay Scene script.
I got a message that it was successful from the script.
I got the first error that I posted when I rendered.
Then I replaced the Yafaray4tS.RsObj
Then I got the path errors.
My guess given the error is the differences in the old YafaRay4tS node in the included scene and the newer one installed? Most likely the old one does not have the Object Render mode.
I ran the Prep YafaRay Scene script.
I got a message that it was successful from the script.
I got the first error that I posted when I rendered.
Then I replaced the Yafaray4tS.RsObj
Then I got the path errors.
My guess given the error is the differences in the old YafaRay4tS node in the included scene and the newer one installed? Most likely the old one does not have the Object Render mode.
-
clintonman
- Captain
- Posts: 5659
- Joined: 21 May 2009, 21:08
- Type the number ten into the box: 0
- Location: California
Re: Yafaray4tS v0.9.0
TestedtrueBlue wrote: 26 Jul 2018, 01:31 I followed the directions.
I ran the Prep YafaRay Scene script.
I got a message that it was successful from the script.
I got the first error that I posted when I rendered.
Then I replaced the Yafaray4tS.RsObj
Then I got the path errors.
My guess given the error is the differences in the old YafaRay4tS node in the included scene and the newer one installed? Most likely the old one does not have the Object Render mode.
downloaded the original demo blend scene
downloaded and unzipped the texture files
opened the scene file and pressed the Prep YafaRay Scene, Start button
tried render got the error
ran render directly from the YafaRay node
got error message about textures
the wood texture was missing from the render
message from Prep YafaRay scene is wrong - said all was ok even though didn't select the textures downloaded
pushed the Choose Texture Source Folder button and chose the textures downloaded
pressed Start an got the same positive message
ran the render from the YafaRay node
render was good, including the wood texture and no error messages
-
clintonman
- Captain
- Posts: 5659
- Joined: 21 May 2009, 21:08
- Type the number ten into the box: 0
- Location: California
Re: Yafaray4tS v0.9.0
Got same errors because YafaRay uses the texture path, not the textures inside trueSpace.trueBlue wrote: 25 Jul 2018, 23:21 ...
Here is one without the errors.
I went inside the objects and changed the paths.
I change the color and enabled transparent shadows.
Had to replace the YafaRay4tS again as I discovered the errors stay with it regardless if they were corrected.
BlendMaterial scene.RsScn
The Prep YafaRay Scene needs to be fixed to give valid error/success messages. It does work if all steps are followed.
Need to update the instructions on the web page to account for the changes since it's creation.
You can use this script to copy values between different YafaRay4tS nodes:
http://clintons3d.com/plugins/downloads ... utes.RsObj
usage:
1. select the old YafaRay4tS node and press the Set Source button
2. select the new YafaRay4tS node and press the Set Destination button
3. press the Copy button
-
trueBlue
- Captain
- Posts: 5548
- Joined: 06 Jul 2009, 22:50
- Type the number ten into the box: 10
Re: Yafaray4tS v0.9.0
So does that mean all is okay?
EDIT: Crossed post
Still trying to get a grip on a simple Blended material.
Without knowing how it works, I came up with a mockup.
Blend comes preloaded with two materials.
File dialog 1 selects material 1 to edit.
File dialog 2 selects material 2 to edit. And exports out the Bitmap
Blend Collection comes preloaded with two materials.
Select Material 1 selects BlendMaterial1 to edit.
Select Material 2 selects BlendMaterial2 to edit.
Not sure what to do with the other eggs.
EDIT: Crossed post
Still trying to get a grip on a simple Blended material.
Without knowing how it works, I came up with a mockup.
Blend comes preloaded with two materials.
File dialog 1 selects material 1 to edit.
File dialog 2 selects material 2 to edit. And exports out the Bitmap
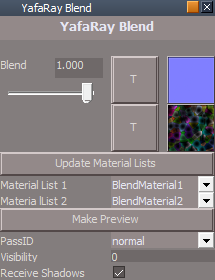
- YafaRay Blend 2.PNG (14.76 KiB) Viewed 4299 times

- Blend Material Collection.PNG (3.19 KiB) Viewed 4299 times
Select Material 1 selects BlendMaterial1 to edit.
Select Material 2 selects BlendMaterial2 to edit.
Not sure what to do with the other eggs.
-
clintonman
- Captain
- Posts: 5659
- Joined: 21 May 2009, 21:08
- Type the number ten into the box: 0
- Location: California
Re: Yafaray4tS v0.9.0
Bug fixed Prep YafaRay Scene script attached
bug - only searched for texture maps if the texture map folder was selected - fixed
bug - reported ok when texture map folder was blank - fixed with error messages
bug - failed silently if the texture map file was not found - fixed with error message
new - gives count of texture map path reassignments when succesful
bug - only searched for texture maps if the texture map folder was selected - fixed
bug - reported ok when texture map folder was blank - fixed with error messages
bug - failed silently if the texture map file was not found - fixed with error message
new - gives count of texture map path reassignments when succesful
- Attachments
-
- Prep YafaRay Scene.RsObj
- (12.79 KiB) Downloaded 195 times
-
clintonman
- Captain
- Posts: 5659
- Joined: 21 May 2009, 21:08
- Type the number ten into the box: 0
- Location: California
Re: Yafaray4tS v0.9.0
Some Blend Material notes:
Blend Material Collection - repository of stand alone materials used inside of a Blend Material. It comes pre-populated with 2 materials since you need 2 materials to make a blend. 3 or more materials cannot be blended together. Use the Add Material button to add more selections for blending. There is no way to remove a material slot once it has been added. The Reset button clears out the collection and reverts back to the 2 blank materials. The Blend Material must have a Blend Material Collection in the scene, otherwise it has no materials to blend between.
YafaRay Blend Material usage:
1. first add a Blend Material Collection to the scene
2. edit 2 of the materials inside the Blend Material Collection
3. if more materials are needed press the Add Material button
4. assign the YafaRay Blend Material to the geometry
5. press the Update Material Lists button to refresh the 2 lists below it
6. choose 2 materials for blending from the 2 drop down lists
7. press the Make Preview button to see a D3D viewport preview for the Blend Material
8. control the amount of blend between the 2 materials using the Blend slider
9. to control the blend with a texture press the T button - this will override the Blend slider
Blend Material Collection - repository of stand alone materials used inside of a Blend Material. It comes pre-populated with 2 materials since you need 2 materials to make a blend. 3 or more materials cannot be blended together. Use the Add Material button to add more selections for blending. There is no way to remove a material slot once it has been added. The Reset button clears out the collection and reverts back to the 2 blank materials. The Blend Material must have a Blend Material Collection in the scene, otherwise it has no materials to blend between.
YafaRay Blend Material usage:
1. first add a Blend Material Collection to the scene
2. edit 2 of the materials inside the Blend Material Collection
3. if more materials are needed press the Add Material button
4. assign the YafaRay Blend Material to the geometry
5. press the Update Material Lists button to refresh the 2 lists below it
6. choose 2 materials for blending from the 2 drop down lists
7. press the Make Preview button to see a D3D viewport preview for the Blend Material
8. control the amount of blend between the 2 materials using the Blend slider
9. to control the blend with a texture press the T button - this will override the Blend slider
-
trueBlue
- Captain
- Posts: 5548
- Joined: 06 Jul 2009, 22:50
- Type the number ten into the box: 10
Re: Yafaray4tS v0.9.0
Isn't this the same as the Update YafaRay Render Node.RsObj in the Yafaray4tS Setup library?clintonman wrote: 26 Jul 2018, 02:22Got same errors because YafaRay uses the texture path, not the textures inside trueSpace.trueBlue wrote: 25 Jul 2018, 23:21 ...
Here is one without the errors.
I went inside the objects and changed the paths.
I change the color and enabled transparent shadows.
Had to replace the YafaRay4tS again as I discovered the errors stay with it regardless if they were corrected.
BlendMaterial scene.RsScn
The Prep YafaRay Scene needs to be fixed to give valid error/success messages. It does work if all steps are followed.
Need to update the instructions on the web page to account for the changes since it's creation.
You can use this script to copy values between different YafaRay4tS nodes:
http://clintons3d.com/plugins/downloads ... utes.RsObj
usage:
1. select the old YafaRay4tS node and press the Set Source button
2. select the new YafaRay4tS node and press the Set Destination button
3. press the Copy button
BTW... the Update YafaRay Render Node.RsObj produces an error if there is no YafaRay4tS.RsObj in the scene.
Enclosed is a script that combines both of the Prep YafaRay Scene and Update YafaRay Render Node scripts .
ToDo: Still need to figure out why the following is not being honored.
Code: Select all
if(!Node.Exists(Source)) return;
if(!Node.Exists(Destination)) return;-
trueBlue
- Captain
- Posts: 5548
- Joined: 06 Jul 2009, 22:50
- Type the number ten into the box: 10
Re: Yafaray4tS v0.9.0
Thanks Clinton!clintonman wrote: 26 Jul 2018, 03:38 Some Blend Material notes:
Blend Material Collection - repository of stand alone materials used inside of a Blend Material. It comes pre-populated with 2 materials since you need 2 materials to make a blend. 3 or more materials cannot be blended together. Use the Add Material button to add more selections for blending. There is no way to remove a material slot once it has been added. The Reset button clears out the collection and reverts back to the 2 blank materials. The Blend Material must have a Blend Material Collection in the scene, otherwise it has no materials to blend between.
YafaRay Blend Material usage:
1. first add a Blend Material Collection to the scene
2. edit 2 of the materials inside the Blend Material Collection
3. if more materials are needed press the Add Material button
4. assign the YafaRay Blend Material to the geometry
5. press the Update Material Lists button to refresh the 2 lists below it
6. choose 2 materials for blending from the 2 drop down lists
7. press the Make Preview button to see a D3D viewport preview for the Blend Material
8. control the amount of blend between the 2 materials using the Blend slider
9. to control the blend with a texture press the T button - this will override the Blend slider
In step 4, do you mean Paint the object from the D3D Material Editor?
-
trueBlue
- Captain
- Posts: 5548
- Joined: 06 Jul 2009, 22:50
- Type the number ten into the box: 10
Re: Yafaray4tS v0.9.0
Made an exciting discovery last night!
Well at least for me.
I was turned off by the use of the OptDetector as a viewer because the plugin demanded to reload it's libraries after you Reset the Default Context.
I discovered a OptDetectorsPreferences node in Preferences.
I saved it to the preobjects folder and added a line to the reset.js file.
No more demanding that the libraries are reloaded!
Well at least for me.
I was turned off by the use of the OptDetector as a viewer because the plugin demanded to reload it's libraries after you Reset the Default Context.
I discovered a OptDetectorsPreferences node in Preferences.
I saved it to the preobjects folder and added a line to the reset.js file.
Code: Select all
RsFileIO.LoadObject( rosDir + '\\scripts\\preObjects\\OptDetectorsPreferences.RsObj', '/Preferences/');-
clintonman
- Captain
- Posts: 5659
- Joined: 21 May 2009, 21:08
- Type the number ten into the box: 0
- Location: California
Re: Yafaray4tS v0.9.0
YestrueBlue wrote: 26 Jul 2018, 07:46Thanks Clinton!clintonman wrote: 26 Jul 2018, 03:38 Some Blend Material notes:
Blend Material Collection - repository of stand alone materials used inside of a Blend Material. It comes pre-populated with 2 materials since you need 2 materials to make a blend. 3 or more materials cannot be blended together. Use the Add Material button to add more selections for blending. There is no way to remove a material slot once it has been added. The Reset button clears out the collection and reverts back to the 2 blank materials. The Blend Material must have a Blend Material Collection in the scene, otherwise it has no materials to blend between.
YafaRay Blend Material usage:
1. first add a Blend Material Collection to the scene
2. edit 2 of the materials inside the Blend Material Collection
3. if more materials are needed press the Add Material button
4. assign the YafaRay Blend Material to the geometry
5. press the Update Material Lists button to refresh the 2 lists below it
6. choose 2 materials for blending from the 2 drop down lists
7. press the Make Preview button to see a D3D viewport preview for the Blend Material
8. control the amount of blend between the 2 materials using the Blend slider
9. to control the blend with a texture press the T button - this will override the Blend slider
In step 4, do you mean Paint the object from the D3D Material Editor?
-
clintonman
- Captain
- Posts: 5659
- Joined: 21 May 2009, 21:08
- Type the number ten into the box: 0
- Location: California
Re: Yafaray4tS v0.9.0
Yes, I forgot it existed.trueBlue wrote: 26 Jul 2018, 07:43 ...
Isn't this the same as the Update YafaRay Render Node.RsObj in the Yafaray4tS Setup library?
...
-
trueBlue
- Captain
- Posts: 5548
- Joined: 06 Jul 2009, 22:50
- Type the number ten into the box: 10
Re: Yafaray4tS v0.9.0
Thanks! Getting closer to understanding your Blend material.clintonman wrote: 26 Jul 2018, 15:43YestrueBlue wrote: 26 Jul 2018, 07:46Thanks Clinton!clintonman wrote: 26 Jul 2018, 03:38 Some Blend Material notes:
Blend Material Collection - repository of stand alone materials used inside of a Blend Material. It comes pre-populated with 2 materials since you need 2 materials to make a blend. 3 or more materials cannot be blended together. Use the Add Material button to add more selections for blending. There is no way to remove a material slot once it has been added. The Reset button clears out the collection and reverts back to the 2 blank materials. The Blend Material must have a Blend Material Collection in the scene, otherwise it has no materials to blend between.
YafaRay Blend Material usage:
1. first add a Blend Material Collection to the scene
2. edit 2 of the materials inside the Blend Material Collection
3. if more materials are needed press the Add Material button
4. assign the YafaRay Blend Material to the geometry
5. press the Update Material Lists button to refresh the 2 lists below it
6. choose 2 materials for blending from the 2 drop down lists
7. press the Make Preview button to see a D3D viewport preview for the Blend Material
8. control the amount of blend between the 2 materials using the Blend slider
9. to control the blend with a texture press the T button - this will override the Blend slider
In step 4, do you mean Paint the object from the D3D Material Editor?
Following your steps I did run into an error.
Also had a couple of instances where only one of the two materials was created.
I did not document it be will try again today.
Enclosed is a modified Blend Material Collection and Blend material, that I think is easier to use.
Blend Material Collection
Modifications:
1. Add
Node.Select(copySphere)
MeshModifiers.OpenMaterialEditor()
to the Run script.
2. Add Select Material 1 Button Control
Node.Select('%THIS_NAME%/BlendMaterial1')
MeshModifiers.OpenMaterialEditor()
3. Add Select Material 2 Button Control
Node.Select('%THIS_NAME%/BlendMaterial2')
MeshModifiers.OpenMaterialEditor()
4. All the primitives have their Render Attributes and Mesh nodes set to not show in the panel.
Blend material
Modifications:
Add script that automatically runs on load
Code: Select all
if(!Node.Exists(Space.CurrentScene() + "/Blend Material Collection")) {
RsFileIO.LoadObject(System.GetMainDir() + '\\Rs Main Libraries\\YafaRay Materials\\Blend Material Collection.RsObj', Space.CurrentScene());
}To use the only requirement is to have the new Blend Material Collection.RsObj in the YafaRa4tS Materials library.
Let me know what you think?
Removed due to update
-
clintonman
- Captain
- Posts: 5659
- Joined: 21 May 2009, 21:08
- Type the number ten into the box: 0
- Location: California
Re: Yafaray4tS v0.9.0
This doesn't make sense for the case where a scene has more than 1 blend material and you need to select BlendMaterial5 or BlendMaterial6 etc.trueBlue wrote: 26 Jul 2018, 17:00 ...
2. Add Select Material 1 Button Control
Node.Select('%THIS_NAME%/BlendMaterial1')
MeshModifiers.OpenMaterialEditor()
3. Add Select Material 2 Button Control
Node.Select('%THIS_NAME%/BlendMaterial2')
MeshModifiers.OpenMaterialEditor()
...
-
trueBlue
- Captain
- Posts: 5548
- Joined: 06 Jul 2009, 22:50
- Type the number ten into the box: 10
Re: Yafaray4tS v0.9.0
This is true but at least it is a start in blending two materials.
You could add an instruction after selecting the Select Material 1 button, to use your keyboard arrow keys to navigate to the BlendMaterial # wanted.
If you created a Combo Ctrl that gets populated after each addition and a button that selects it would be much better.
Even better a Watch Dog that selects automatically.
You could add an instruction after selecting the Select Material 1 button, to use your keyboard arrow keys to navigate to the BlendMaterial # wanted.
If you created a Combo Ctrl that gets populated after each addition and a button that selects it would be much better.
Even better a Watch Dog that selects automatically.
-
trueBlue
- Captain
- Posts: 5548
- Joined: 06 Jul 2009, 22:50
- Type the number ten into the box: 10
Re: Yafaray4tS v0.9.0
I signed up at the YafaRay user’s forum and asked about Input Color Space and Background Color Space. Here is the reply:
Quote - David Bluecame:
“Keep in mind I'm actively working on a significantly modified upcoming yafaray v4 that will have a more clearly defined API to be more compatible with 3rd party software, using either XML files, Python3 or directly interfacing with YafaRay interface C++ API.
The reason of those differences in the Color Space are historical. The Background was developed by other developers and the Color Space settings they included in the Background were only used for it but not for the rest of the software.
Around 2-3 years ago I introduced Color Spaces in the rest of the software but, to be honest, did not dare to mess around the Background color spaces code so I kept it "separate" with its own Color Space code and parameters.
I agree it would be ideal to have a single Color Space model for the entire renderer, including Backgrounds. I will have to study how the background code works and I will try to unify this in the upcoming v4 if I can...”
Quote - David Bluecame:
“About the color spaces in the general renderer, there are actually 4 options:
* Linear RGB: in this mode, the colors are taken "as is" without any processing. For example color R=0.5, G=0.5, B=0.5 would be written in a "low dynamic range" such as PNG the following way: R=127, G=127, B=127 and vice-versa
* RAW / Manual Gamma: in this mode a Gamma value can be specified and the color values are transformed using the specified gamma value.
* sRGB: this mode is somewhat similar (but not the same) as a RAW Manual Gamma with gamma 2.2. However the sRGB standard is not exactly a gamma curve and has two segments (one linear and one exponencial). The difference is subtle but for color accuracy this is normally necessary when using PNG, JPG, etc.
* XYZ: this is experimental (and possibly not correctly implemented?)”
End Quotes
Changes to Input Color Space implemented last year:
https://github.com/YafaRay/Core/commit/ ... 4ec3864a98
Input Color Space
You can read the code here:
C:\Program Files\yafaray_v3\include\yafaray\core_api\color.h
Background - Color Space
You can read the code here:
C:\Program Files\yafaray_v3\include\yafaray\utilities\ColorConv.h
Within the code follow the link:
http://www.brucelindbloom.com
Everything you ever wanted to know about color from a color scientist.
So this is what I purpose:
Default
Input Color Space - Color processing options for all textures.
LinearRGB - Linear with no color processing. [Legacy]
sRGB - Color processing with Gamma 2.2. [Recommended]
XYZ - Matrix color processing. [Experimental]
Background
Color Space - Color processing options for the Background.
CIE (D50) - ?
CIE (E) - ?
sRGB (D50) - ?
sRGB (D65) - ?
Exposure - Lighting multiplier.
Matrix color processing was a total guess, actually all were.
……………………………………………
Procedurals
Image Cloud
Color - Enable Color Noise.
Depth - Amount of Noise detail.
Hard - Enable Hard Noise strength / Not Enabled - Soft Noise strength.
Size - Amount of Noise size.
X Size - ?
Y Size - ?
Useful for soft bump mapping of irregular surfaces.
Image Marble
Depth - Amount of Noise detail.
Hard - Enable Hard Noise strength / Not Enabled - Soft Noise strength.
Shape - Band types:
Sin - ?
Saw - ?
Triangle - ?
Sharpness - Noise definition types:
Soft - ?
Sharp - ?
Sharper - ?
Size - Amount of Noise size.
Turbulence - Amount of turbulence for bands.
X Size - ?
Y Size - ?
Image Wood
Hard - Enable Hard Noise strength / Not Enabled - Soft Noise strength.
Shape - Band types:
Sin - ?
Saw - ?
Triangle - ?
Size - Amount of Noise size.
Turbulence - Amount of turbulence for bands or rings.
Wood Type - Band types:
Band Noise - Use Bands with Noise.
Band - Use Bands.
Ring Noise - Use Rings with Noise.
Ring - Use Rings.
X Size - ?
Y Size - ?
Useful for basic bands and noise with a structure.
Image Voronoi
Color Type - ?
Intensity - ?
Position - ?
Position and Outline - ?
Position, Outline, and Intensity - ?
Distance Metric - Shape of the cells:
ActualDistance - ?
Chebychev - ?
Distance Squared - ?
Manhattan - ?
Minovsky 1/2 - ?
Minovsky 4 - ?
Intensity - Amount of intensity applied to the image.
Size - Amount of Cell size.
Weight 1 - Amount of distance between each cell.
Weight 2 - Amount of distance between each cell.
Weight 3 - Amount of distance between each cell.
Weight 4 - Amount of distance between each cell.
X Size - ?
Y Size - ?
Quote - David Bluecame:
“Keep in mind I'm actively working on a significantly modified upcoming yafaray v4 that will have a more clearly defined API to be more compatible with 3rd party software, using either XML files, Python3 or directly interfacing with YafaRay interface C++ API.
The reason of those differences in the Color Space are historical. The Background was developed by other developers and the Color Space settings they included in the Background were only used for it but not for the rest of the software.
Around 2-3 years ago I introduced Color Spaces in the rest of the software but, to be honest, did not dare to mess around the Background color spaces code so I kept it "separate" with its own Color Space code and parameters.
I agree it would be ideal to have a single Color Space model for the entire renderer, including Backgrounds. I will have to study how the background code works and I will try to unify this in the upcoming v4 if I can...”
Quote - David Bluecame:
“About the color spaces in the general renderer, there are actually 4 options:
* Linear RGB: in this mode, the colors are taken "as is" without any processing. For example color R=0.5, G=0.5, B=0.5 would be written in a "low dynamic range" such as PNG the following way: R=127, G=127, B=127 and vice-versa
* RAW / Manual Gamma: in this mode a Gamma value can be specified and the color values are transformed using the specified gamma value.
* sRGB: this mode is somewhat similar (but not the same) as a RAW Manual Gamma with gamma 2.2. However the sRGB standard is not exactly a gamma curve and has two segments (one linear and one exponencial). The difference is subtle but for color accuracy this is normally necessary when using PNG, JPG, etc.
* XYZ: this is experimental (and possibly not correctly implemented?)”
End Quotes
Changes to Input Color Space implemented last year:
https://github.com/YafaRay/Core/commit/ ... 4ec3864a98
Input Color Space
You can read the code here:
C:\Program Files\yafaray_v3\include\yafaray\core_api\color.h
Background - Color Space
You can read the code here:
C:\Program Files\yafaray_v3\include\yafaray\utilities\ColorConv.h
Within the code follow the link:
http://www.brucelindbloom.com
Everything you ever wanted to know about color from a color scientist.
So this is what I purpose:
Default
Input Color Space - Color processing options for all textures.
LinearRGB - Linear with no color processing. [Legacy]
sRGB - Color processing with Gamma 2.2. [Recommended]
XYZ - Matrix color processing. [Experimental]
Background
Color Space - Color processing options for the Background.
CIE (D50) - ?
CIE (E) - ?
sRGB (D50) - ?
sRGB (D65) - ?
Exposure - Lighting multiplier.
Matrix color processing was a total guess, actually all were.
……………………………………………
Procedurals
Image Cloud
Color - Enable Color Noise.
Depth - Amount of Noise detail.
Hard - Enable Hard Noise strength / Not Enabled - Soft Noise strength.
Size - Amount of Noise size.
X Size - ?
Y Size - ?
Useful for soft bump mapping of irregular surfaces.
Image Marble
Depth - Amount of Noise detail.
Hard - Enable Hard Noise strength / Not Enabled - Soft Noise strength.
Shape - Band types:
Sin - ?
Saw - ?
Triangle - ?
Sharpness - Noise definition types:
Soft - ?
Sharp - ?
Sharper - ?
Size - Amount of Noise size.
Turbulence - Amount of turbulence for bands.
X Size - ?
Y Size - ?
Image Wood
Hard - Enable Hard Noise strength / Not Enabled - Soft Noise strength.
Shape - Band types:
Sin - ?
Saw - ?
Triangle - ?
Size - Amount of Noise size.
Turbulence - Amount of turbulence for bands or rings.
Wood Type - Band types:
Band Noise - Use Bands with Noise.
Band - Use Bands.
Ring Noise - Use Rings with Noise.
Ring - Use Rings.
X Size - ?
Y Size - ?
Useful for basic bands and noise with a structure.
Image Voronoi
Color Type - ?
Intensity - ?
Position - ?
Position and Outline - ?
Position, Outline, and Intensity - ?
Distance Metric - Shape of the cells:
ActualDistance - ?
Chebychev - ?
Distance Squared - ?
Manhattan - ?
Minovsky 1/2 - ?
Minovsky 4 - ?
Intensity - Amount of intensity applied to the image.
Size - Amount of Cell size.
Weight 1 - Amount of distance between each cell.
Weight 2 - Amount of distance between each cell.
Weight 3 - Amount of distance between each cell.
Weight 4 - Amount of distance between each cell.
X Size - ?
Y Size - ?
-
clintonman
- Captain
- Posts: 5659
- Joined: 21 May 2009, 21:08
- Type the number ten into the box: 0
- Location: California
Re: Yafaray4tS v0.9.0
I agree but I would like to see if another option is feasible first.trueBlue wrote: 26 Jul 2018, 18:34 This is true but at least it is a start in blending two materials.
You could add an instruction after selecting the Select Material 1 button, to use your keyboard arrow keys to navigate to the BlendMaterial # wanted.
If you created a Combo Ctrl that gets populated after each addition and a button that selects it would be much better.
Even better a Watch Dog that selects automatically.
-
clintonman
- Captain
- Posts: 5659
- Joined: 21 May 2009, 21:08
- Type the number ten into the box: 0
- Location: California
Re: Yafaray4tS v0.9.0
X Size and Y Size control resolution in pixels for the generated textures used in the 3d viewport preview
https://docs.blender.org/manual/en/dev/ ... index.html
Image Marble
Depth - Amount of Noise detail.
Hard - Enable Hard Noise strength / Not Enabled - Soft Noise strength.
Shape - Band types:
"Shape of wave to produce bands.
Sine, Saw, Triangle"
Sharpness - Noise definition types:
"Three settings for soft to more clearly defined Marble.
Soft, Sharp, Sharper"
Size - Amount of Noise size.
Turbulence - Amount of turbulence for bands.
X Size - ?
Y Size - ?
Image Wood
Hard - Enable Hard Noise strength / Not Enabled - Soft Noise strength.
Shape - Band types:
"Shape of wave to produce bands.
Sine, Saw, Triangle"
Size - Amount of Noise size.
Turbulence - Amount of turbulence for bands or rings.
Wood Type - Band types:
Band Noise - Use Bands with Noise.
Band - Use Bands.
Ring Noise - Use Rings with Noise.
Ring - Use Rings.
X Size - ?
Y Size - ?
Useful for basic bands and noise with a structure.
Image Voronoi
"Four settings (Intensity, Position, Position and Outline, and Position, Outline, and Intensity) that can use four different noise basis as methods to calculate color and intensity of the texture output. This gives the Voronoi texture you create with the “Worley Sliders” a completely different appearance and is the equivalent of the noise basis setting found on the other textures."
Color Type - ?
Intensity - ?
Position - ?
Position and Outline - ?
Position, Outline, and Intensity - ?
Distance Metric - Shape of the cells:
"This procedural texture has seven Distance Metric options. These determine the algorithm to find the distance between cells of the texture. These options are:
Minkowsky
Minkowsky 4
Minkowsky 1/2
Chebychev
Manhattan
Distance Squared
Actual Distance
"
Intensity - Amount of intensity applied to the image.
Size - Amount of Cell size.
"These four sliders at the bottom of the Voronoi panel represent the values of the four Worley constants, which are used to calculate the distances between each cell in the texture based on the distance metric. Adjusting these values can have some interesting effects on the end result"
Weight 1 - Amount of distance between each cell.
Weight 2 - Amount of distance between each cell.
Weight 3 - Amount of distance between each cell.
Weight 4 - Amount of distance between each cell.
X Size - ?
Y Size - ?
https://docs.blender.org/manual/en/dev/ ... index.html
Image Marble
Depth - Amount of Noise detail.
Hard - Enable Hard Noise strength / Not Enabled - Soft Noise strength.
Shape - Band types:
"Shape of wave to produce bands.
Sine, Saw, Triangle"
Sharpness - Noise definition types:
"Three settings for soft to more clearly defined Marble.
Soft, Sharp, Sharper"
Size - Amount of Noise size.
Turbulence - Amount of turbulence for bands.
X Size - ?
Y Size - ?
Image Wood
Hard - Enable Hard Noise strength / Not Enabled - Soft Noise strength.
Shape - Band types:
"Shape of wave to produce bands.
Sine, Saw, Triangle"
Size - Amount of Noise size.
Turbulence - Amount of turbulence for bands or rings.
Wood Type - Band types:
Band Noise - Use Bands with Noise.
Band - Use Bands.
Ring Noise - Use Rings with Noise.
Ring - Use Rings.
X Size - ?
Y Size - ?
Useful for basic bands and noise with a structure.
Image Voronoi
"Four settings (Intensity, Position, Position and Outline, and Position, Outline, and Intensity) that can use four different noise basis as methods to calculate color and intensity of the texture output. This gives the Voronoi texture you create with the “Worley Sliders” a completely different appearance and is the equivalent of the noise basis setting found on the other textures."
Color Type - ?
Intensity - ?
Position - ?
Position and Outline - ?
Position, Outline, and Intensity - ?
Distance Metric - Shape of the cells:
"This procedural texture has seven Distance Metric options. These determine the algorithm to find the distance between cells of the texture. These options are:
Minkowsky
Minkowsky 4
Minkowsky 1/2
Chebychev
Manhattan
Distance Squared
Actual Distance
"
Intensity - Amount of intensity applied to the image.
Size - Amount of Cell size.
"These four sliders at the bottom of the Voronoi panel represent the values of the four Worley constants, which are used to calculate the distances between each cell in the texture based on the distance metric. Adjusting these values can have some interesting effects on the end result"
Weight 1 - Amount of distance between each cell.
Weight 2 - Amount of distance between each cell.
Weight 3 - Amount of distance between each cell.
Weight 4 - Amount of distance between each cell.
X Size - ?
Y Size - ?
-
clintonman
- Captain
- Posts: 5659
- Joined: 21 May 2009, 21:08
- Type the number ten into the box: 0
- Location: California
Re: Yafaray4tS v0.9.0
To answer your now invisible post:
tested mappingCSPGlossy scene, no problems here.
Don't forget the standard IT response. "Try turning your computer off and on" - if you've ever seen the the TV show, IT Crowd.
tested mappingCSPGlossy scene, no problems here.
Don't forget the standard IT response. "Try turning your computer off and on" - if you've ever seen the the TV show, IT Crowd.
-
trueBlue
- Captain
- Posts: 5548
- Joined: 06 Jul 2009, 22:50
- Type the number ten into the box: 10
Re: Yafaray4tS v0.9.0
Busted
I redownloaded the scene and it worked.
Must have fiddled with the scene in question that disappeared, while watching IT Crowd.
Testing Input Color Space and logging the results.
sRGB
ImageTexture: The image is a HDR/EXR file: forcing linear RGB and ignoring selected color space 'Raw_Manual_Gamma' and the gamma setting.
LinearRGB
ImageTexture: The image is a HDR/EXR file: forcing linear RGB and ignoring selected color space 'Raw_Manual_Gamma' and the gamma setting.
XYZ
ImageTexture: The image is a HDR/EXR file: forcing linear RGB and ignoring selected color space 'Raw_Manual_Gamma' and the gamma setting.
All three of them are being logged has being used on another line.
XYZ gives a yellow hue to the image.
YafaRay4tS materials do not have a texture property to set diiferent flavors.
Is that even possible on per texture basis?
I redownloaded the scene and it worked.
Must have fiddled with the scene in question that disappeared, while watching IT Crowd.
Testing Input Color Space and logging the results.
sRGB
ImageTexture: The image is a HDR/EXR file: forcing linear RGB and ignoring selected color space 'Raw_Manual_Gamma' and the gamma setting.
LinearRGB
ImageTexture: The image is a HDR/EXR file: forcing linear RGB and ignoring selected color space 'Raw_Manual_Gamma' and the gamma setting.
XYZ
ImageTexture: The image is a HDR/EXR file: forcing linear RGB and ignoring selected color space 'Raw_Manual_Gamma' and the gamma setting.
All three of them are being logged has being used on another line.
XYZ gives a yellow hue to the image.
YafaRay4tS materials do not have a texture property to set diiferent flavors.
Is that even possible on per texture basis?
-
clintonman
- Captain
- Posts: 5659
- Joined: 21 May 2009, 21:08
- Type the number ten into the box: 0
- Location: California
Re: Yafaray4tS v0.9.0
In Blender those 3 values are set on the scene not on the individual textures, unless you mean something else by "flavors".trueBlue wrote: 27 Jul 2018, 02:28 Busted
I redownloaded the scene and it worked.
Must have fiddled with the scene in question that disappeared, while watching IT Crowd.
Testing Input Color Space and logging the results.
sRGB
ImageTexture: The image is a HDR/EXR file: forcing linear RGB and ignoring selected color space 'Raw_Manual_Gamma' and the gamma setting.
LinearRGB
ImageTexture: The image is a HDR/EXR file: forcing linear RGB and ignoring selected color space 'Raw_Manual_Gamma' and the gamma setting.
XYZ
ImageTexture: The image is a HDR/EXR file: forcing linear RGB and ignoring selected color space 'Raw_Manual_Gamma' and the gamma setting.
All three of them are being logged has being used on another line.
XYZ gives a yellow hue to the image.
YafaRay4tS materials do not have a texture property to set diiferent flavors.
Is that even possible on per texture basis?
-
clintonman
- Captain
- Posts: 5659
- Joined: 21 May 2009, 21:08
- Type the number ten into the box: 0
- Location: California
Re: Yafaray4tS v0.9.0

replaced the YafaRay Blend Material in the Collection - Blend materials can't be blended in trueSpace. only simple materials can be blended together
locked the transforms of all the elements except for the main flat surface. it can be used to move and size the collection in the 3d view
added an active checkbox - turns on selection processing
select the "plus button" in the 3d view to add a new material to the collection
to edit a material:
select a material sphere or it's label in the 3d view then use the eyedropper tool that appears to load it into the material editor
- Attachments
-
- Blend Material Collection.RsObj
- (1.17 MiB) Downloaded 203 times
-
trueBlue
- Captain
- Posts: 5548
- Joined: 06 Jul 2009, 22:50
- Type the number ten into the box: 10
Re: Yafaray4tS v0.9.0
Not sure what is meant by this?clintonman wrote: 27 Jul 2018, 07:03 Blend materials can't be blended in trueSpace. only simple materials can be blended together
Is there a reason why this has a YafaRay Blend material?clintonman wrote: 27 Jul 2018, 07:03 select the "plus button" in the 3d view to add a new material to the collection
1.) If you have this Active and you select you keyboard Right -> arrow key, it adds more materials to the collection.
2.) Also when it is Active and you inspect material 1 & 2, the Shinny Diffuse material that they have does not show in the Material Editor. The material 1 & or 2t is being selected then the Blend Material Collection gets selected.
If I select material 1 & 2 without it being Active, the material does show in the Material Editor.
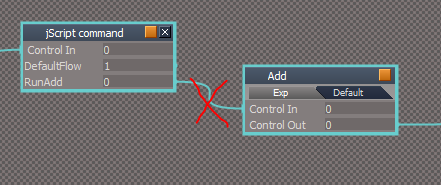
- Capture.PNG (8.36 KiB) Viewed 4875 times
The Inspect tool is kind of weird in the way it works.
Open up the Command History and use the Inspect tool, to see what happens, using different objects with different material. Watch for the last selected object getting selected after exiting the Inspect tool.
I think what is happening with your project (Active or not Active) is the Blend Material Collection's material is being inspected and not the Sphere's material and or material 1 & 2.
-
clintonman
- Captain
- Posts: 5659
- Joined: 21 May 2009, 21:08
- Type the number ten into the box: 0
- Location: California
Re: Yafaray4tS v0.9.0
You cant assign the YafaRay Blend material to the items inside the Blend material collection.trueBlue wrote: 27 Jul 2018, 15:27Not sure what is meant by this?clintonman wrote: 27 Jul 2018, 07:03 Blend materials can't be blended in trueSpace. only simple materials can be blended together
...
-
clintonman
- Captain
- Posts: 5659
- Joined: 21 May 2009, 21:08
- Type the number ten into the box: 0
- Location: California
Re: Yafaray4tS v0.9.0
Nope, must have been an accidenttrueBlue wrote: 27 Jul 2018, 15:27 ...
Is there a reason why this has a YafaRay Blend material?
...
-
trueBlue
- Captain
- Posts: 5548
- Joined: 06 Jul 2009, 22:50
- Type the number ten into the box: 10
Re: Yafaray4tS v0.9.0
Clinton,
Hope you are having a great weekend!
Would you mind sharing your latest and greatest YafaRay4tS.RsObj?
Hope you are having a great weekend!
Would you mind sharing your latest and greatest YafaRay4tS.RsObj?
-
clintonman
- Captain
- Posts: 5659
- Joined: 21 May 2009, 21:08
- Type the number ten into the box: 0
- Location: California
Re: Yafaray4tS v0.9.0
I'll have to get back to you on that. I noted one change but it was to RC19 which was released twice. Don't know if I have the new RC19 or the old, so need to re-download.trueBlue wrote: 28 Jul 2018, 22:35 Clinton,
Hope you are having a great weekend!
Would you mind sharing your latest and greatest YafaRay4tS.RsObj?
-
trueBlue
- Captain
- Posts: 5548
- Joined: 06 Jul 2009, 22:50
- Type the number ten into the box: 10
Re: Yafaray4tS v0.9.0
Okay thanks!
I never applied that update.
With regards to YafaRay materials:
Is the 'Alpha preview is inactive' button just for Transparency?
At the bottom of the YafaRay materials there is a 'D3D Preview' button.
Is that just for the Bump?
Also there is Receive Shadows.
Is that have anything to do with the Render Pass or is it for the material, or both?
Never have used Render Pass.
Do the attributes at the bottom of the materials that are for the Render Pass, need to be shown on the material interface?
Or are they per material settings for Render Pass?
I never applied that update.
With regards to YafaRay materials:
Is the 'Alpha preview is inactive' button just for Transparency?
At the bottom of the YafaRay materials there is a 'D3D Preview' button.
Is that just for the Bump?
Also there is Receive Shadows.
Is that have anything to do with the Render Pass or is it for the material, or both?
Never have used Render Pass.
Do the attributes at the bottom of the materials that are for the Render Pass, need to be shown on the material interface?
Or are they per material settings for Render Pass?
-
trueBlue
- Captain
- Posts: 5548
- Joined: 06 Jul 2009, 22:50
- Type the number ten into the box: 10
Re: Yafaray4tS v0.9.0
Blend Material Collection
Add Material button
Adds a new material Egg, selects it, opens the ME, and Inspect tool to inspect and paint.
I have the Blend material set to automatically load the Blend Material Collection into the scene, if it does not exist, open it's floating panel, reset the D3D Material Editor's default material.
Note: Reset ME material is for removing the Blend material from the ME.
Select Material button
Selects the BlendMaterial# in the Material combo control, opens the ME, and Inspect tool to inspect and paint.
Cube, Plane, and Text are locked down.
All objects have their inner panels set to not export. Show in the Stack.
Sphere, BlendMaterial1, and BlendMaterial2 have Edit controls for setting notes. IE material descriptions.
Workflow
With your object selected, Load the Blend material. The Blend Material Collection loads into the scene, selects the BlendMaterial1, and opens the Inspect tool.
Inspect and Paint that Blend material.
Select BlendMateral2 from the combo cntrl and press the Select Material buton.
Inspect and Paint the Blend material.
Inspect your object and press the Make Preview button.
Adjust the Blend amount and your done.
You can now delete or save your collection.
If you add another material to the collection, press the Update Material List button.
Removed due to update

- Capture.PNG (3.43 KiB) Viewed 4839 times
Adds a new material Egg, selects it, opens the ME, and Inspect tool to inspect and paint.
I have the Blend material set to automatically load the Blend Material Collection into the scene, if it does not exist, open it's floating panel, reset the D3D Material Editor's default material.
Note: Reset ME material is for removing the Blend material from the ME.
Select Material button
Selects the BlendMaterial# in the Material combo control, opens the ME, and Inspect tool to inspect and paint.
Cube, Plane, and Text are locked down.
All objects have their inner panels set to not export. Show in the Stack.
Sphere, BlendMaterial1, and BlendMaterial2 have Edit controls for setting notes. IE material descriptions.

With your object selected, Load the Blend material. The Blend Material Collection loads into the scene, selects the BlendMaterial1, and opens the Inspect tool.
Inspect and Paint that Blend material.
Select BlendMateral2 from the combo cntrl and press the Select Material buton.
Inspect and Paint the Blend material.
Inspect your object and press the Make Preview button.
Adjust the Blend amount and your done.
You can now delete or save your collection.
If you add another material to the collection, press the Update Material List button.
Removed due to update
-
trueBlue
- Captain
- Posts: 5548
- Joined: 06 Jul 2009, 22:50
- Type the number ten into the box: 10
Re: Yafaray4tS v0.9.0
Paint object with Blend material and render.clintonman wrote: 25 Jul 2018, 21:46Fix - update system trace error message to the new error handling systemtrueBlue wrote: 25 Jul 2018, 20:36 Fixed the typo in the Render Object button.
Re uploaded RC -19 in the previous post.
Here is a scene that shows that YafaRay does not recognize the Blend material when there is no materials applied.
Check the console.
YafaRay4tS/MaterialsFnSet around line 1382Code: Select all
function ExportBlendMaterial(MaterialNode) {
	var Errors = Node.AccessFnSet(System.ThisOwner() + '/ErrorsFnSet');
	if(!Node.Exists(Space.CurrentScene() + "/Blend Material Collection")) {
		//System.Trace("Error: Blend Material Collection not found. Skipping material export.");
		Errors.Add("Blend Material Collection not found. Skipping material export.");
		return;
	}
Error Found

- Blend Error.PNG (4.16 KiB) Viewed 4761 times
Error Found
- Blend Error.PNG (4.16 KiB) Viewed 4761 times
Replace YafaRay4tS.RsObj in the scene with a new one.
Is there a way to clear Errors Found in your new errors handling system after they are created?
I notice that in ErrorsFnSet you have:
Code: Select all
function Clear()
{
	message = '';
	IndexOfPolyFill();
}If not maybe you can give instructions in the error message on how to rectify the above issue.
-
clintonman
- Captain
- Posts: 5659
- Joined: 21 May 2009, 21:08
- Type the number ten into the box: 0
- Location: California
Re: Yafaray4tS v0.9.0
Yes.trueBlue wrote: 29 Jul 2018, 00:22 ...
With regards to YafaRay materials:
Is the 'Alpha preview is inactive' button just for Transparency?
...
Yes.trueBlue wrote: 29 Jul 2018, 00:22 ...
At the bottom of the YafaRay materials there is a 'D3D Preview' button.
Is that just for the Bump?
...
Only PassID is used for render passes and it's per material. The other attributes are for render control, but do not use the render pass system. If you make a simple scene and look at the xml file you can see those attributes belong in the material.trueBlue wrote: 29 Jul 2018, 00:22 ...
Do the attributes at the bottom of the materials that are for the Render Pass, need to be shown on the material interface?
Or are they per material settings for Render Pass?