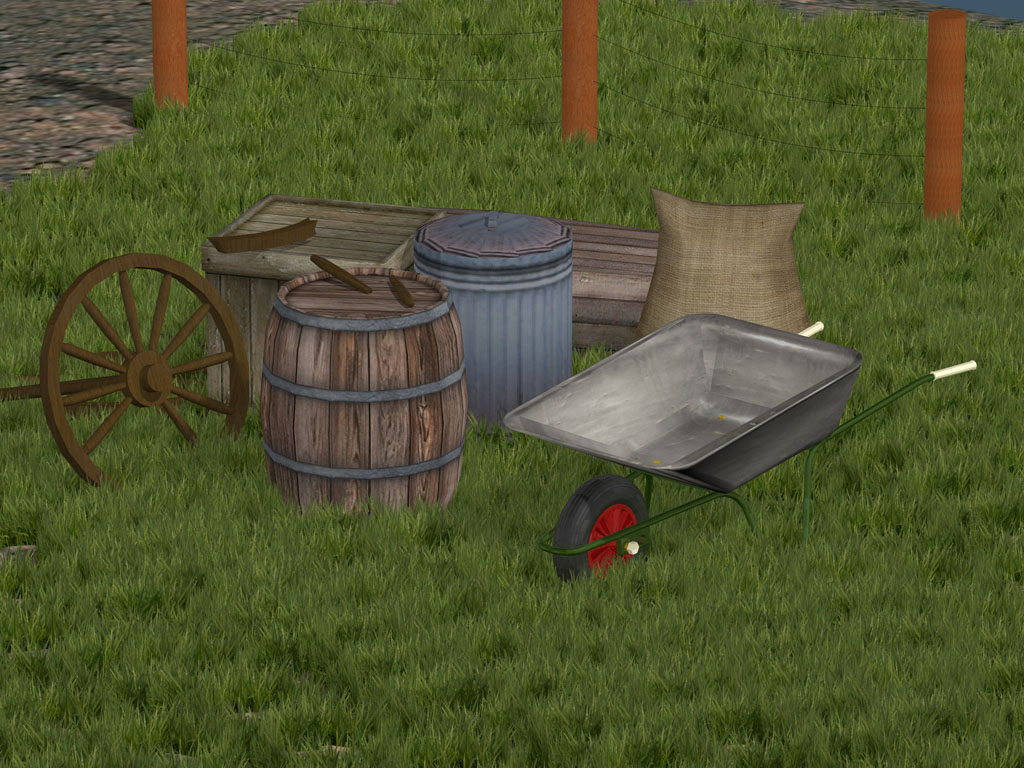
Hey all... lately I have been getting back into rendering and have been playing around with a couple of things that have eluded me for awhile now. Grass and Lighting. But I think I'm getting closer to something that is beginning to look a bit more realistic in manner of lighting. As for grass, I'm almost there... I can feel it. Here's a test render of one of my latest endeavours to test out these two things. I'm still working on it and getting things into place, but I feel like I'm getting close. Thought I would share it all with you. Please any comments or suggestions, feel free to let me know!
-=> Jim! <=-
Grass and Wheelbarrow
-
lrdsatyr8
- Petty Officer First Class
- Posts: 68
- Joined: 24 Mar 2013, 20:19
- Type the number ten into the box: 10
Grass and Wheelbarrow
- Attachments
-
Last edited by lrdsatyr8 on 24 Jan 2014, 17:45, edited 1 time in total.
-
lrdsatyr8
- Petty Officer First Class
- Posts: 68
- Joined: 24 Mar 2013, 20:19
- Type the number ten into the box: 10
Re: Grass and Wheelbarrow
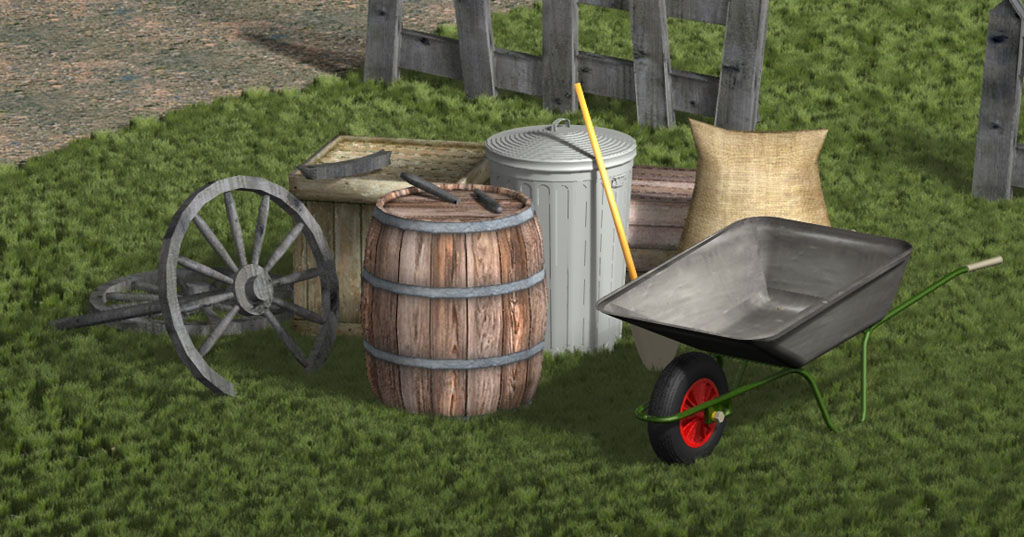
I forgot to mention, I'm doing all this in TrueSpace 7.61... trying to push the limits of what I've been learning with it and seeing just what I can do. Here's a second attempt. I didn't like the wire fence in the background so I replaced it with a old picket fence. I also didn't like the trash can so I fixed it and changed the texture on the wagon wheel. The major adjustment I did was was with the grass. Its just a transparent grass texture on the sides of a cube. In the first version I had 2 cubes, one was offset 45 degrees. But I had them too large and it makes it look like a wheat field almost. So I shortened them down and removed one of the cubes. Now it renders alot faster. Still not quite happy with it. Gonna have to tweak teh textures some more I think. Maybe dump the textured boxes and actually build each one individually. But I got the shadows looking about right. I like the softness to the edges and they aren't crisp. I'm not using a single infinite light to light this. It's all lit using Local Lights. Here's the second attempt... lemme know what you think. I'll keep working on it and am open to any suggestions or ideas.
Last edited by lrdsatyr8 on 24 Jan 2014, 17:53, edited 1 time in total.
-
Draise

- Captain
- Posts: 3200
- Joined: 21 Sep 2009, 19:33
- Type the number ten into the box: 0
- Location: Bogota, Colombia
Re: Grass and Wheelbarrel
The grass is looking great!!!! Is it translucent? Maybe that will give it that much more of a realistic look to it. I am impressed with the lawnmower guy - it is very nice but I could imagine taller tufts of it near different parts, like on the fence and around other areas hard to get to with the lawnmower.
Good idea about the cubes and textures!
and.. is this in realtime? Or are you using the MS?
Good idea about the cubes and textures!
and.. is this in realtime? Or are you using the MS?
-
lrdsatyr8
- Petty Officer First Class
- Posts: 68
- Joined: 24 Mar 2013, 20:19
- Type the number ten into the box: 10
Re: Grass and Wheelbarrel
Yeah I was thinking the same thing and am still working on it. Alot of little things that just don't feel right to me. But I'm getting closer, I can feel it. As for translucency, I'll have to give that a try and see if that gives it a better look.Draise wrote:The grass is looking great!!!! Is it translucent? Maybe that will give it that much more of a realistic look to it. I am impressed with the lawnmower guy - it is very nice but I could imagine taller tufts of it near different parts, like on the fence and around other areas hard to get to with the lawnmower.
No this isn't realtime, its all on the model side, but I should see how it looks on the WS side. I turned my bridge off awhile ago, seems to slow things down when rendering.Good idea about the cubes and textures!
and.. is this in realtime? Or are you using the MS?
-
lrdsatyr8
- Petty Officer First Class
- Posts: 68
- Joined: 24 Mar 2013, 20:19
- Type the number ten into the box: 10
Re: Grass and Wheelbarrow
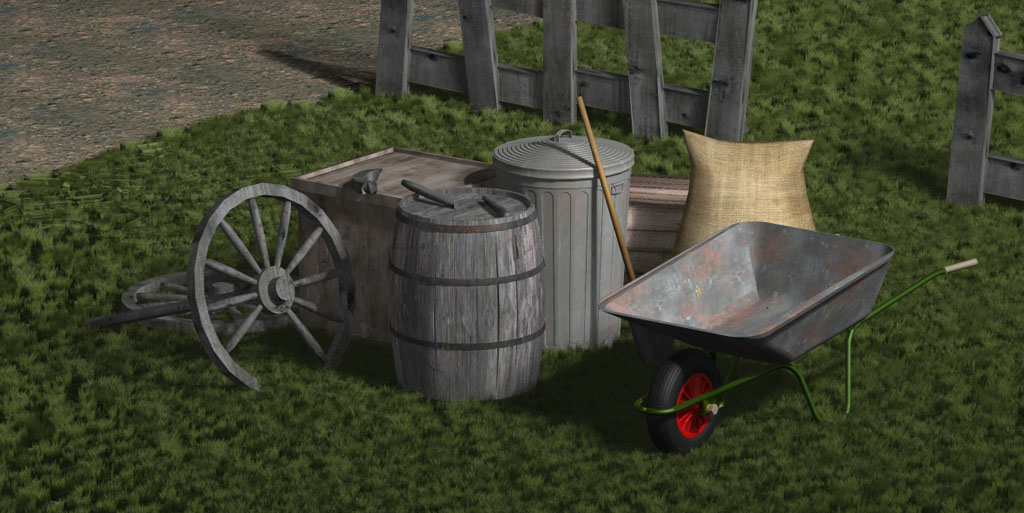
OK... here's the latest update. I made some changes. Still got some more work to do with it. With this iteration, I've built a barrel and box from scratch with individual pieces instead of a texture mapped box. I think they give it a bit more life. I also attempted to "dirty" up the wheel barrel and trash can a bit to give them a bit more character. I'm still in the process of remaking the wagonwheel and want to put some weeds and maybe even a couple of wild flowers on the ground somewhere. Seems the more I add to this, the longer it takes to render... don't know why! LOL... more to come as it progresses. Was thinking of doing the shadow of a tree somewhere, not sure yet thou.
Last edited by lrdsatyr8 on 24 Jan 2014, 17:54, edited 1 time in total.
-
jamesmc
- Captain
- Posts: 1776
- Joined: 08 Jul 2009, 15:35
Re: Grass and Wheelbarrel
"Baseball been very, very good to me".
Like the style and effort, looking good and all your would is that weathered gray (one of my favorites - gray wood). I would give some variation weathering by studying old gray wood so the items appear more natural. A normal or more bump would be good on the wooden objects.
Like the barrels below, weathered, the rings slipping from their original spots with some oxidation (rust).
The modeling is excellent.
Like the style and effort, looking good and all your would is that weathered gray (one of my favorites - gray wood). I would give some variation weathering by studying old gray wood so the items appear more natural. A normal or more bump would be good on the wooden objects.
Like the barrels below, weathered, the rings slipping from their original spots with some oxidation (rust).
The modeling is excellent.
- Attachments
-

- barrel_weathred.jpg (10.09 KiB) Viewed 5951 times
Walk by faith, not by sight.
-
spacekdet

- Captain
- Posts: 1810
- Joined: 27 May 2009, 15:00
- Type the number ten into the box: 10
- Location: On the day shift at the Utility Muffin Research Kitchen
Re: Grass and Wheelbarrel
Barrow.
Wheelbarrow.
Wheelbarrow.
-
lrdsatyr8
- Petty Officer First Class
- Posts: 68
- Joined: 24 Mar 2013, 20:19
- Type the number ten into the box: 10
Re: Grass and Wheelbarrow
Happy now?spacekdet wrote:Barrow.
Wheelbarrow.

Last edited by lrdsatyr8 on 24 Jan 2014, 17:55, edited 1 time in total.
-
lrdsatyr8
- Petty Officer First Class
- Posts: 68
- Joined: 24 Mar 2013, 20:19
- Type the number ten into the box: 10
Re: Grass and Wheelbarrow
I've always been terrible at bump maps and texturing. Really need to get some good pointers in that for TS. Would I 3D paint the objects in this case for the barrel?jamesmc wrote:Like the style and effort, looking good and all your would is that weathered gray (one of my favorites - gray wood). I would give some variation weathering by studying old gray wood so the items appear more natural. A normal or more bump would be good on the wooden objects.
That gives me alot of inspiration, just not sure how I'm going to impliment it to get the proper look to it.Like the barrels below, weathered, the rings slipping from their original spots with some oxidation (rust).
Thank you very much! I'm working on a much more detailed wagon wheel. I basically used this one as a low poly test subject.The modeling is excellent.
-
spacekdet
- Captain
- Posts: 1810
- Joined: 27 May 2009, 15:00
- Type the number ten into the box: 10
- Location: On the day shift at the Utility Muffin Research Kitchen
Re: Grass and Wheelbarrow
Stay away from 3D paint tool.
Bump or normal mapping is all you need.
Bump or normal mapping is all you need.
-
lrdsatyr8
- Petty Officer First Class
- Posts: 68
- Joined: 24 Mar 2013, 20:19
- Type the number ten into the box: 10
Re: Grass and Wheelbarrow
Should I unwrap the objects and then create a texture/bump map in PS?spacekdet wrote:Stay away from 3D paint tool.
Bump or normal mapping is all you need.
-
jamesmc
- Captain
- Posts: 1776
- Joined: 08 Jul 2009, 15:35
Re: Grass and Wheelbarrow
lrdsatyr8 wrote:Should I unwrap the objects and then create a texture/bump map in PS?spacekdet wrote:Stay away from 3D paint tool.
Bump or normal mapping is all you need.
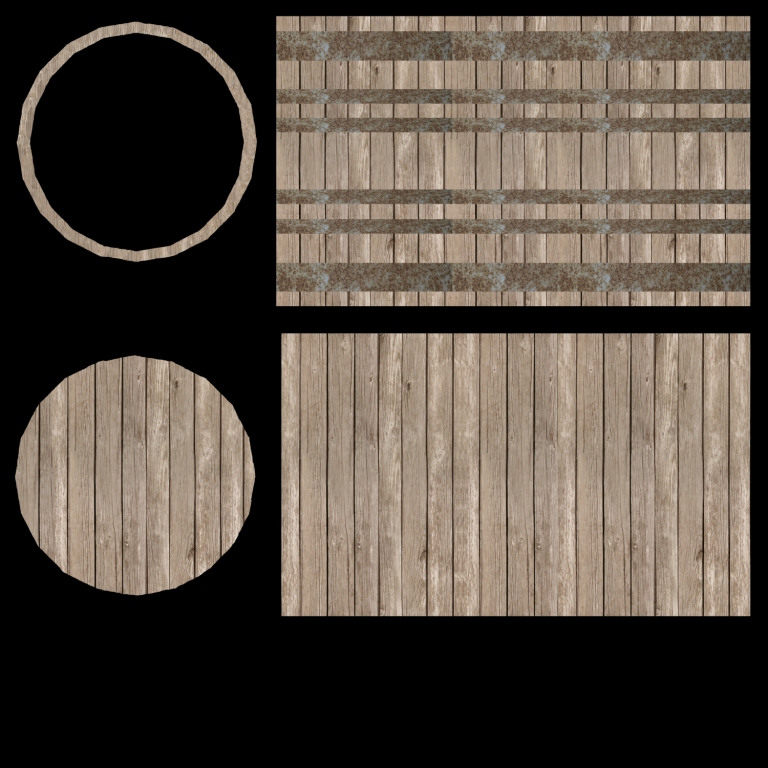
That's the way I would do it for the barrel.
Two ends o o - for slat like wood in different direction
Two end wooden rings on end (0) (0) - so the wood can run in proper direction on rings
Metal Rings - to get that metal rusted look or that rusted metal look.

Middle barrel part for slate boards.
You could either use the textures for the bump maps or use the black and white function in PS to make a gray scale bump.
Could look like this guys texture map.
- Attachments
-
Walk by faith, not by sight.
-
Finis

- Captain
- Posts: 5410
- Joined: 21 May 2009, 18:26
- Type the number ten into the box: 0
- Location: America!
Re: Grass and Wheelbarrow
I like the arraignment of the objects.
On model side or pre 7.5 versions of TS you can use the standard UV's for most things. Use cylindrical for the main body of course and planar for the top and bottom. Don't know about workspace but TS's UV unwrap tools aren't great.
On model side or pre 7.5 versions of TS you can use the standard UV's for most things. Use cylindrical for the main body of course and planar for the top and bottom. Don't know about workspace but TS's UV unwrap tools aren't great.
I prefer dangerous freedom over peaceful servitude. -- Thomas Jefferson/Jean Jacques Rousseau
-
lrdsatyr8
- Petty Officer First Class
- Posts: 68
- Joined: 24 Mar 2013, 20:19
- Type the number ten into the box: 10
Re: Grass and Wheelbarrow
There's only one problem with that. Its not a solid object, it's comprised of several different objects. So unwrapping maybe a problem. However, I maybe able to come up with another solution. Will mess around with it this week and see how it looks. Here's the latest update.
Something I've always found a bit annoying is that some tranparent textures leave a single pixel line of garbage at the top of the texture, no matter what you do it fix it (I've tried adjusting the texture to be only .90 percent on the U and the V, adjusting the offset and nothing seems to get rid of it. You can see what I mean in this render. Any suggestions there?

-
Steinie

- Captain
- Posts: 2958
- Joined: 21 May 2009, 17:38
- Type the number ten into the box: 10
Re: Grass and Wheelbarrow
Your image has improved from the first try. However I get a cold feeling about the lighting and the objects still feel somewhat flat.
I would add a little yellow to the light to add warmth. It looks like you are using one light source coming from the top right.
Adding a secondary light (maybe soft red in color) originating from behind and left of center, with shadows turned off could add interest.
What rendering engine are you using? What light types? The work you have done is admirable so far.
I would add a little yellow to the light to add warmth. It looks like you are using one light source coming from the top right.
Adding a secondary light (maybe soft red in color) originating from behind and left of center, with shadows turned off could add interest.
What rendering engine are you using? What light types? The work you have done is admirable so far.
-
lrdsatyr8
- Petty Officer First Class
- Posts: 68
- Joined: 24 Mar 2013, 20:19
- Type the number ten into the box: 10
Re: Grass and Wheelbarrow
Yeah... I get that feeling too... like something is missing.Steinie wrote:Your image has improved from the first try. However I get a cold feeling about the lighting and the objects still feel somewhat flat.
Actually I'm using about 150 different colored Local Lights in various grouped clusters at a low intensity setting. The first group is my main light source and has shadowing turned on. The lights are spread out evenly in a large circular formation to give the shadows a soft edge. The second group is much like the first only alot smaller to give the darker central shadows. The third has shadowing turned off and is in a ring that surrounds the entire scene to allow the shadows from the first two to not be so harsh and to simulate the reflective light from the surroundings. Either way, it'll be a be a harder to change all the light settings in the clusters.I would add a little yellow to the light to add warmth. It looks like you are using one light source coming from the top right. Adding a secondary light (maybe soft red in color) originating from behind and left of center, with shadows turned off could add interest.
I've been using the LightWorks engine. I missed being able to get the free V-Ray engine. Pity thou. I'm having trouble trying to get the indigo and yafaray plugins working. Not sure how to get them working right. Thanks for the compliments... it's mainly just an experiment to see just what I can do and a learning experience. I've been working in tS since version 3.What rendering engine are you using? What light types? The work you have done is admirable so far.
-
Finis
- Captain
- Posts: 5410
- Joined: 21 May 2009, 18:26
- Type the number ten into the box: 0
- Location: America!
Re: Grass and Wheelbarrow
Lightworks, so you are on model side TS 7.6x or an older version.
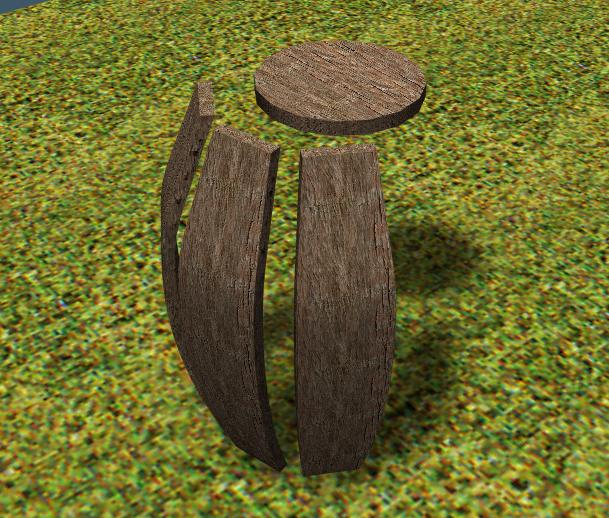
Here are some barrel parts, TS 7.6 model side, each having standard TS cubic projection applied. No unwrapping. Lighting is one infinite light with mapped shadows and the global environment light with no shadows.
If you liked VRay you could try Kerkythea for a realistic render. Export to obj to send things to it.
Here are some barrel parts, TS 7.6 model side, each having standard TS cubic projection applied. No unwrapping. Lighting is one infinite light with mapped shadows and the global environment light with no shadows.
If you liked VRay you could try Kerkythea for a realistic render. Export to obj to send things to it.
- Attachments
-
I prefer dangerous freedom over peaceful servitude. -- Thomas Jefferson/Jean Jacques Rousseau
-
lrdsatyr8
- Petty Officer First Class
- Posts: 68
- Joined: 24 Mar 2013, 20:19
- Type the number ten into the box: 10
Re: Grass and Wheelbarrow
Yes... I'm using the latest 7.61 version of TS on the model side. But I attempted to get the same "fuzzy" shadows you did using only 2 lights like you said and for the life of me it doesn't work. I always end up getting sharp unrealistic shadows... mind sharing in more detail your light setup there? Pwease??Finis wrote:Lightworks, so you are on model side TS 7.6x or an older version.
Here are some barrel parts, TS 7.6 model side, each having standard TS cubic projection applied. No unwrapping. Lighting is one infinite light with mapped shadows and the global environment light with no shadows.
I got the plugin for Kerkythea but for the life of me couldn't figure out how to get it installed and running. Any help there would be great too! Ever since they changed the whole layout in TS in 7.x I've been lost. I love alot of the new tools, but always find myself working on the model side all the time. I must be missing something somewhere. Someone needs to do some more tutorials for us old timers!If you liked VRay you could try Kerkythea for a realistic render. Export to obj to send things to it.

-
Finis
- Captain
- Posts: 5410
- Joined: 21 May 2009, 18:26
- Type the number ten into the box: 0
- Location: America!
Re: Grass and Wheelbarrow
I usually start with Map Size = 1024, Sharpness = 2, Quality = 8 for mapped shadows. Mapped shadows don't work if the light has transparent shadows on.
Here's what the mapped shadow controls do:
Map Size: Blotches on edges. Low size makes blotches or blobs in the edges.
Sharpness: Low is sharper. Controls the blurriness of edges. The shadow is bigger and blurrier for higher settings.
Quality: Pixelation of blurry area. Like the blotches of map size but smaller and sharper. Higher values make smoother shadows.
When using the Global Illumination light as fill, to simulate GI, I select some mostly white image, no shadows, use only GE off, show GE image off, back intensity zero, light intensity adjust to desired effect.
Kerkythea: I didn't know there was a plugin. I did these here and here by export/import of obj files. Remember that KT sees the materials/textures not objects. So a TS cube with a different color applied to each face would be 6 "objects" in KT.
Here's what the mapped shadow controls do:
Map Size: Blotches on edges. Low size makes blotches or blobs in the edges.
Sharpness: Low is sharper. Controls the blurriness of edges. The shadow is bigger and blurrier for higher settings.
Quality: Pixelation of blurry area. Like the blotches of map size but smaller and sharper. Higher values make smoother shadows.
When using the Global Illumination light as fill, to simulate GI, I select some mostly white image, no shadows, use only GE off, show GE image off, back intensity zero, light intensity adjust to desired effect.
Kerkythea: I didn't know there was a plugin. I did these here and here by export/import of obj files. Remember that KT sees the materials/textures not objects. So a TS cube with a different color applied to each face would be 6 "objects" in KT.
I prefer dangerous freedom over peaceful servitude. -- Thomas Jefferson/Jean Jacques Rousseau
-
lrdsatyr8
- Petty Officer First Class
- Posts: 68
- Joined: 24 Mar 2013, 20:19
- Type the number ten into the box: 10
Re: Grass and Wheelbarrow
Hey Finis... thanks for the info... but for some reason it still doesn't work. The only way that I could get it to work is if I used an array of Local Lights. I think it may have something to do with the fact that I'm using TS 7.61 in an XP SP3 environment. I think 32bit windows aren't able to handle the map sizes of a single Inf Light source, but it still may just be something I'm doing wrong. Waiting for a render to finish and will upload an update.
-
Finis
- Captain
- Posts: 5410
- Joined: 21 May 2009, 18:26
- Type the number ten into the box: 0
- Location: America!
Re: Grass and Wheelbarrow
I've got TS 7.6 (and 5 and 3) on 32bit XP Pro SP3. Pentium D dual core (the first 2-core cpu's), 3.6 GHz, 2Gb memory. Your scene should render in seconds with the Inf + GE lights.
How does it behave? Are the shadows still sharp? Be sure that transparent shadows are off on the inf light. Mapped won't work if the light has 'em. Of course, be sure the light's shadows are set to mapped (duh!). Try experimenting in a simple scene with just a mapped shadow light and a couple of objects.
Whatever lights the scene is looking better each time you work on it.
How does it behave? Are the shadows still sharp? Be sure that transparent shadows are off on the inf light. Mapped won't work if the light has 'em. Of course, be sure the light's shadows are set to mapped (duh!). Try experimenting in a simple scene with just a mapped shadow light and a couple of objects.
Whatever lights the scene is looking better each time you work on it.
I prefer dangerous freedom over peaceful servitude. -- Thomas Jefferson/Jean Jacques Rousseau
-
lrdsatyr8
- Petty Officer First Class
- Posts: 68
- Joined: 24 Mar 2013, 20:19
- Type the number ten into the box: 10
Re: Grass and Wheelbarrow
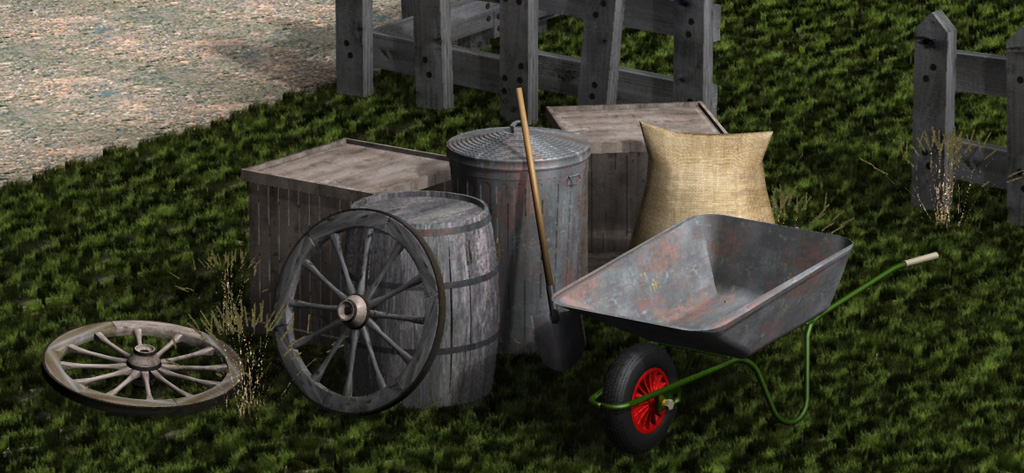
Ok... here's my latest rendering with the new light rig I've made.
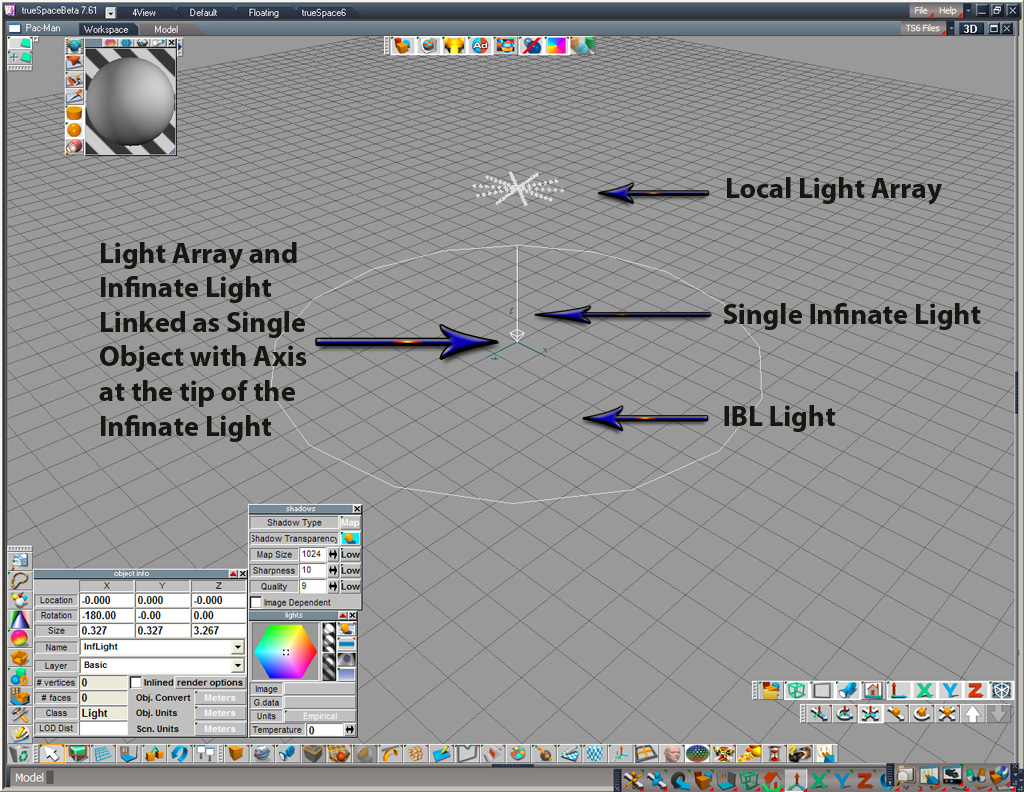
Its still looking better, but seems that the dark areas of the shadow are still too dark. I have to put a couple of local lights near where the shadows are darkest to lighten them up. Here's my light rig setup.
As you can see, Its pretty basic but it's the only way I can achieve the blurry edge shadows. Here's a test rendering to give an idea of what I was talking about having to place a couple of local lights around the base to lighten up the shadows a bit more, but it still isn't quite right.
Take note of the 3 small inf lights I placed behind the plant to lighten the shadow a bit. If they weren't there it would be almost black in the middle.

-
spacekdet
- Captain
- Posts: 1810
- Joined: 27 May 2009, 15:00
- Type the number ten into the box: 10
- Location: On the day shift at the Utility Muffin Research Kitchen
Re: Grass and Wheelbarrow
Do you have an image assigned to the IBL?
(Gradient images work great)
Since you're already using it, it should work for the fill light and you won't need the glued infinite/local for shadow fill.
It will be a lot slower, but usually looks nicer.
A couple notes on IBL, right click on the intensity slider and you can manually input a higher number than just the slider allows. (this works for almost any light).
Right click on IBL icon to bring up options. Fully expand light panel by clicking the red arrow.
This allows input of image for IBL.
An IBL can be used without assigning an image. Color can be changed.
Once an image is assigned, it can only be changed, but not deleted.
Increasing resolution parameter effectively increases the # of virtual lights the IBL contains, also brightening it.
It's basically an array light just like the one you built, only sphere shaped, with color/intensity/direction dependent on the image assigned to it.
Scaling up your array in size might also help.
UPDATE: Couple more observations: the color of the can is very similar to the color of the wheelbarrow and to the color of the wagon wheels. Maybe introduce a little more variation. Maybe the barrow was repainted at some point.
It also appears 'modern' while the rest of the stuff is antique.
It feels a little awkward plopped down there in the middle of the lawn- maybe it would be better piled against the fence.
(Gradient images work great)
Since you're already using it, it should work for the fill light and you won't need the glued infinite/local for shadow fill.
It will be a lot slower, but usually looks nicer.
A couple notes on IBL, right click on the intensity slider and you can manually input a higher number than just the slider allows. (this works for almost any light).
Right click on IBL icon to bring up options. Fully expand light panel by clicking the red arrow.
This allows input of image for IBL.
An IBL can be used without assigning an image. Color can be changed.
Once an image is assigned, it can only be changed, but not deleted.
Increasing resolution parameter effectively increases the # of virtual lights the IBL contains, also brightening it.
It's basically an array light just like the one you built, only sphere shaped, with color/intensity/direction dependent on the image assigned to it.
Scaling up your array in size might also help.
UPDATE: Couple more observations: the color of the can is very similar to the color of the wheelbarrow and to the color of the wagon wheels. Maybe introduce a little more variation. Maybe the barrow was repainted at some point.
It also appears 'modern' while the rest of the stuff is antique.
It feels a little awkward plopped down there in the middle of the lawn- maybe it would be better piled against the fence.
-
Finis
- Captain
- Posts: 5410
- Joined: 21 May 2009, 18:26
- Type the number ten into the box: 0
- Location: America!
Re: Grass and Wheelbarrow
Here is a simple scene with mapped shadows infinite light and no shadows GE light. If this doesn't work with your 7.6x TS then it is not "user error". Note: Lights with mapped shadows must have regular non-transparent shadows turned on.
When you just want a fill light use the GE light. It is very fast compared to IBL. Downside: You can only have one. You can't rotate or scale it so that is a problem when using it when you want to see its image in the background. IBL is better for that. Note: GE light must have an image or there is no light from it.
When you just want a fill light use the GE light. It is very fast compared to IBL. Downside: You can only have one. You can't rotate or scale it so that is a problem when using it when you want to see its image in the background. IBL is better for that. Note: GE light must have an image or there is no light from it.
- Attachments
-
- MapShadowsScene76.zip
- (34.72 KiB) Downloaded 227 times
I prefer dangerous freedom over peaceful servitude. -- Thomas Jefferson/Jean Jacques Rousseau
-
spacekdet
- Captain
- Posts: 1810
- Joined: 27 May 2009, 15:00
- Type the number ten into the box: 10
- Location: On the day shift at the Utility Muffin Research Kitchen
Re: Grass and Wheelbarrow
GE or GI?
One influences laws and elections with vast sums of money, the other is used in 3D. Better specify, I might get them mixed up.
One other note on IBL, I usually use raytraced shadows.
Last night's experiment is here.
Looking further at your render, there's something off about the scale of the various objects.
The shovel looks small compared to the trash can.
Wagon wheels come in various sizes, but those look quite small.
Right now it's a collection of objects, can you make them 'tell a story'?
One influences laws and elections with vast sums of money, the other is used in 3D. Better specify, I might get them mixed up.
One other note on IBL, I usually use raytraced shadows.
Last night's experiment is here.
Looking further at your render, there's something off about the scale of the various objects.
The shovel looks small compared to the trash can.
Wagon wheels come in various sizes, but those look quite small.
Right now it's a collection of objects, can you make them 'tell a story'?
-
Finis
- Captain
- Posts: 5410
- Joined: 21 May 2009, 18:26
- Type the number ten into the box: 0
- Location: America!
Re: Grass and Wheelbarrow
Global environment light. Not global illumination like Vray.
I prefer dangerous freedom over peaceful servitude. -- Thomas Jefferson/Jean Jacques Rousseau
-
spacekdet
- Captain
- Posts: 1810
- Joined: 27 May 2009, 15:00
- Type the number ten into the box: 10
- Location: On the day shift at the Utility Muffin Research Kitchen
Re: Grass and Wheelbarrow
Never too old to learn.
Not familiar with this one.
trueSpace is still full of surprises even after all these years.
Not familiar with this one.
trueSpace is still full of surprises even after all these years.
-
Steinie
- Captain
- Posts: 2958
- Joined: 21 May 2009, 17:38
- Type the number ten into the box: 10
Re: Grass and Wheelbarrow
This thread was about lighting but I too notice that the setup of the scene is kind of boring. Put the sack IN the wheel barrow
and lay the hoe on top of the sack. I would lean the wagon wheels back along the fence.
As far as lighting I would get some yellow lighting into the scene to add warmth. Too much gray/blue giving the viewer a cold feeling.
and lay the hoe on top of the sack. I would lean the wagon wheels back along the fence.
As far as lighting I would get some yellow lighting into the scene to add warmth. Too much gray/blue giving the viewer a cold feeling.
-
marcel

- Captain
- Posts: 2247
- Joined: 21 May 2009, 19:52
- Type the number ten into the box: 0
- Location: paris - France
Re: Grass and Wheelbarrow
There are two ways of working light:
As a photographer who search photorealism and it is important to have the appropriate renderer (as does Rayman).
As a painter who wants to put the light where he wants without worrying about reality.
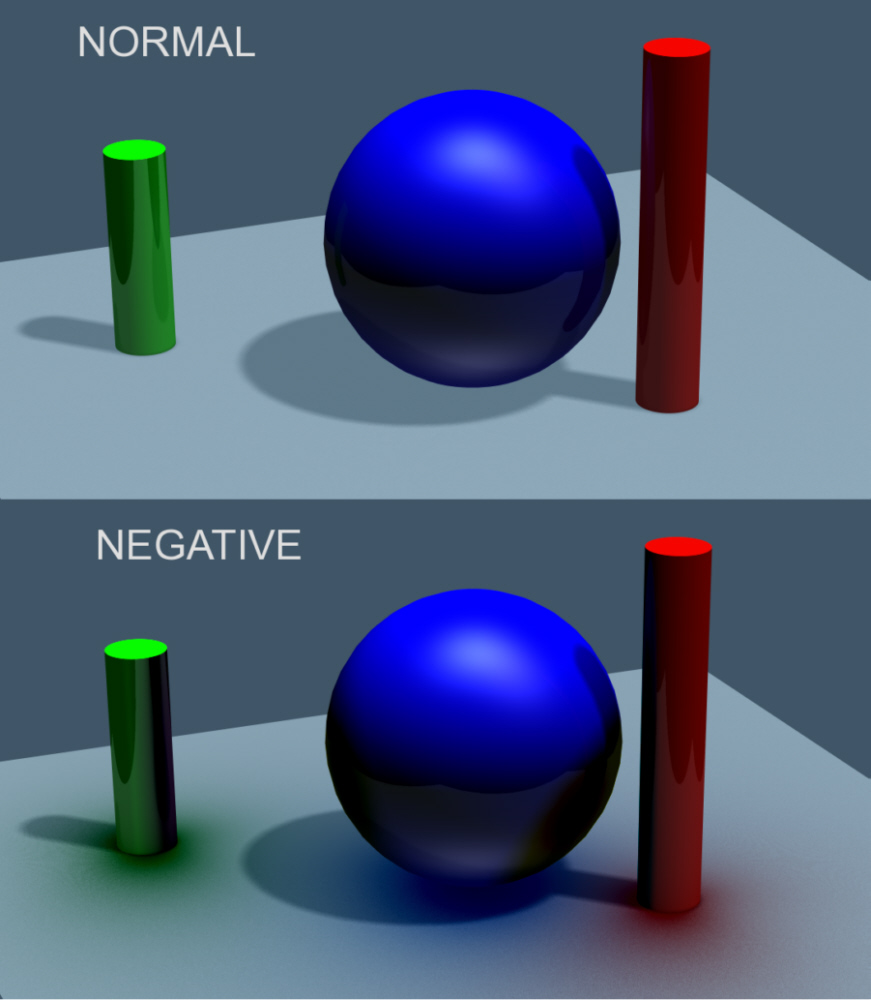
With Lightwork we often forget that the light can be negative and sometimes it is interesting to associate a negative light color compared to the color of an object, choose a negative intensity, then glue the lamp and the object (the lamp is inside the object). The object can be moved and his colored shadows follow. Thus, each part of an illustration have its light adjusting.
Negative lights work well with loclights and no cast shadow. However, all types of lights can be negative to create artistic effects. The rendering is very fast and requires only a few seconds because there are very few sources of light Compared to a truly global illumination (the rendering engine multiplicity light sources based on user settings) and it acts on the entire scene, while a negative light may be sufficient to correct a detail only when the rest looks ok.
Here is a sample of a lightwork render with and without the negative lights. Time to render is the same for both.
As a photographer who search photorealism and it is important to have the appropriate renderer (as does Rayman).
As a painter who wants to put the light where he wants without worrying about reality.
With Lightwork we often forget that the light can be negative and sometimes it is interesting to associate a negative light color compared to the color of an object, choose a negative intensity, then glue the lamp and the object (the lamp is inside the object). The object can be moved and his colored shadows follow. Thus, each part of an illustration have its light adjusting.
Negative lights work well with loclights and no cast shadow. However, all types of lights can be negative to create artistic effects. The rendering is very fast and requires only a few seconds because there are very few sources of light Compared to a truly global illumination (the rendering engine multiplicity light sources based on user settings) and it acts on the entire scene, while a negative light may be sufficient to correct a detail only when the rest looks ok.
Here is a sample of a lightwork render with and without the negative lights. Time to render is the same for both.
- Attachments
-
Design - illustration - Animation
http://www.crea-vision.fr
http://www.crea-vision.fr
-
lrdsatyr8
- Petty Officer First Class
- Posts: 68
- Joined: 24 Mar 2013, 20:19
- Type the number ten into the box: 10
Re: Grass and Wheelbarrow
Ok... I realize my scene isn't the best looking one in the world. But then again, I never really was worried about the objects in it themselves. It started out as a study to find out if I could make a realistic looking grass and if I could get fuzzy shadows. It's kinda grown from that! The way I see the piece now is that the grounds keeper of Wild West Attraction at Disney World went to lunch. He'll be back in an hour! LOL 
-
Draise
- Captain
- Posts: 3200
- Joined: 21 Sep 2009, 19:33
- Type the number ten into the box: 0
- Location: Bogota, Colombia
Re: Grass and Wheelbarrow
This is great!!!
I remember writing a post on here but I think I lost it before it sent.
Anyway, keep up the experimenting, the more one's feet gets wet, the more you want to dive right in! I love 3D cause of that..
For some cool sunlight/fuzzy directional shadows, I use an array of Infinite lights/Directional lights. You have the center one, then a whole bunch of smaller ones that are slightly off axis but generally pointing in the same direction. You get some nice shadows that way - like in ray based renderes like Arnold or Vray or something..
I remember writing a post on here but I think I lost it before it sent.
Anyway, keep up the experimenting, the more one's feet gets wet, the more you want to dive right in! I love 3D cause of that..
For some cool sunlight/fuzzy directional shadows, I use an array of Infinite lights/Directional lights. You have the center one, then a whole bunch of smaller ones that are slightly off axis but generally pointing in the same direction. You get some nice shadows that way - like in ray based renderes like Arnold or Vray or something..
-
lrdsatyr8
- Petty Officer First Class
- Posts: 68
- Joined: 24 Mar 2013, 20:19
- Type the number ten into the box: 10
Re: Grass and Wheelbarrow
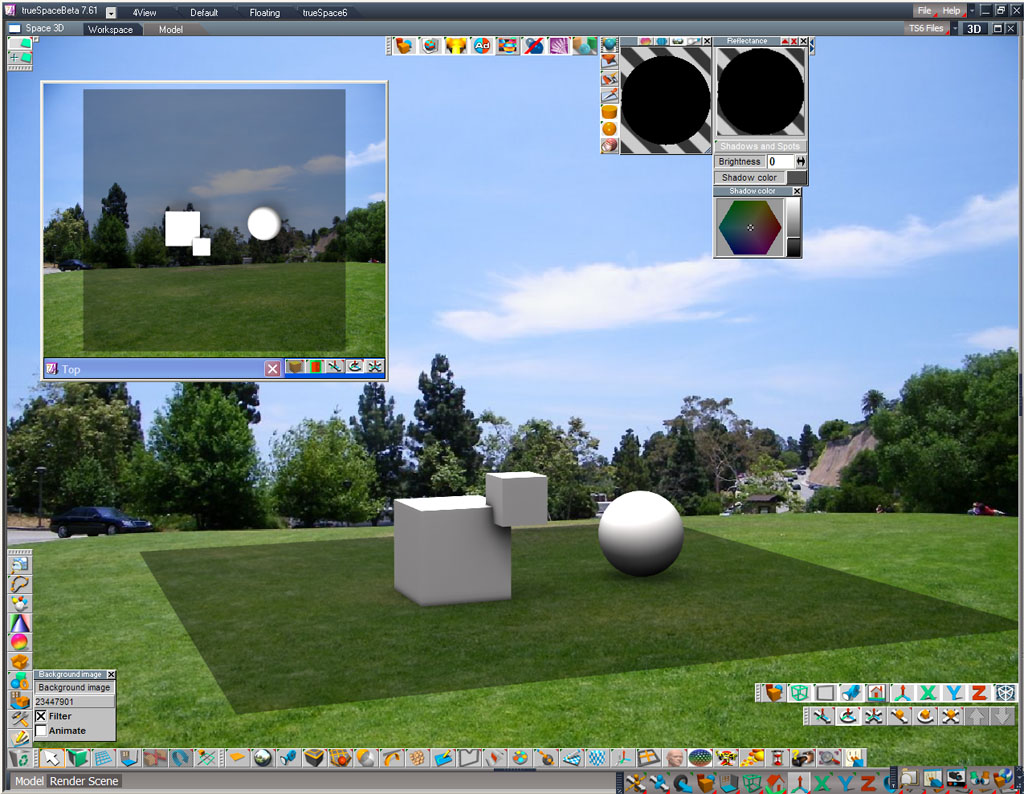
I tried out your example and it worked fine for a plane with a color/texture on it. However, if you change the texture/color to ShadowCatcher it don't work anymore! I do alot of work on photographs for my job, and using the ShadowCatcher to cast faux shadows on the background image is important, but for some reason, when using a GI light, the SC catches every single shadow without taking into account the fuzzy factor. So you end up with a bunch of sharp shadows that you don't want in your image. It also ends up darkening the entire SC object so that what isn't collecting shadows isn't transparent anymore. Any ideas to fix this?Finis wrote:Here is a simple scene with mapped shadows infinite light and no shadows GE light. If this doesn't work with your 7.6x TS then it is not "user error". Note: Lights with mapped shadows must have regular non-transparent shadows turned on.
-
Finis
- Captain
- Posts: 5410
- Joined: 21 May 2009, 18:26
- Type the number ten into the box: 0
- Location: America!
Re: Grass and Wheelbarrow
Hmm, don't know about shadow catcher. I guess you'll have to use the IBL instead of GE for that part of the lighting with a shadow catcher. Only disadvantage there is render time. IBL is slow. Does the infinite light with mapped shadows work with a shadow catcher?
I prefer dangerous freedom over peaceful servitude. -- Thomas Jefferson/Jean Jacques Rousseau
-
lrdsatyr8
- Petty Officer First Class
- Posts: 68
- Joined: 24 Mar 2013, 20:19
- Type the number ten into the box: 10
Re: Grass and Wheelbarrow
It works but it makes the rest of the object that is painted with the SC texture dark as if it is covered with window tinting. You can still see thru it, but whatever is behind it the color is messed up from the shading of the tint as you can see from my screen cap.Finis wrote:Hmm, don't know about shadow catcher. I guess you'll have to use the IBL instead of GE for that part of the lighting with a shadow catcher. Only disadvantage there is render time. IBL is slow. Does the infinite light with mapped shadows work with a shadow catcher?