I changed the curve of the road so it went more to the left. That activated the incorrect render bug even though the camera is far from the road. I refined the patch like Marcel advised but then the refined part of the road was distorted. I converted to mesh and, unlike the last time I tried that where it still rendered wrong, it rendered like the wireframe. Too much like the wireframe. The smoothness of the nurb road was gone and the segments were visible.
So I will leave the road curving toward the viewer as in the recent images.
I found another problem. If I use miles for the units then the accuracy to place the road and smaller items isn't there and the depth cue doesn't work. If I use a scale like 1 inch = 1 foot then the scene is 32000+ inches wide and depth cue near and far settings only go to 1000. I tried to changed it to yards which should give enough accuracy and small enough numbers for depth cue but when I change the world (or is it scene) units then the objects units aren't converted or change back to inches. Also when I try to correct that by resizing the whole scene, all objects selected, the SDS object's measurements and location change to gibberish like "3.#-0" and are not visible. Typing numbers in the panel does no good. It just returns to the gibberish.
I'll try remaking the tower array with the non-SDS unioned together towers, converting the array to a group so it won't move on scene reload, and resizing to appropriate measurements in yards. If that doesn't work then I'll render without depth cue and do some post processing in Paint Shop. Or maybe I'll just skip the attempt to resize and use depth cue.
Elegant Bridge
-
Finis

- Captain
- Posts: 5410
- Joined: 21 May 2009, 18:26
- Type the number ten into the box: 0
- Location: America!
Re: Elegant Bridge
I prefer dangerous freedom over peaceful servitude. -- Thomas Jefferson/Jean Jacques Rousseau
-
marcel

- Captain
- Posts: 2247
- Joined: 21 May 2009, 19:52
- Type the number ten into the box: 0
- Location: paris - France
Re: Elegant Bridge
inch, foot, yard, ... i think it is not easy to reduce a scale and understand what represent the news values. Ts have the same problem with very little object than very big object. i use the middle scale with decimal (meters). i "think" the scale: my object have a size of 8, it is a 8 centimeters bottle or a 8 meters house, etc... and if i need to scale the object at his real size i move the decimal on the panel info not the scale of the scene, the number remains the same. it is more convenient but especially when the decimal system is the standard in the country where you live. 
Design - illustration - Animation
http://www.crea-vision.fr
http://www.crea-vision.fr
-
Finis
- Captain
- Posts: 5410
- Joined: 21 May 2009, 18:26
- Type the number ten into the box: 0
- Location: America!
Re: Elegant Bridge
Good point. If I change to metric units then I get that benefit and a meter is close enough to a yard for me to still have the intuitive feel of how big something is.
My scaling problem is mostly coming from the depth cue tool's limit of 1000 units. So I probably will just not use the depth cue and do that in post process. There are threads in this forum about making depth masks for post processing if I want to really get a depth cue effect. I just want to blur the distant horizon slightly and that should be easy to do in Paint Shop.
I'll do more on this with Messiah's renderer and animation abilities but I want to finish a nice image for this project with TS. It is a kind of farewell to TS as my main 3D thing. It will still be my modeler until I can get Silo.
My scaling problem is mostly coming from the depth cue tool's limit of 1000 units. So I probably will just not use the depth cue and do that in post process. There are threads in this forum about making depth masks for post processing if I want to really get a depth cue effect. I just want to blur the distant horizon slightly and that should be easy to do in Paint Shop.
I'll do more on this with Messiah's renderer and animation abilities but I want to finish a nice image for this project with TS. It is a kind of farewell to TS as my main 3D thing. It will still be my modeler until I can get Silo.
I prefer dangerous freedom over peaceful servitude. -- Thomas Jefferson/Jean Jacques Rousseau
-
marcel
- Captain
- Posts: 2247
- Joined: 21 May 2009, 19:52
- Type the number ten into the box: 0
- Location: paris - France
Re: Elegant Bridge
For the post precessing you need a z render. you can use it to simulate a depht cue but also it is interesting to increase the contrast near and reduce the contrast far. you can work the background, then invert the mask and work the foreground.
Design - illustration - Animation
http://www.crea-vision.fr
http://www.crea-vision.fr
-
Finis
- Captain
- Posts: 5410
- Joined: 21 May 2009, 18:26
- Type the number ten into the box: 0
- Location: America!
Re: Elegant Bridge
I remade the tower array using the single object versions instead of the groups with the save/load movement problem and converted the spline array to a group. Now it saves and loads fine. Those towers didn't get the strange coordinates problem so I shrunk the scene until it is less than 1000 units across so the depth of field will work.
What can I do about the land where it goes into the water?
I don't have anything to unwrap the island texture so I can paint a beach on the appropriate areas and then use that as a texture. Maybe I can find an aerial photo of a beach with plants inland and use it as a texture. I could make some rocks and place them along the water line and up on the land but fading in size and frequency so there is a transition from plants to rocks.
Still need a different texture for the plants.
Attempts to paint faces of the island with rock texture cause TS to crash.
What can I do about the land where it goes into the water?
I don't have anything to unwrap the island texture so I can paint a beach on the appropriate areas and then use that as a texture. Maybe I can find an aerial photo of a beach with plants inland and use it as a texture. I could make some rocks and place them along the water line and up on the land but fading in size and frequency so there is a transition from plants to rocks.
Still need a different texture for the plants.
Attempts to paint faces of the island with rock texture cause TS to crash.
I prefer dangerous freedom over peaceful servitude. -- Thomas Jefferson/Jean Jacques Rousseau
-
spacekdet

- Captain
- Posts: 1810
- Joined: 27 May 2009, 15:00
- Type the number ten into the box: 10
- Location: On the day shift at the Utility Muffin Research Kitchen
Re: Elegant Bridge
Try prepping the texture first, then Point Edit selecting them, then hit Paint Face. Worth a shot!Finis wrote:
Attempts to paint faces of the island with rock texture cause TS to crash.
-
Finis
- Captain
- Posts: 5410
- Joined: 21 May 2009, 18:26
- Type the number ten into the box: 0
- Location: America!
Re: Elegant Bridge
That helped some Spacekdet. Painting faces turned out not to produce suitable results though.
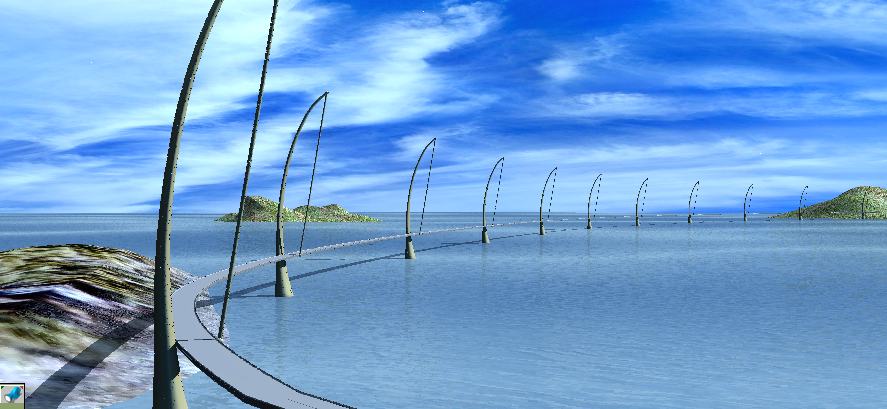
Here is a method I'm experimenting with. Goal: to paint an island texture with a beach. First I made a render of the island with top view and color only render. Then in Paint Shop I made layers so the island is transparent into the bottom layer. The bottom layer has the vegetation image. Then I clone brushed with low density around the edge with a rock texture.
I applied that texture to the island in TS and used Primitive Itch UV Tools to rotate, size, and position it over the island above sea level.
Now to find or make a high res texture that works for the main vegetation and then make a high res texture with a beach with this method.
The road still has a render deflection near the viewer. I can if I make the picture taller it will move that out of the area I want.
Here is a method I'm experimenting with. Goal: to paint an island texture with a beach. First I made a render of the island with top view and color only render. Then in Paint Shop I made layers so the island is transparent into the bottom layer. The bottom layer has the vegetation image. Then I clone brushed with low density around the edge with a rock texture.
I applied that texture to the island in TS and used Primitive Itch UV Tools to rotate, size, and position it over the island above sea level.
Now to find or make a high res texture that works for the main vegetation and then make a high res texture with a beach with this method.
The road still has a render deflection near the viewer. I can if I make the picture taller it will move that out of the area I want.
- Attachments
-

- BaseOverhead.jpg (3.41 KiB) Viewed 4862 times
-
-

I prefer dangerous freedom over peaceful servitude. -- Thomas Jefferson/Jean Jacques Rousseau
-
Finis
- Captain
- Posts: 5410
- Joined: 21 May 2009, 18:26
- Type the number ten into the box: 0
- Location: America!
Re: Elegant Bridge
Made a new near island. Working on a texture for the islands. I'm having trouble getting one that doesn't look blurry on the close up parts. This image of a hedge, about 850 x 1200, repeats 15 times on the near island and is still a little blurry. If I make a single texture in Paint Shop to add the beach then it would be huge. Maybe a beach with a gradient transparency as a second layer.
Although mapped shadows worked fine in the example I did for RJeff (see his stomper thread) worked fine I can't get any useful results with this picture. It has one infinite light with shadows and the GE light without shadows. Different lights produce drastically different results. Different textures seem to react differently to various lights. I'll try putting the infinite light closer to the objects. Maybe mapped shadows will like that. I like the sky light so I might try that but render times are long and "rapid prototyping", try-adjust-try-adjust..., is needed for it.
I'll work on the shore of the near island. It is too straight.
Edit: It is the reflectance shader that reacts differently to different lights.
Although mapped shadows worked fine in the example I did for RJeff (see his stomper thread) worked fine I can't get any useful results with this picture. It has one infinite light with shadows and the GE light without shadows. Different lights produce drastically different results. Different textures seem to react differently to various lights. I'll try putting the infinite light closer to the objects. Maybe mapped shadows will like that. I like the sky light so I might try that but render times are long and "rapid prototyping", try-adjust-try-adjust..., is needed for it.
I'll work on the shore of the near island. It is too straight.
Edit: It is the reflectance shader that reacts differently to different lights.
- Attachments
-

Last edited by Finis on 28 Feb 2011, 16:21, edited 1 time in total.
I prefer dangerous freedom over peaceful servitude. -- Thomas Jefferson/Jean Jacques Rousseau
-
spacekdet
- Captain
- Posts: 1810
- Joined: 27 May 2009, 15:00
- Type the number ten into the box: 10
- Location: On the day shift at the Utility Muffin Research Kitchen
Re: Elegant Bridge
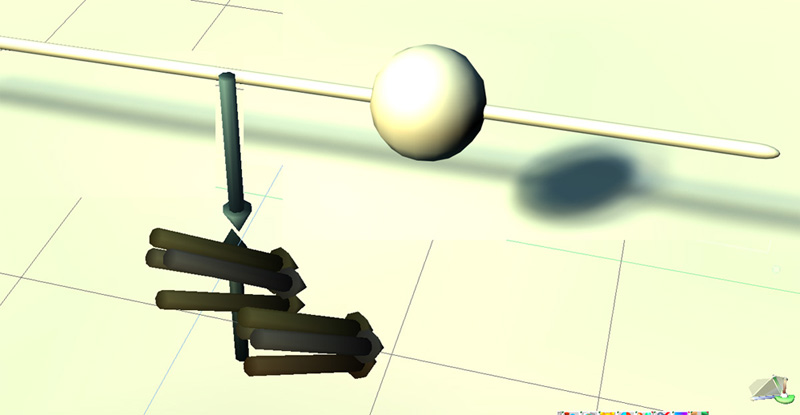
Make an array of infinites rather than just one.
You can do this manually or if you want to get fancy and use the array tool you'll have to glue the intial light to an invisible null object first.
Make the intensity of each a fraction of your current infinite- if you have 4 in the array set the intensity to 25%, etc.
Vary the angle of each one in the array just a little, along with the color.
Skylights are nice for fill, match the color to the predominant color of your sky texture. Skip shadowing with skylights unless you have extra time in your day.
A non shadowcasting pair of infinites, one pointing up and one down, can also work for fill lights.
Keep these low intensity and color matched to the predominant sky / ground colors respectively.
Infinite light position is moot, (other than for accessibility) all that counts is angle-color-intensity-shadows, etc.
Quick and dirty example:
You can do this manually or if you want to get fancy and use the array tool you'll have to glue the intial light to an invisible null object first.
Make the intensity of each a fraction of your current infinite- if you have 4 in the array set the intensity to 25%, etc.
Vary the angle of each one in the array just a little, along with the color.
Skylights are nice for fill, match the color to the predominant color of your sky texture. Skip shadowing with skylights unless you have extra time in your day.
A non shadowcasting pair of infinites, one pointing up and one down, can also work for fill lights.
Keep these low intensity and color matched to the predominant sky / ground colors respectively.
Infinite light position is moot, (other than for accessibility) all that counts is angle-color-intensity-shadows, etc.
Quick and dirty example:
-
Finis
- Captain
- Posts: 5410
- Joined: 21 May 2009, 18:26
- Type the number ten into the box: 0
- Location: America!
Re: Elegant Bridge
Thanks Spacekdet. I'll try a light array. Now what did I do with that Gaffer's Assistant plugin?
Something that shouldn't matter with the infinite light does matter for mapped shadows. Otherwise I could get similar results to the stomper example but the only results possible in this scene are the extremes. Settings produce either a crisp raytrace-like shadow or a huge vague shadow that includes areas that should have no shadow.
The position of the spot light in the stomper example matters. If I got it looking good and then moved the light some it would produce artifacts like banding and need slight adjustments to the settings. Of course that light doesn't have parallel rays.
Something that shouldn't matter with the infinite light does matter for mapped shadows. Otherwise I could get similar results to the stomper example but the only results possible in this scene are the extremes. Settings produce either a crisp raytrace-like shadow or a huge vague shadow that includes areas that should have no shadow.
The position of the spot light in the stomper example matters. If I got it looking good and then moved the light some it would produce artifacts like banding and need slight adjustments to the settings. Of course that light doesn't have parallel rays.
I prefer dangerous freedom over peaceful servitude. -- Thomas Jefferson/Jean Jacques Rousseau
-
spacekdet
- Captain
- Posts: 1810
- Joined: 27 May 2009, 15:00
- Type the number ten into the box: 10
- Location: On the day shift at the Utility Muffin Research Kitchen
Re: Elegant Bridge
Yep, position comes into play with other light types, even more so if they have any falloff assigned.
Light manager plug-ins are a definite bonus when it comes to large numbers of lights in an array.
Point or local lights are good candidates for making light arrays since they don't have any directional issues.
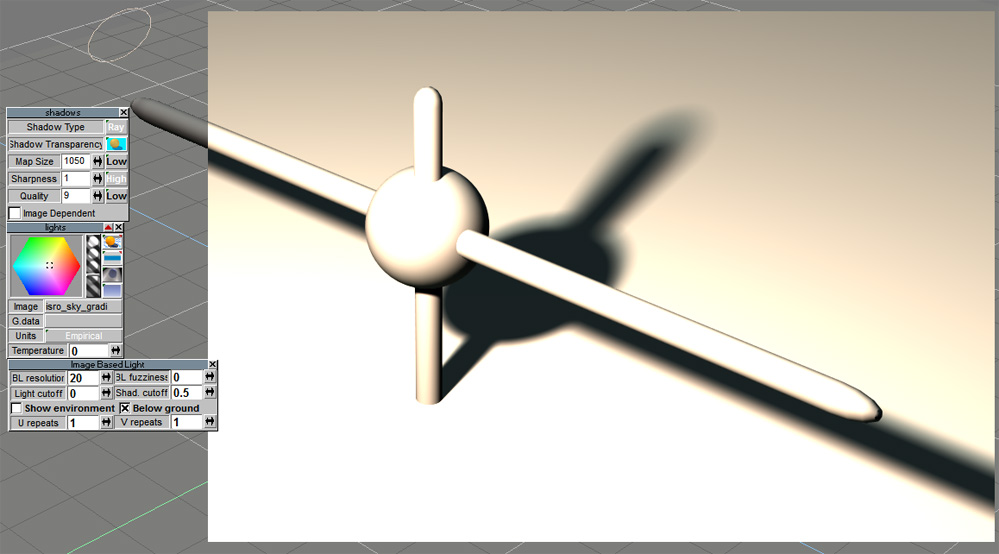
On the other hand, I find that an IBL works fine since it's basically a pre-made array.
It looks like a ring but it's actually a sphere with the number of local lights distributed across it's surface.
The parameter 'IBL resolution' controls this number.
Since it uses a large number of lights, the manual recommends against using mapped shadows with IBL.
I like that you can influence the color with both the image assigned and the light color itself.
I get good results using gradients culled from sky photographs thanks to the great 'Gradient Thief'!
Instead of making the IBL large and encompassing the entire scene, I'll instead scale it small and put it up near (but inside) the skydome, about where the 'sun' would be.
Uncheck the 'show environment' box. Show environment causes the light object itself to render- which can be handy if you want to use it as a background or also to check to see which direction the image texture is 'facing'.
If your terrain dips below the 'ground grid', tic the 'below ground' box.
One other thing that often trips me up- make sure there aren't any extra default lights in the scene- use the scene editor to weed them out or the 'None' light library before you begin building your setup.
here is an example render and the settings visible, and also the archived scene file if you want to play around with it.
zipped scene file:
Light manager plug-ins are a definite bonus when it comes to large numbers of lights in an array.
Point or local lights are good candidates for making light arrays since they don't have any directional issues.
On the other hand, I find that an IBL works fine since it's basically a pre-made array.
It looks like a ring but it's actually a sphere with the number of local lights distributed across it's surface.
The parameter 'IBL resolution' controls this number.
Since it uses a large number of lights, the manual recommends against using mapped shadows with IBL.
I like that you can influence the color with both the image assigned and the light color itself.
I get good results using gradients culled from sky photographs thanks to the great 'Gradient Thief'!
Instead of making the IBL large and encompassing the entire scene, I'll instead scale it small and put it up near (but inside) the skydome, about where the 'sun' would be.
Uncheck the 'show environment' box. Show environment causes the light object itself to render- which can be handy if you want to use it as a background or also to check to see which direction the image texture is 'facing'.
If your terrain dips below the 'ground grid', tic the 'below ground' box.
One other thing that often trips me up- make sure there aren't any extra default lights in the scene- use the scene editor to weed them out or the 'None' light library before you begin building your setup.
here is an example render and the settings visible, and also the archived scene file if you want to play around with it.
-
Finis
- Captain
- Posts: 5410
- Joined: 21 May 2009, 18:26
- Type the number ten into the box: 0
- Location: America!
Re: Elegant Bridge
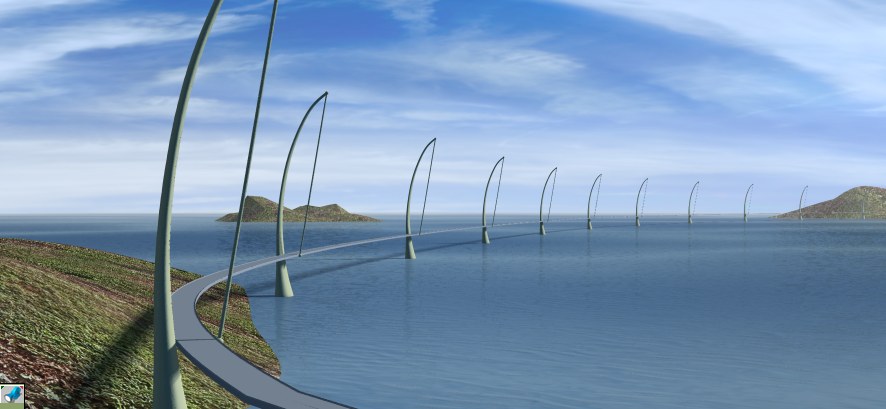
Lighting is now a few infinite lights with ray shadows at slightly different angles, thanks Spacekdet, and GE light with no shadows and the sky texture image. That made good fuzzy shadows.
I think the shadow on the water would be very indistinct. I'll adjust the lights to blur the shadow more on the water and accept the extra blurry results on the land.
Now to de-straighten the shore of the near island and add a beach. Road needs its asphalt and stripes. Then a little fine tuning, maybe adjustments from advice from you all, and its done. Probably do some other versions in other software to try different looks like sunset and night. Animation of driving on it someday.
The convertable car from the TS objects library will replace the minivan. In bridgeworld everyone has a cool car.
There are some render artifacts, spots, on the towers again. That's a job for Paint Shop.
I think the shadow on the water would be very indistinct. I'll adjust the lights to blur the shadow more on the water and accept the extra blurry results on the land.
Now to de-straighten the shore of the near island and add a beach. Road needs its asphalt and stripes. Then a little fine tuning, maybe adjustments from advice from you all, and its done. Probably do some other versions in other software to try different looks like sunset and night. Animation of driving on it someday.
The convertable car from the TS objects library will replace the minivan. In bridgeworld everyone has a cool car.
There are some render artifacts, spots, on the towers again. That's a job for Paint Shop.
- Attachments
-
I prefer dangerous freedom over peaceful servitude. -- Thomas Jefferson/Jean Jacques Rousseau
-
marcel
- Captain
- Posts: 2247
- Joined: 21 May 2009, 19:52
- Type the number ten into the box: 0
- Location: paris - France
Re: Elegant Bridge
don't blur the shadow on the land. If you want to reduce the shadow on the water maybe with more refflect on the water it will be ok. Also i think the global effect will be better.
in case you like the entire image but not this shadow, here is a way for a still image:
create 2 images, the second will have the water with a setting to don't receive shadow. then merge both image with transparency. you can adjust the intensity of the shadow on the water like you want. when you are near the final render it is sometime easier to use differents render and use them on post production work.
in case you like the entire image but not this shadow, here is a way for a still image:
create 2 images, the second will have the water with a setting to don't receive shadow. then merge both image with transparency. you can adjust the intensity of the shadow on the water like you want. when you are near the final render it is sometime easier to use differents render and use them on post production work.
Design - illustration - Animation
http://www.crea-vision.fr
http://www.crea-vision.fr
-
Dragneye

- Lieutenant
- Posts: 906
- Joined: 02 Sep 2009, 22:09
Re: Elegant Bridge
Hey, this is coming out very nice Finis. Thanx for giving a 'play by play' on the lighting also. I'm sure many will find the details useful.
-
Finis
- Captain
- Posts: 5410
- Joined: 21 May 2009, 18:26
- Type the number ten into the box: 0
- Location: America!
Re: Elegant Bridge
Thanks Dragneye.
I'll do something like that Marcel. That will get both water and land shadows but each with its own look.
Spacekdet provided images of bridge shadows on water and I looked at some over deep water and they all have sharp shadows. The land and water shadows aren't very different. So that's real shadows. For art I still want the water shadows to be less distinct like in my SMC round bridge.

Business is picking up with mowing season approaching so I might not have much time for this for a while.
I'll do something like that Marcel. That will get both water and land shadows but each with its own look.
Spacekdet provided images of bridge shadows on water and I looked at some over deep water and they all have sharp shadows. The land and water shadows aren't very different. So that's real shadows. For art I still want the water shadows to be less distinct like in my SMC round bridge.
Business is picking up with mowing season approaching so I might not have much time for this for a while.
I prefer dangerous freedom over peaceful servitude. -- Thomas Jefferson/Jean Jacques Rousseau
-
MikomDude

- Captain
- Posts: 1930
- Joined: 04 Oct 2010, 11:12
- Type the number ten into the box: 0
- Location: The Hague, Netherlands
Re: Elegant Bridge
That is one of the most useless bridges I've ever seen  Cool model though! I really like the triangle shaped bases for the bridge.
Cool model though! I really like the triangle shaped bases for the bridge.-
marcel
- Captain
- Posts: 2247
- Joined: 21 May 2009, 19:52
- Type the number ten into the box: 0
- Location: paris - France
Re: Elegant Bridge
Useless object: that is a good subject for a MMC! that can be very cool 
Design - illustration - Animation
http://www.crea-vision.fr
http://www.crea-vision.fr
-
Finis
- Captain
- Posts: 5410
- Joined: 21 May 2009, 18:26
- Type the number ten into the box: 0
- Location: America!
Re: Elegant Bridge
Useless object is a good MMC or SMC theme. Go put it in the MMC suggestions thread. When I did the round bridge I was thinking about how to do it fast and it had no meaning. It could have symbolic meanings though.
Elegant bridge: I worked on producing a single texture image for the near island. It would produce the effect from the previous image (not the round one) and add a beach with the Paint Shop method noted earlier. So far attempts to apply the new texture crash TS.
Things I'll try:
-- Leave the island as is for the vegetation and create another layer with the beach. That will probably not allow me to align the beach with the shore. I need to learn UV mapping. I have LithUnwrap.
-- Create a duplicate island and enlarge it slightly and apply a partially transparent beach. That creates the effect of a two layer texture but I can use Primitive Itch (I think) UV tools to move and size the beach to fit.
-- Continue to try to paint a single texture and apply it to the island.
I also intend to make the islands lighter green like in the earlier pictures with the grass textures. I like the way that color looks with the sky.
Elegant bridge: I worked on producing a single texture image for the near island. It would produce the effect from the previous image (not the round one) and add a beach with the Paint Shop method noted earlier. So far attempts to apply the new texture crash TS.
Things I'll try:
-- Leave the island as is for the vegetation and create another layer with the beach. That will probably not allow me to align the beach with the shore. I need to learn UV mapping. I have LithUnwrap.
-- Create a duplicate island and enlarge it slightly and apply a partially transparent beach. That creates the effect of a two layer texture but I can use Primitive Itch (I think) UV tools to move and size the beach to fit.
-- Continue to try to paint a single texture and apply it to the island.
I also intend to make the islands lighter green like in the earlier pictures with the grass textures. I like the way that color looks with the sky.
I prefer dangerous freedom over peaceful servitude. -- Thomas Jefferson/Jean Jacques Rousseau
-
Finis
- Captain
- Posts: 5410
- Joined: 21 May 2009, 18:26
- Type the number ten into the box: 0
- Location: America!
Re: Elegant Bridge
I tried making a simple tree-like plant and putting that on the island with geometry paint. The plants were hardly visible and the render time for the sparse test scene's 400,000 polygons means one with enough coverage would crash or render for years.
I prefer dangerous freedom over peaceful servitude. -- Thomas Jefferson/Jean Jacques Rousseau
-
Finis
- Captain
- Posts: 5410
- Joined: 21 May 2009, 18:26
- Type the number ten into the box: 0
- Location: America!
Re: Elegant Bridge
Finishing unfinished projects. No MMC's or SMC's for me for a while. I'll work on finishing my dueling pistols and occasionally on this.
This needs a texture with beaches or other interface of land and water. Then it is done. May need to learn UV mapping.
Also will work on learning Messiah 3D interface and renderer. Then the animation. Then I'll animate a drive along the bridge in Messiah.
This needs a texture with beaches or other interface of land and water. Then it is done. May need to learn UV mapping.
Also will work on learning Messiah 3D interface and renderer. Then the animation. Then I'll animate a drive along the bridge in Messiah.
I prefer dangerous freedom over peaceful servitude. -- Thomas Jefferson/Jean Jacques Rousseau
-
Steinie

- Captain
- Posts: 2958
- Joined: 21 May 2009, 17:38
- Type the number ten into the box: 10
Re: Elegant Bridge
Well all your work is great no matter where you decide to put your efforts.
-
Breech Block

- Master Chief Petty Officer
- Posts: 482
- Joined: 13 Jun 2009, 20:31
Re: Elegant Bridge
Even at this unfinished stage, this image looks pretty darned good. The only thing that is really spoiling for me it is the kink in the road surface about 5 millimetres from the bottom of the picture. Keep up the good work.

-
Finis
- Captain
- Posts: 5410
- Joined: 21 May 2009, 18:26
- Type the number ten into the box: 0
- Location: America!
Re: Elegant Bridge
Here is the bridge in Bryce. It took around 3 hours to render. Just the bridge from TS. Sky, land, water are Bryce.
I'll have to learn more about the instancing tools. I found it impossible to spread palm trees where I wanted. I could not relate the wirefame overhead view, just a grid, on the instance screen to the terrain features and the nano-preview is way too nano. There is really no point in having such a tiny preview there. Maybe there is another way to spread instances or to change that view.
I'll have to learn more about the instancing tools. I found it impossible to spread palm trees where I wanted. I could not relate the wirefame overhead view, just a grid, on the instance screen to the terrain features and the nano-preview is way too nano. There is really no point in having such a tiny preview there. Maybe there is another way to spread instances or to change that view.
- Attachments
-

I prefer dangerous freedom over peaceful servitude. -- Thomas Jefferson/Jean Jacques Rousseau
-
Finis
- Captain
- Posts: 5410
- Joined: 21 May 2009, 18:26
- Type the number ten into the box: 0
- Location: America!
Re: Elegant Bridge
I had some time and tried things to help place instances where I want them in Bryce.
- Use another object to mark the area for trees on the terrain. Didn't work. Only the item selected to receive instances, the terrain, appeared in the instancing tool.
- Group the terrain and the marker item above. Didn't work. The group had no instancing icon.
- Move the terrain into the ground plane to produce a shoreline like effect in the instance tool. Might work if you want to spread instances on top of hills.
- Make a few instances and move them in the main view to mark the area to receive instances. Probably work but I need to learn more about selecting objects. So far the instances are sometimes grouped for unknown reasons or are otherwise hard to select.
- Put instances all over and then delete the ones you don't need. Might work if I can select them in the main view and with a lasso type multi-selection tool.
- Paint them on the land in the main view. I have found no tool to do this.
I'll remodel the bridge in Hexagon sometime.
- Use another object to mark the area for trees on the terrain. Didn't work. Only the item selected to receive instances, the terrain, appeared in the instancing tool.
- Group the terrain and the marker item above. Didn't work. The group had no instancing icon.
- Move the terrain into the ground plane to produce a shoreline like effect in the instance tool. Might work if you want to spread instances on top of hills.
- Make a few instances and move them in the main view to mark the area to receive instances. Probably work but I need to learn more about selecting objects. So far the instances are sometimes grouped for unknown reasons or are otherwise hard to select.
- Put instances all over and then delete the ones you don't need. Might work if I can select them in the main view and with a lasso type multi-selection tool.
- Paint them on the land in the main view. I have found no tool to do this.
I'll remodel the bridge in Hexagon sometime.
I prefer dangerous freedom over peaceful servitude. -- Thomas Jefferson/Jean Jacques Rousseau