Shape Controls - using a colour picker to control morphs

User avatar
Draise
Captain
Posts: 3200
Joined: 21 Sep 2009, 19:33
Type the number ten into the box: 0
Location: Bogota, Colombia

Shape Controls - using a colour picker to control morphs

Post by Draise »

Example for a Shape Control using a square colour map!

Image

Nodes needed:

Min_Max node
Binary_Op node located under Math-Scripts library.
Colour Picker in the Objects-Script Objects library.


To start, you need to define the morphs you will need for the deformation, and define how you want to control them. Typically you will control more or less 4 morphs or a mix of those multiples according to your square colour control.

Next you will have to setup you colour map to contain 100 R at the top left corner, 100 G at the top right corner, 100 R and 100 B in the bottom left corner, and 100 G and 100 blue in the bottom right corner.

Now using a combination of binary_ops and min_max nodes you can then seperate the 3 colours into three different morphs. But we need another 4th input.... How do we do this?

Because we only have blue to account for our X axis, we have to inverse it using a combination of the RG data and a self cancellation mathematic feature. We then are able to get a reverse X axis. So using only 3 colour channels we get 4 axis for four different morphs, or more!

I recommend using the Min_Max node because the morphs has an additive matrix to every vertice. If you look left and add the negative values of another morph, you may get results that don't look good......
User avatar
Steinie
Captain
Posts: 2958
Joined: 21 May 2009, 17:38
Type the number ten into the box: 10

Re: Shape Controls - using a colour picker to control morphs

Post by Steinie »

Draise,
Thanks for showing us the Shape Controller using color range. I am not very good with LE and not very good with Morphs. How would I connect this controller to my object? Do you have to have morph targets built into the object first?
I can see how this works but not sure how to connect it to my model.
My plan is to use morphs for facial expressions and speech.
User avatar
Draise
Captain
Posts: 3200
Joined: 21 Sep 2009, 19:33
Type the number ten into the box: 0
Location: Bogota, Colombia

Re: Shape Controls - using a colour picker to control morphs

Post by Draise »

Steinie wrote: How would I connect this controller to my object? Do you have to have morph targets built into the object first?
I can see how this works but not sure how to connect it to my model.
My plan is to use morphs for facial expressions and speech.
Thanks for showing the interest Steinie!

Do you see the Vertex Morph node in the diagram? That is automatically created when you click on "Add Morph" tool inside the Object Node (the mesh/object with the morph).

Image

This can be selected anytime and the "default" tab is the familiar morph menu, where you can add, change, delete morphs. I have it on the "exp" tab for ease of access to the morph values, like below:

Image

Now to connect all of the above to the morphs in the object node, you have the example I showed you before with each value from each colour to each morph in that Vertex Morph node. I try keep the morph ranges from 0.000 to 1.000.

And yes, the controls are just a way to make less keyframes from morph animation and mouth syncing. Tho I would reccommend making the lipsync animation to clips that you can place quickly where needed. I am working on a workflow to using Papagayo and a sound playing node, or even a MS soundfile viewer plugin I found for free a while back to get accurate lipsyncing. I'll probably use this extensively for my animations.

Later I'll show you how to export these controls to the root of the object so you don't have to see all the mess inside it to control the morphs!
User avatar
trueBlue
Captain
Posts: 5548
Joined: 06 Jul 2009, 22:50
Type the number ten into the box: 10

Re: Shape Controls - using a colour picker to control morphs

Post by trueBlue »

Draise wrote:Later I'll show you how to export these controls to the root of the object so you don't have to see all the mess inside it to control the morphs!
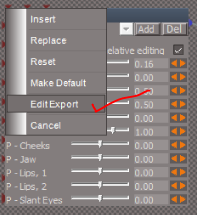
FYI: An easy way to Export the whole panel:
Right Click the panel's titlebar twice and select EditExport.
Capture1.PNG
Capture1.PNG (18.7 KiB) Viewed 2939 times
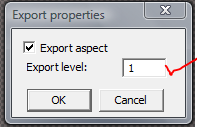
Enter the Export level that is the scene level.
I think for morphs it is 2.
Capture2.PNG
Capture2.PNG (13.51 KiB) Viewed 2938 times
Now when you select the character the panel will show in the Stack.
Attachments
Capture3.PNG

Return to “Animation”