Architectural tutorial
-
bkjernisted
- Chief Petty Officer
- Posts: 114
- Joined: 23 May 2009, 06:10
Architectural tutorial
I'm trying to get the walls in the Caligari architectural tutorial to sweep to 8.5 ft. Only some of the walls in this dxf file will sweep. Any suggestions besides retracing the walls with the add curve tool. Thanks!
-
brent kjernisted
- Petty Officer Third Class
- Posts: 19
- Joined: 10 Jul 2010, 23:17
Re: Architectural tutorial
Is this a problem with 64 bit systems and would it sweep fine in a 32 bit system? Is there a way of saving it in vecad and then importing it back into truespace that would work?
-
v3rd3
- Lieutenant Commander
- Posts: 1191
- Joined: 21 May 2009, 20:04
Re: Architectural tutorial
I don't know that we have enough info on what you are trying to do to be helpful...
I have not followed the architecture tut for a couple of years so I don't recall all the steps you are trying to follow.
Could you offer a little more detail please?
I have not followed the architecture tut for a couple of years so I don't recall all the steps you are trying to follow.
Could you offer a little more detail please?
-
spacekdet

- Captain
- Posts: 1810
- Joined: 27 May 2009, 15:00
- Type the number ten into the box: 10
- Location: On the day shift at the Utility Muffin Research Kitchen
Re: Architectural tutorial
Save it as a COB in tS and then try flipping the faces.
They sometimes import with the normals flipped.
They sometimes import with the normals flipped.
-
marcel

- Captain
- Posts: 2247
- Joined: 21 May 2009, 19:52
- Type the number ten into the box: 0
- Location: paris - France
Re: Architectural tutorial
kjernisted, brent kjernisted... Are you registered multiple times?
Design - illustration - Animation
http://www.crea-vision.fr
http://www.crea-vision.fr
-
brent kjernisted
- Petty Officer Third Class
- Posts: 19
- Joined: 10 Jul 2010, 23:17
Re: Architectural tutorial
Thanks for all the replies! Marcel I should have asked how to retrieve my password but I had an old email address that was deleted without any forewarning and I lost all my emails. I guess I was in ahrray and figured the best way to solve the problem was toopen a new account. If you could delete my bkjernisted account I'll continue to use the brent kjernisted account. Sorry and thanks!
-
brent kjernisted
- Petty Officer Third Class
- Posts: 19
- Joined: 10 Jul 2010, 23:17
Re: Architectural tutorial
v3rd3 there is a dxf file that comes with the project for the first floor. It is to be swept to a height of 8.5 feet. When you sweep it it sweeps correctly in some places and in others the top of the dxf file sweeps to the initial height of the sweep but when rendered there are no walls created where top of the dxf file sweeps to the initial height. I tried turning the file into a cob file and then reversed the normals and swept the result but this only freezes truespace and I need to log off. Could someone try this and let me know what their results are? Thanks!
-
theuns
- Lieutenant Junior Grade
- Posts: 868
- Joined: 10 Jun 2009, 11:21
- Type the number ten into the box: 0
- Location: South Africa
Re: Architectural tutorial
can you post some pics to show what you mean? and maybe upload the dxf file here if it isn't too big?
theuns - tSer since 2000
. http://theunsfvo.cgarena.com/" onclick="window.open(this.href);return false; |:.
. http://bluestarcreations.wordpress.com/" onclick="window.open(this.href);return false; |:.
.
http://theunsfvo.cgarena.com/" onclick="window.open(this.href);return false; |:..
http://bluestarcreations.wordpress.com/" onclick="window.open(this.href);return false; |:.-
bkjernisted
- Chief Petty Officer
- Posts: 114
- Joined: 23 May 2009, 06:10
Re: Architectural tutorial
Theuns the dxf file is the first dxf file in the project files for the architectural tutorial from the caligari website. I'll try to post some pictures if I can figure it out. Thanks!
-
bkjernisted
- Chief Petty Officer
- Posts: 114
- Joined: 23 May 2009, 06:10
Re: Architectural tutorial
theuns the dxf file is too big.
-
trueBlue

- Captain
- Posts: 5548
- Joined: 06 Jul 2009, 22:50
- Type the number ten into the box: 10
Re: Architectural tutorial
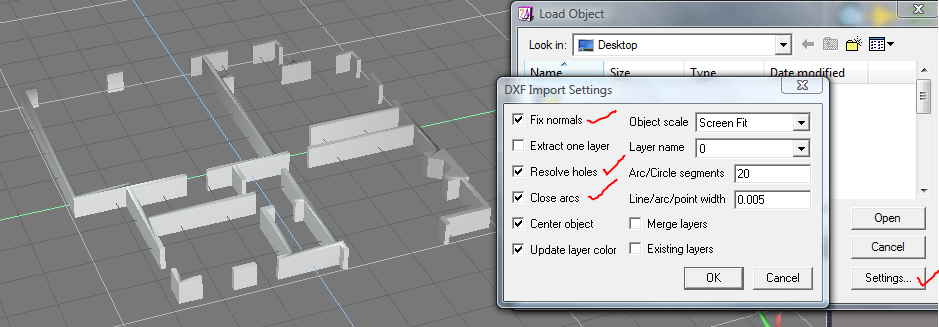
Before you Load the arch_13_downstairs.dxf, select DXF as File Type and then Settings.
Try loading the file with these options selected. Seem to work for me in tS7.61 Beta8.
Try loading the file with these options selected. Seem to work for me in tS7.61 Beta8.
- Attachments
-
-
brent kjernisted
- Petty Officer Third Class
- Posts: 19
- Joined: 10 Jul 2010, 23:17
Re: Architectural tutorial
trueBlue it worked this time but my measurements seem out of wack. My location z measurement says .5 feet and if I set my z height to 8.5 feet the proportions are going to be way out of wack. Is there an update to fix this? Thanks for your help so far!
- Attachments
-

-
brent kjernisted
- Petty Officer Third Class
- Posts: 19
- Joined: 10 Jul 2010, 23:17
Re: Architectural tutorial
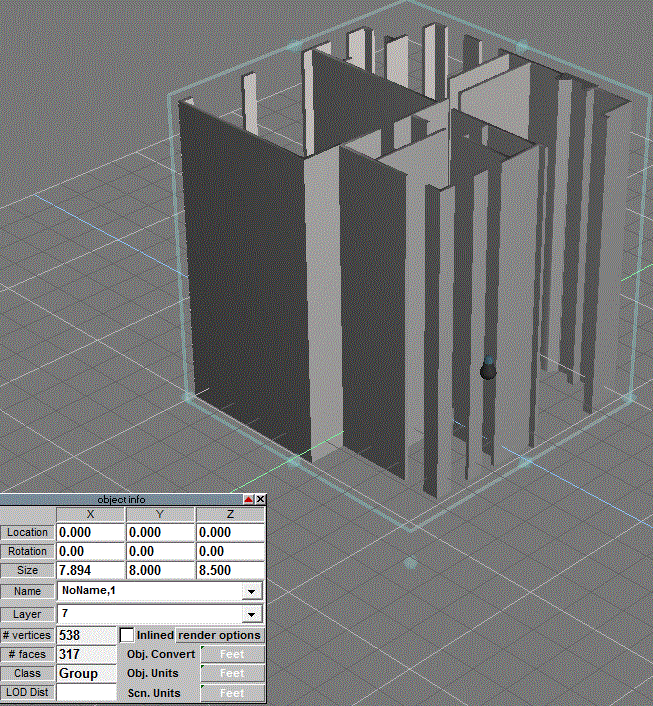
Here is a picture with my z height set to 8.5 ft.
- Attachments
-
-
clintonman

- Captain
- Posts: 5659
- Joined: 21 May 2009, 21:08
- Type the number ten into the box: 0
- Location: California
Re: Architectural tutorial
It looks like the scale of the dxf file is in inches. So import with object import scale set to feet and then multiply the x and y size values in the object info panel by 12 to get it back up to actual feet.
-
bkjernisted
- Chief Petty Officer
- Posts: 114
- Joined: 23 May 2009, 06:10
Re: Architectural tutorial
Clinton and anybody else having trouble setting the dimensions of the house, watch the videos and you will see the dimensions needed. I am having a problem though! When I go to set the Z size or thickness of the wall section for the window I am not able to set it to 0.400 feet. Can someone help me with this? The cob part name is 7,1_1.cob.
-
bkjernisted
- Chief Petty Officer
- Posts: 114
- Joined: 23 May 2009, 06:10
Re: Architectural tutorial
I've found the solution to my problem! Get out of extrude mode after the 1st extrude. Then click on the object so you have the controls around the whole object. Enter your dimensions for the thickness of the wall and hit enter. As well use "Window surround plane .cob." This file already has the correct dimensions except for thickness.
-
spacekdet
- Captain
- Posts: 1810
- Joined: 27 May 2009, 15:00
- Type the number ten into the box: 10
- Location: On the day shift at the Utility Muffin Research Kitchen
Re: Architectural tutorial
Ah, yep. The Object info panel displays the size/rot/scale of the currently selected element.
As you found out, it could be the whole object, or just whatever you have selected via point edit.
As you found out, it could be the whole object, or just whatever you have selected via point edit.
-
bkjernisted
- Chief Petty Officer
- Posts: 114
- Joined: 23 May 2009, 06:10
Re: Architectural tutorial
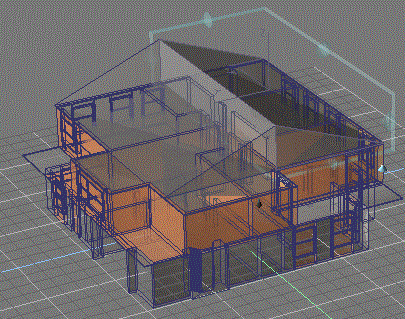
As you can see in the attached photo the selector cage is only around half of the roof and I,m not able to get it to go around the other half to extend it over the left hand side of the house. How do I get it out of this mode, extend the left side of the roof and then raise the ridge of the roof? Thanks?
- Attachments
-
-
Steinie

- Captain
- Posts: 2958
- Joined: 21 May 2009, 17:38
- Type the number ten into the box: 10
Re: Architectural tutorial
Try multi-selecting by holding down the CTRL key. That should change
the selector cage I believe.
the selector cage I believe.
-
Finis

- Captain
- Posts: 5410
- Joined: 21 May 2009, 18:26
- Type the number ten into the box: 0
- Location: America!
Re: Architectural tutorial
Model side:
Holding CTRL or Shift while clicking individual objects adds or removes them from a multi-object selection. Operations like scale, rotate, and move effect the whole selection as if it was one object.
You can also select multiple objects with a rubber rectangle by holding the CTRL key and holding the mouse button.
You can raise the roof ridge in point edit mode. Select just the edge or edges that make the ridge, select move on the point edit menu, and move the edge up. Try limiting the movement to vertical by using the XYZ buttons to activate only the appropriate axis. Then put the XYZ's back or it will get confusing later.
Holding CTRL or Shift while clicking individual objects adds or removes them from a multi-object selection. Operations like scale, rotate, and move effect the whole selection as if it was one object.
You can also select multiple objects with a rubber rectangle by holding the CTRL key and holding the mouse button.
You can raise the roof ridge in point edit mode. Select just the edge or edges that make the ridge, select move on the point edit menu, and move the edge up. Try limiting the movement to vertical by using the XYZ buttons to activate only the appropriate axis. Then put the XYZ's back or it will get confusing later.
I prefer dangerous freedom over peaceful servitude. -- Thomas Jefferson/Jean Jacques Rousseau
-
bkjernisted
- Chief Petty Officer
- Posts: 114
- Joined: 23 May 2009, 06:10
Re: Architectural tutorial
In order to get the cage where it is in the photo I had to " arrange the roofs axis so they sit level with the bottom of the object but centered in Xand Y." This can be seen in video 14 of the architectural tutorial. I have not tried the above two suggestions but will in two hours. I just cannot seem to deselect the cage on the right hand side of the roof. Thanks!
-
bkjernisted
- Chief Petty Officer
- Posts: 114
- Joined: 23 May 2009, 06:10
Re: Architectural tutorial
All I had to do to get rid of the selector cage was restart Truespace. Now I am having trouble drawing up the ridge. Only one side will draw up and not straight up. Do I use the object move control and highlight Z so the grey area is larger or do I use toggle navigation using Z axis? I see now that I'm supposesd to be using the point editing move tools. Do I need to glue the two roof halves together?
Last edited by bkjernisted on 09 Aug 2010, 22:39, edited 1 time in total.
-
bkjernisted
- Chief Petty Officer
- Posts: 114
- Joined: 23 May 2009, 06:10
Re: Architectural tutorial
How do I go about lining up the sides of the building so the textures can be applied correctly?
-
v3rd3
- Lieutenant Commander
- Posts: 1191
- Joined: 21 May 2009, 20:04
Re: Architectural tutorial
There is a technique shown at some point in the tutorial where you create a couple of small cubes to the scene, aligning the appropriate faces with the wall, you then select the wall and the matching faces of the 2 cubes, apply the texture and it works.....
-
bkjernisted
- Chief Petty Officer
- Posts: 114
- Joined: 23 May 2009, 06:10
Re: Architectural tutorial
When I go to extrude the roof in the z axis it extrudes straight up but when I extrude the half roof it extrudes at an angle to the left lookingfrom the right side. How do I fix this problem? Thanks!
-
v3rd3
- Lieutenant Commander
- Posts: 1191
- Joined: 21 May 2009, 20:04
Re: Architectural tutorial
I believe that extrude follows the direction of the surface normal. I think the easiest way to deal with this is to either move the face resulting from the extrude or to adjust the edges or vertices on the edge planes.
-
clintonman
- Captain
- Posts: 5659
- Joined: 21 May 2009, 21:08
- Type the number ten into the box: 0
- Location: California
Re: Architectural tutorial
If sweep tool is what you're using you can right click to open the options and set the values for x,y and z to 0. When you sweep the face doesn't move and then you can move it in world space.
-
bkjernisted
- Chief Petty Officer
- Posts: 114
- Joined: 23 May 2009, 06:10
Re: Architectural tutorial
Thankyou clintonman and v3rd3! I used clintonman's method but had to turn segments to zero.
-
v3rd3
- Lieutenant Commander
- Posts: 1191
- Joined: 21 May 2009, 20:04
Re: Architectural tutorial
If you are choosing between Clintonman's solutions and mine, I can comfortably be ignored. 