As an Architect I have had a ball learning this newly discovered program for organic modeling requirements. I have successfully completed the basic form of this project and added dx materials with bitmap references from the actual horse. I'd like to explore the modelspace side of the program but when I switch sides, with the bridge set to 'auto' or 'on' the horse, as well as a number of light sources do not carry over.
I thought that because I had various objects that create the horse not encapsulated, that was the problem, as only his forehead markings and eyeballs carried over. I encapsulated all the objects into a single one and now I see carry over no part of it.
What am I missing here?
Dreamcatcher107
Architect's Learning Curve
-
dreamcatcher107
- Petty Officer First Class
- Posts: 70
- Joined: 23 Aug 2009, 16:26
- Type the number ten into the box: 0
- Location: Illinois, USA
Architect's Learning Curve
-
trueBlue

- Captain
- Posts: 5548
- Joined: 06 Jul 2009, 22:50
- Type the number ten into the box: 10
Re: Architect's Learning Curve
It sounds like you have Encapsulated your objects and NOT 3D Encpsulate them. 3D Encapsulate will add the necessary Transform node. They are both in the same toolbar flyout.
HTH
HTH
-
dreamcatcher107
- Petty Officer First Class
- Posts: 70
- Joined: 23 Aug 2009, 16:26
- Type the number ten into the box: 0
- Location: Illinois, USA
Re: Architect's Learning Curve
Thanks Trueblue -
I 3d encapsulated and switched over to find that more of the horse transferred, but not all of it. Looking at the link editor, I noted that the transform bar linked to each aspect of the horse parts that were separate objects. There were three that had 'sub-encapsulated' objects previously combined that were not linked to the transform bar. Do I need to 'flatten history' or something similar before the combined object will link to the transform bar?
I just read on another post that not all aspects (textures and bones for example) cross over and perhaps I should just stay on the workspace side of things. I have neither of those two aspects in this horse, but I have plenty of shaders that also accordingly will not carry over. Still, this baffles me and I can't stand not solving a problem.
I 3d encapsulated and switched over to find that more of the horse transferred, but not all of it. Looking at the link editor, I noted that the transform bar linked to each aspect of the horse parts that were separate objects. There were three that had 'sub-encapsulated' objects previously combined that were not linked to the transform bar. Do I need to 'flatten history' or something similar before the combined object will link to the transform bar?
I just read on another post that not all aspects (textures and bones for example) cross over and perhaps I should just stay on the workspace side of things. I have neither of those two aspects in this horse, but I have plenty of shaders that also accordingly will not carry over. Still, this baffles me and I can't stand not solving a problem.
-
trueBlue
- Captain
- Posts: 5548
- Joined: 06 Jul 2009, 22:50
- Type the number ten into the box: 10
Re: Architect's Learning Curve
I would start over by saving all of your Unencapsulated objects to a library.
Start a new scene and Import all of your objects.
Select all of your objects and 3D Encapsulate them into one object.
If you need help just upload your object here.
Start a new scene and Import all of your objects.
Select all of your objects and 3D Encapsulate them into one object.
If you need help just upload your object here.
-
dreamcatcher107
- Petty Officer First Class
- Posts: 70
- Joined: 23 Aug 2009, 16:26
- Type the number ten into the box: 0
- Location: Illinois, USA
Re: Architect's Learning Curve
I got the bulk of the model recreated and can now cross the bridge. I must have screwed up the materials in the link editor as I lost them on the majority of the model. They still read within their lower nested areas, but don't have the material flavor link that connected them, and can't seem to figure out how to recreate it. Material flavor links were grouped outside of the objects themselves for some reason. I created objects with them as well - probably need to save them as new materials though, don't I.
I can go through the labor intensive UV mapping process in modelspace, but still need to apply the bitmap materials from the actual horse. I get that the shaders won't cross the bridge, and am willing to get 'down and dirty' with mapping, but can't quite figure out what I need to reconnect on the workspace side to see these materials in the Link Editor.
Bottom line is, as I understand it, modelspace allows export to Blender or Kerkythea (both free, and I have), and I still haven't tried to figure that out, while workspace requires the purchase of a rendering engine, which this project can not afford. I also need to generate both static (still) images and dynamic (animated) clips for the client. I find workspace exceptionally intuitive and wonder why I should be trying to cross the bidge at all, except for exporting, unless I'm missing a key component in this puzzle.
I tried uploading the object file but is was not allowed. What format does the server allow?
I can go through the labor intensive UV mapping process in modelspace, but still need to apply the bitmap materials from the actual horse. I get that the shaders won't cross the bridge, and am willing to get 'down and dirty' with mapping, but can't quite figure out what I need to reconnect on the workspace side to see these materials in the Link Editor.
Bottom line is, as I understand it, modelspace allows export to Blender or Kerkythea (both free, and I have), and I still haven't tried to figure that out, while workspace requires the purchase of a rendering engine, which this project can not afford. I also need to generate both static (still) images and dynamic (animated) clips for the client. I find workspace exceptionally intuitive and wonder why I should be trying to cross the bidge at all, except for exporting, unless I'm missing a key component in this puzzle.
I tried uploading the object file but is was not allowed. What format does the server allow?
-
Karthogen
- Master Chief Petty Officer
- Posts: 454
- Joined: 03 Jun 2009, 14:12
Re: Architect's Learning Curve
I believe you have to compress it. ZIP ARC... etc.
Workspace can realtime render your image which is included, as well as realtiem render an image sequence for compilig to animation. But, I found you really need to be good with your materials to get good results. You can also use YAfaray, Free but would require learning a new render and material system. http://www.Yafaray4ts.org"
Modelside has a very good built in render with lightworks that can really produce some nice results, but does have a different material system than the workspace side. Any materials that are created on the workspace side and bridged over will attempt to show correctly but will ultimately need to be redone on the modelside.
Workspace can realtime render your image which is included, as well as realtiem render an image sequence for compilig to animation. But, I found you really need to be good with your materials to get good results. You can also use YAfaray, Free but would require learning a new render and material system. http://www.Yafaray4ts.org"
Modelside has a very good built in render with lightworks that can really produce some nice results, but does have a different material system than the workspace side. Any materials that are created on the workspace side and bridged over will attempt to show correctly but will ultimately need to be redone on the modelside.
-
Karthogen
- Master Chief Petty Officer
- Posts: 454
- Joined: 03 Jun 2009, 14:12
Re: Architect's Learning Curve
I think I was getting the best results when I was modeling on workspace with the intuitive tools, and then briding the blank modle to workspace for texturing, uv maps, lighting and rendering.
-
dreamcatcher107
- Petty Officer First Class
- Posts: 70
- Joined: 23 Aug 2009, 16:26
- Type the number ten into the box: 0
- Location: Illinois, USA
Re: Architect's Learning Curve
Thanks for the help. I'll go back into each object, drop their materials, reassemble things and cross the bridge. I did notice that some of the materials tried to carry over and they looked less than acceptable to my eye. |I'll keep you all posted as this Architect sorts out the finer elements of graphic design and animation. Anyone need design and construction documents on a new home, remodel, addition or commercial space/building? I'm willing to barter in return for the help that you've provided.
-
Karthogen
- Master Chief Petty Officer
- Posts: 454
- Joined: 03 Jun 2009, 14:12
Re: Architect's Learning Curve
Thank you for the offer. I was new not to long ago and everyone here really helped me out with lot of questions. I am just happy to return the favor when I can.
-
dreamcatcher107
- Petty Officer First Class
- Posts: 70
- Joined: 23 Aug 2009, 16:26
- Type the number ten into the box: 0
- Location: Illinois, USA
Re: Architect's Learning Curve
OK, so I'm on the model side and progressing through applying materials. The mane and forelock objects have hair (obviously) and when I assign the material it goes directly into the hair pigmentation though I can select the 'scalp' material with the program. I am versed in LE on the workspace side, but can't seem to gather the correct blocks to transfer the 'scalp' material color. I have the material block, the color shader block, and the input color block. What's missing?
-
dreamcatcher107
- Petty Officer First Class
- Posts: 70
- Joined: 23 Aug 2009, 16:26
- Type the number ten into the box: 0
- Location: Illinois, USA
Re: Architect's Learning Curve
I figured out how to solve my dilemma, by going into the LE deeper before painting the object. This time I was able to manipulate the scalp separate from the hair color. This program becomes more interesting by the day. I'm not sure why it worked, but it did.
The materials are now fully complete but where I'm trying to transition from one material into the next, it looks too blocky due to the mesh. Is there a simple way the program will allow me to distort this so it appears more natural?
The materials are now fully complete but where I'm trying to transition from one material into the next, it looks too blocky due to the mesh. Is there a simple way the program will allow me to distort this so it appears more natural?
-
Karthogen
- Master Chief Petty Officer
- Posts: 454
- Joined: 03 Jun 2009, 14:12
Re: Architect's Learning Curve
sorry I can't be more help with that one. I did a few searches but could not find any tuts or help on hair.
I am sure someone here has the answer, just finding the right one.
I am sure someone here has the answer, just finding the right one.
-
dreamcatcher107
- Petty Officer First Class
- Posts: 70
- Joined: 23 Aug 2009, 16:26
- Type the number ten into the box: 0
- Location: Illinois, USA
Re: Architect's Learning Curve
Thanks Karthogen. It's not a hair problem any longer. Prior post suggests an intuituive solution. I need to blend color transitions within or across the mesh. I suppose I need to go into the mesh editor itself, but I'm also trying to blend across two objects. I tried adding a zipped attachment so you could see my dilemma, but the server is limited to 5 MB and this is too large an object.
-
dreamcatcher107
- Petty Officer First Class
- Posts: 70
- Joined: 23 Aug 2009, 16:26
- Type the number ten into the box: 0
- Location: Illinois, USA
Re: Architect's Learning Curve
I found the 3D paint command and had begun to 'blend' my transitions. The program (or my memory) couldn't handle it, and am now locked into an error report about failed rendering and that the program will restart. I can not reload to a point before I screwed up. How do I correct the problem?
-
v3rd3
- Lieutenant Commander
- Posts: 1191
- Joined: 21 May 2009, 20:04
Re: Architect's Learning Curve
If the problem you are describing is that TS continues to open the previous (error generating) scene at startup I believe you will have to delete the truespace.cfg file in the TS directory which I understand includes the reference to the last scene you had open....
You should then be able to open up TS without encountering the error and load a prior version of your scene.
To be safe make a copy of the cfg file before you delete it or rename it so it does not load on TS startup.
You should then be able to open up TS without encountering the error and load a prior version of your scene.
To be safe make a copy of the cfg file before you delete it or rename it so it does not load on TS startup.
-
dreamcatcher107
- Petty Officer First Class
- Posts: 70
- Joined: 23 Aug 2009, 16:26
- Type the number ten into the box: 0
- Location: Illinois, USA
Re: Architect's Learning Curve
Thanks for the help. I actually had to lose all my work (thankfully from a prior post I had all the objects to reassemble) then delete and downlaod the program again. I'm finding another error when I've rebuilt this model that tells me that the texture renderers failed. |Am |I asking too much of the program by mixing basic color shaders in one object and material textures in another?
Perhaps I just have way too much on the hard drive to commit enough space for it to function correctly, or I am overtaxing its limits. I'm not sure; I can build these things from an empty box but this one was specifically bought for gaming, upgrading the graphics card and power supply to handle the new requirement. I'm stumped. Darn Gateway...
Perhaps I just have way too much on the hard drive to commit enough space for it to function correctly, or I am overtaxing its limits. I'm not sure; I can build these things from an empty box but this one was specifically bought for gaming, upgrading the graphics card and power supply to handle the new requirement. I'm stumped. Darn Gateway...
-
spacekdet

- Captain
- Posts: 1810
- Joined: 27 May 2009, 15:00
- Type the number ten into the box: 10
- Location: On the day shift at the Utility Muffin Research Kitchen
Re: Architect's Learning Curve
Should be no trouble mixing color shaders with other materials.
I would advise against using the 3D Paint in the future- it creates a texture for every single polygon on any object that it's used on and it can quickly add up and overwhelm any machine.
The Workspace has better 3d bump mapping tools that will create actual bumpy geometry rather than the 'fake' that 3D Paint does.
I would advise against using the 3D Paint in the future- it creates a texture for every single polygon on any object that it's used on and it can quickly add up and overwhelm any machine.
The Workspace has better 3d bump mapping tools that will create actual bumpy geometry rather than the 'fake' that 3D Paint does.
-
dreamcatcher107
- Petty Officer First Class
- Posts: 70
- Joined: 23 Aug 2009, 16:26
- Type the number ten into the box: 0
- Location: Illinois, USA
Re: Architect's Learning Curve
I needed to 'blend' a transition across colors so it appeared more natural. The polygons were too 'choppy' as the brown of the horse body becomes the black of the knee. Is there another tool that would take less memory? Can I 'flatten history' and reduce the file size that way?
-
dreamcatcher107
- Petty Officer First Class
- Posts: 70
- Joined: 23 Aug 2009, 16:26
- Type the number ten into the box: 0
- Location: Illinois, USA
Re: Architect's Learning Curve
I have reloaded my materials and abandoned the 3D paint tool as it was causing errors (I think). I still need to blend the material transitions across two objects and am unsure as to what to use. Should I be layering materials? It's my next best guess given the Modelspace Surfacing text in the manual. If this is the case, I still need some direction on the how (and where to look for control of this aspect) of the program. Is this UV mapping? Any posted assistance would be much appreciated.
-
dreamcatcher107
- Petty Officer First Class
- Posts: 70
- Joined: 23 Aug 2009, 16:26
- Type the number ten into the box: 0
- Location: Illinois, USA
Re: Architect's Learning Curve
BTW, I will next need this horse body object to 'breathe' . Can the mesh and materials be manipulated to achieve this? I have seen the beginnings of the animation tutorial and understand how to cause rotation, as this must spin around like Dorothy's house during the tornado in the Wizard of Oz movie, but am unsure whether the program will allow this horse to breath and snort. Any direction would be most helpful.
-
Karthogen
- Master Chief Petty Officer
- Posts: 454
- Joined: 03 Jun 2009, 14:12
Re: Architect's Learning Curve
I would think the breathing would be pretty easy to morph, but if I remember correctly you are on workspace side so that will not work.
I am sure there is an easier way but I was thinking you could put a V shaped bone structure in the chest area and paint the control points to allow it to control the area of the chest you are looking to move.
I am sure there is an easier way but I was thinking you could put a V shaped bone structure in the chest area and paint the control points to allow it to control the area of the chest you are looking to move.
-
dreamcatcher107
- Petty Officer First Class
- Posts: 70
- Joined: 23 Aug 2009, 16:26
- Type the number ten into the box: 0
- Location: Illinois, USA
Re: Architect's Learning Curve
I am difficulty getting a handle on the UV mapping editor in the workspace side of the program. I found that I might be able to blend my color transition through this without using the 3D paint tool that hogs so much memory. I believe I understand that I need to 'unwrap the mesh in order to manipulate it correctly. The object is basically an open ended cylinder. I can not seemto bring up the unwrapped mesh in the editor. I have reviewed the 'slice' tool and understand it is for closed objects such as spheres. Am I missing something?
-
Steinie

- Captain
- Posts: 2958
- Joined: 21 May 2009, 17:38
- Type the number ten into the box: 10
Re: Architect's Learning Curve
I am not sure where your problem is so I'll post three screen captures
and see if this might help solve your problem.
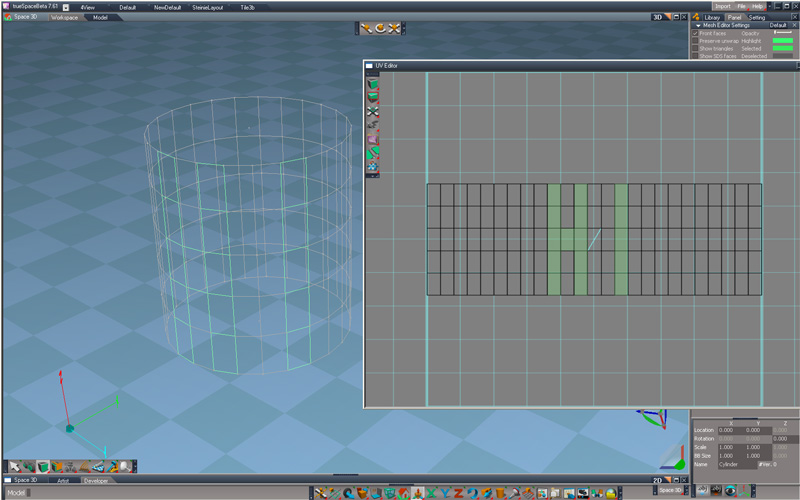
In the first screen I created a cylinder with no capped ends.
The UV was created automatically when I created the object.
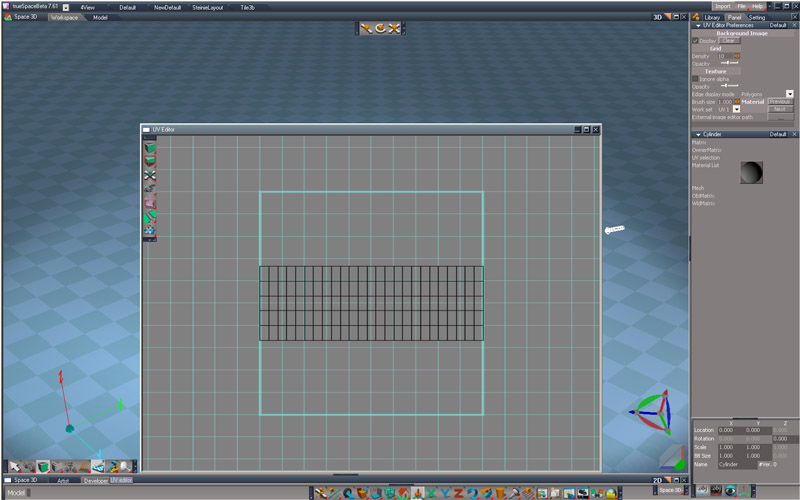
The second screen shows I used the eyedropper UV icon to bring up the UV Map.
(I use the mouse wheel to shrink the screen or enlarge the screen) As you can see the
UV Map is already created by trueSpace automatically and the type of UV mapping is determined
by the shape of the object.
In the third screen I used the "Select Faces" and as I selected faces (while holding
down the "ctrl key" you will see the result on the UV Map in real time. Holding down the shift key
while selecting faces will deselect any faces selected by mistake.
Can you show screen capture of the problem if this doesn't help?
and see if this might help solve your problem.
In the first screen I created a cylinder with no capped ends.
The UV was created automatically when I created the object.
The second screen shows I used the eyedropper UV icon to bring up the UV Map.
(I use the mouse wheel to shrink the screen or enlarge the screen) As you can see the
UV Map is already created by trueSpace automatically and the type of UV mapping is determined
by the shape of the object.
In the third screen I used the "Select Faces" and as I selected faces (while holding
down the "ctrl key" you will see the result on the UV Map in real time. Holding down the shift key
while selecting faces will deselect any faces selected by mistake.
Can you show screen capture of the problem if this doesn't help?
- Attachments
-
-
-

-
dreamcatcher107
- Petty Officer First Class
- Posts: 70
- Joined: 23 Aug 2009, 16:26
- Type the number ten into the box: 0
- Location: Illinois, USA
Re: Architect's Learning Curve
Thanks for the help Steinie. I found a way to achieve this next goal. I am getting into the animation aspect pf the project next and am viewing the tutorials. I found that if I limit myself to color shaders, they transfer easily across the bridge to workspace, which seems much easier to get a 'grip' on.
I will need to make this horse breathe and snort and, from a prior post, understand I can morph on this side of the bridge. I must assume that morphing is much the same as animation, except with a 'tugging and pulling' on the mesh, rather than manipulating the object as a whole. Do I understand correctly that these actions can be combined? The client also expressed an interest in the nostrils snorting fire. I have seen the fire shader, but if I am to use it in this manner, what procedure is involved? Do I need to develop another object that is rendered withthe fire material, and if so, do I create it at its inception from he nostril and expand, or at its greatest extreme and collapse? Is there a difference in the approach I take?
I will need to make this horse breathe and snort and, from a prior post, understand I can morph on this side of the bridge. I must assume that morphing is much the same as animation, except with a 'tugging and pulling' on the mesh, rather than manipulating the object as a whole. Do I understand correctly that these actions can be combined? The client also expressed an interest in the nostrils snorting fire. I have seen the fire shader, but if I am to use it in this manner, what procedure is involved? Do I need to develop another object that is rendered withthe fire material, and if so, do I create it at its inception from he nostril and expand, or at its greatest extreme and collapse? Is there a difference in the approach I take?