Hi...
Before start, i must thank those (gilrs and boys) who support this new Tutorium forum and of course Norm for the help and support.. 8)
VRAY INTERIOR LIGHTING – Level – Medium
In this tutorial im gonna show you how (you can made)to achieve a nice interior lighting using few light and settings with the new VRay Render engine from Truespace 7.11 and above..
Hope you like!!
Let's start.
Vray Interior Lighting
-
Prodigy

- Site Admin
- Posts: 957
- Joined: 21 May 2009, 14:46
- Type the number ten into the box: 0
- Location: Uruguay
Vray Interior Lighting
๑۩۞۩๑ prodigy ๑۩۞۩๑
-
Prodigy
- Site Admin
- Posts: 957
- Joined: 21 May 2009, 14:46
- Type the number ten into the box: 0
- Location: Uruguay
Re: Vray Interior Lighting
First you must understand how many kind of lights you must replicate to simulate reality.
1) From the skydome and exterior
2) From the sun.
3) From the bounces of the any ray of light inside the room
Vray are capable to help you simulate those lights with quality and at incredible render speed.
First we gonna enable the Global Illumination (GI) from the Vray settings panel to get the 1st and 2nd bouces plus the Envoirament color light..
We gonna select the (Very Low) preset to get a fast preview form what we are doing.
The environment color let you choose the color coming from the sky.
We gonna use the white color for the environment, but if you want you can use a little cyan.
You can see the scene is too dark. And that is because we dont have any source of light with the intesity recquired to iluminate the interior of the room..
** You can increse the interior intesity using the 1st and 2nd bounces but that will be a subject for following articles
1) From the skydome and exterior
2) From the sun.
3) From the bounces of the any ray of light inside the room
Vray are capable to help you simulate those lights with quality and at incredible render speed.
First we gonna enable the Global Illumination (GI) from the Vray settings panel to get the 1st and 2nd bouces plus the Envoirament color light..
We gonna select the (Very Low) preset to get a fast preview form what we are doing.
The environment color let you choose the color coming from the sky.
We gonna use the white color for the environment, but if you want you can use a little cyan.
You can see the scene is too dark. And that is because we dont have any source of light with the intesity recquired to iluminate the interior of the room..
** You can increse the interior intesity using the 1st and 2nd bounces but that will be a subject for following articles
๑۩۞۩๑ prodigy ๑۩۞۩๑
-
Prodigy
- Site Admin
- Posts: 957
- Joined: 21 May 2009, 14:46
- Type the number ten into the box: 0
- Location: Uruguay
Re: Vray Interior Lighting
Now we gonna insert the sun light.
In this case we gonna use a directional light with shadows enabled and no falloff with distance.
The light of the sun, have a bit of yelow color. How much yelow?? That’s depend from the hour of the day, the season and other variables..
Puting a little yelow and orange you can find a nice warm effect.
The light direction must be pointing to the windows. Thats gonna simulate the sun entering into the room..
Now we gonna make a new render..
Now, we can see the sunlight’s bounces through the room and a bit of Gi.
But still to dark..
In this case we gonna use a directional light with shadows enabled and no falloff with distance.
The light of the sun, have a bit of yelow color. How much yelow?? That’s depend from the hour of the day, the season and other variables..
Puting a little yelow and orange you can find a nice warm effect.
The light direction must be pointing to the windows. Thats gonna simulate the sun entering into the room..
Now we gonna make a new render..
Now, we can see the sunlight’s bounces through the room and a bit of Gi.
But still to dark..
๑۩۞۩๑ prodigy ๑۩۞۩๑
-
Prodigy
- Site Admin
- Posts: 957
- Joined: 21 May 2009, 14:46
- Type the number ten into the box: 0
- Location: Uruguay
Re: Vray Interior Lighting
As you can see the previous render still to dark..
For that, we gonna use the Area light on each window.
You must locate the Area lights ouside the room, infront the window looking to the inside. They must have the same shape of the window, with a similar size to simulate the lights comming from the outside..
We must enable the shadows with an intensity of 0.3 for each light.
Now we are ready to make another render..
That looks much better..
If you look, are fewer dark shadows. And to help the light bouces we gonna have to add a local light..
The function of this local light is try to light those dark areas, must be located in the center of the room and cannot emit shadows..
The intesity of this light must be very soft.. 0.4 or less, we gonna select the squared falloff..
The distance of that falloff should be the same of the room size..
Now if we make a render, we can see the room has improved its illumination.
For that, we gonna use the Area light on each window.
You must locate the Area lights ouside the room, infront the window looking to the inside. They must have the same shape of the window, with a similar size to simulate the lights comming from the outside..

Now we are ready to make another render..

If you look, are fewer dark shadows. And to help the light bouces we gonna have to add a local light..
The function of this local light is try to light those dark areas, must be located in the center of the room and cannot emit shadows..
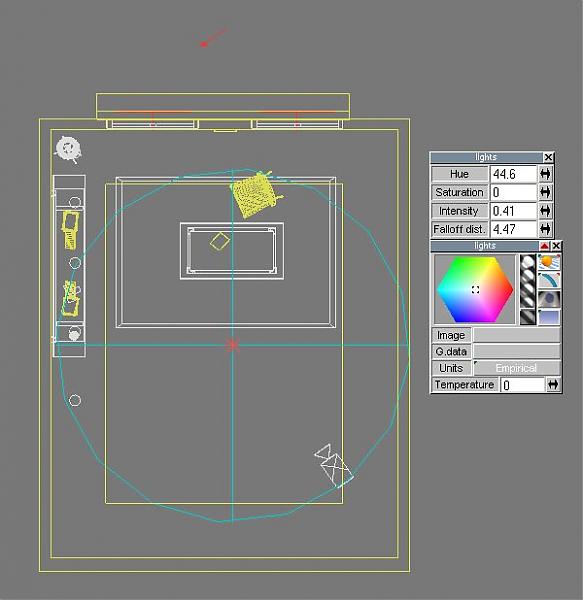
The distance of that falloff should be the same of the room size..
Now if we make a render, we can see the room has improved its illumination.

๑۩۞۩๑ prodigy ๑۩۞۩๑
-
Prodigy
- Site Admin
- Posts: 957
- Joined: 21 May 2009, 14:46
- Type the number ten into the box: 0
- Location: Uruguay
Re: Vray Interior Lighting
With a few touches you can get a pretty interior lighting room.
To solve the grain on the walls you can increse the antialiasing..
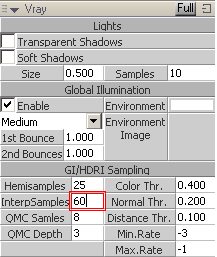
For a final render i recomend use x4 antialiasing and now yes.. we need to change the Vray preset setting to Medium or better to get an accurate bounce..
Increase the InterpSamples to 50 or 60..
And i recommends you, save the GI map because if you need to make a little change you dont need to wait again the GI calculation..
Next step is texturize and Voilá !!
Now you can download this scene and practice (if you whant) or burn the room...
*The scene doesn't have any lights or textures.. if you need the lights? read again the tutorial
*All the objects on this scene were created by myself for this tutorial and you can use them freely without a problem and for any propose.
*The image ouside the room was maded saving the render in Tga file format 32bits with Alpha channel and added in post process..
I hope you like this first tutorial..
Thanks Cobayo for the help!!
Best Regards,

For a final render i recomend use x4 antialiasing and now yes.. we need to change the Vray preset setting to Medium or better to get an accurate bounce..
- 13.jpg (18.45 KiB) Viewed 5162 times
And i recommends you, save the GI map because if you need to make a little change you dont need to wait again the GI calculation..
Next step is texturize and Voilá !!
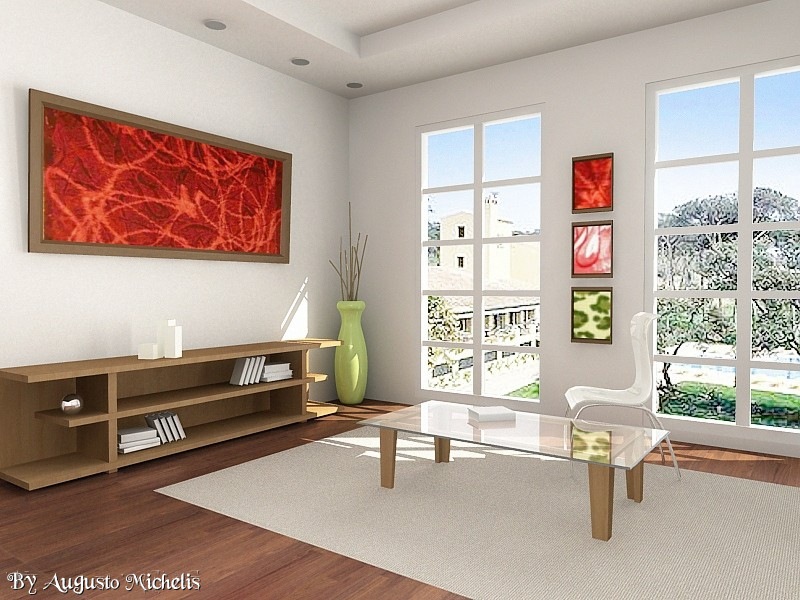
*The scene doesn't have any lights or textures.. if you need the lights? read again the tutorial
*All the objects on this scene were created by myself for this tutorial and you can use them freely without a problem and for any propose.
*The image ouside the room was maded saving the render in Tga file format 32bits with Alpha channel and added in post process..
I hope you like this first tutorial..
Thanks Cobayo for the help!!
Best Regards,
๑۩۞۩๑ prodigy ๑۩۞۩๑