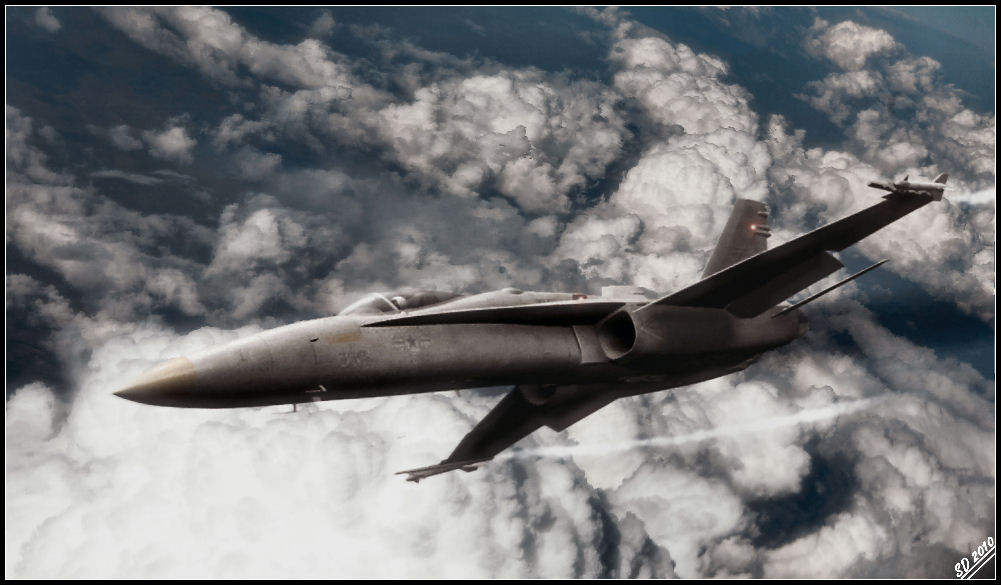
Just a quickie one I did last night, Leon would know, I was flinging screenshots at him
Not really fond of the hornet's position but given then background it was probably the best one there
Started at midnight, finished at 2 in the morning
Hornet again
-
Steve

- Master Chief Petty Officer
- Posts: 394
- Joined: 29 Jun 2009, 10:20
- Type the number ten into the box: 0
- Location: Hiding (Like a ninja)
Hornet again
- Attachments
-
-
Steve
- Master Chief Petty Officer
- Posts: 394
- Joined: 29 Jun 2009, 10:20
- Type the number ten into the box: 0
- Location: Hiding (Like a ninja)
Re: Hornet again
And another one made today
Warning, this is HUGE! Click only if you feel like a 3000x2000 image unfolding in your face. It's of the thunderbolts again, in a different scenario
http://fc00.deviantart.net/fs70/f/2010/ ... Weevil.jpg"
Warning, this is HUGE! Click only if you feel like a 3000x2000 image unfolding in your face. It's of the thunderbolts again, in a different scenario
http://fc00.deviantart.net/fs70/f/2010/ ... Weevil.jpg"
-
Steve
- Master Chief Petty Officer
- Posts: 394
- Joined: 29 Jun 2009, 10:20
- Type the number ten into the box: 0
- Location: Hiding (Like a ninja)
Re: Hornet again
-
Prodigy

- Site Admin
- Posts: 957
- Joined: 21 May 2009, 14:46
- Type the number ten into the box: 0
- Location: Uruguay
Re: Hornet again
Nice! i like it a lot! 
๑۩۞۩๑ prodigy ๑۩۞۩๑
-
Breech Block

- Master Chief Petty Officer
- Posts: 482
- Joined: 13 Jun 2009, 20:31
Re: Hornet again
Great stuff Steve! As ever. I really like the A10's too.
You always seem to find an interesting angle to pose your models to give them that great, dynamic look.
I'm also always impressed at how you manage to intergrate you models into the backplate with good use of heat haze and smoke trails.
BTW, I'd be curious to know where you source your background images from.
You always seem to find an interesting angle to pose your models to give them that great, dynamic look.
I'm also always impressed at how you manage to intergrate you models into the backplate with good use of heat haze and smoke trails.
BTW, I'd be curious to know where you source your background images from.

-
Steve
- Master Chief Petty Officer
- Posts: 394
- Joined: 29 Jun 2009, 10:20
- Type the number ten into the box: 0
- Location: Hiding (Like a ninja)
Re: Hornet again
Thanks guys
Breech, funny you should mention the two things that I could probably write an entire book on!
First off, I get the backing plates from CGtextures.com
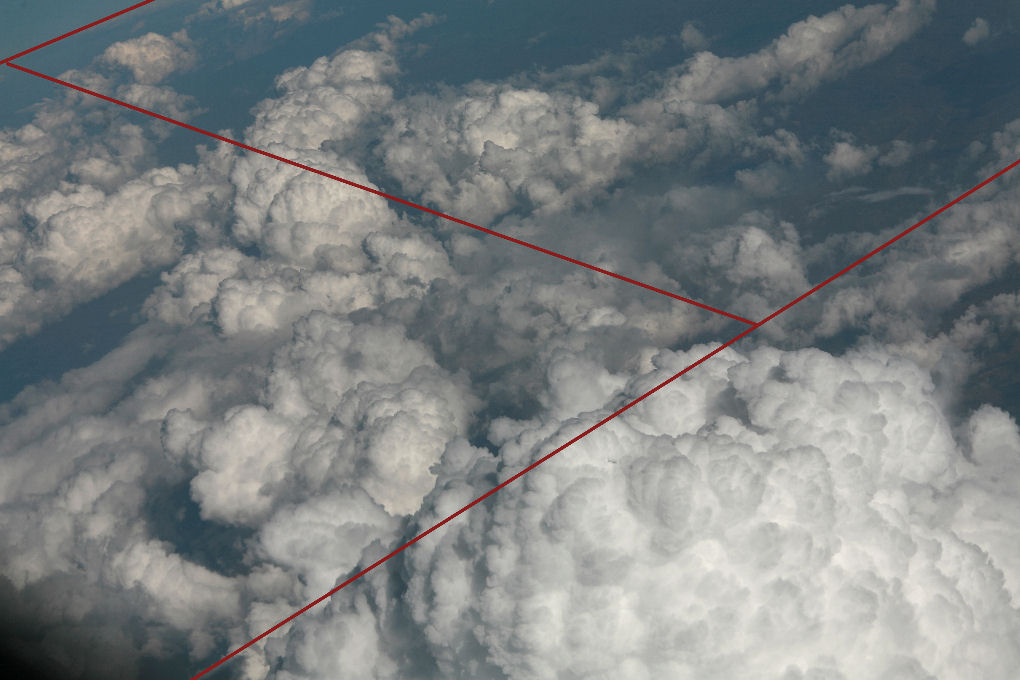
Second point, getting the aircraft into specific poses just involves looking at the backing plate's 'flow', if you see any out standing lines, use them. (As shown below)
The image used for the hornet had a massive cloud in the forefront, similar to that of an obstacle, the plane would either be going round or climbing over it. The F-18 is firing from left to right rather than right to left, as in the west we read from left to right, we would be reading 'with' the plane, making it a bit slower and more of a 'juggernaut'.
In the case of the backing plate for the thunderbolt image, if I were to mirror the backing plate, the thunderbolts would appear to be flying straight thanks to the bank of the image and 'against flow' because of the way the clouds form a corridor from left to right
When it comes to getting the colours right, it is all post process work, I do an 'uncoloured' test render where the object is not textured, to make sure my lights are okay (i look at light direction on the image, highlight colour and shadow colour, thickness and direction, especially on the clouds) then do another render. I correct the colours and increase brightness and contrast as needed.
Fun fact, for those who remember the image of the tornado
http://fc08.deviantart.net/fs70/f/2010/ ... Weevil.jpg"
Bonus points for those who can spot the fatal lighting flaw that has gone undetected until now!
An under rated tool is the 'shadows, highlight and midtones' tool, that is the tool that turned my images into high contrast 'wow' factors. Coupled with soft focus (or bloom) and then followed up by an unsharp mask, it does wonders.
Blending the plane onto the backing plate is easy, render each obejct as a seperate .png file. Import them onto the backing plate in photoshop or paintshop as a new layer, then use the magic tool to select the empty space of the layer an feather the selection, you may need a high feather depending on the image size. Then erase unti lthe edges have faded out sufficiently to 'anchor' or 'sink' it onto the backing plate, edges are notoriously sharp otherwise.
The contrails are simple, I have a splatter like brush and I paint with it, then I get a mottled eraser and erase random parts, then gaussian blur it. heat haze involves using the warp brush to distort certain parts on the backing plate, then on a new layer draw a subtle black haze and warping that, then smudge tooling the background.
Breech, funny you should mention the two things that I could probably write an entire book on!
First off, I get the backing plates from CGtextures.com
Second point, getting the aircraft into specific poses just involves looking at the backing plate's 'flow', if you see any out standing lines, use them. (As shown below)
The image used for the hornet had a massive cloud in the forefront, similar to that of an obstacle, the plane would either be going round or climbing over it. The F-18 is firing from left to right rather than right to left, as in the west we read from left to right, we would be reading 'with' the plane, making it a bit slower and more of a 'juggernaut'.
In the case of the backing plate for the thunderbolt image, if I were to mirror the backing plate, the thunderbolts would appear to be flying straight thanks to the bank of the image and 'against flow' because of the way the clouds form a corridor from left to right
When it comes to getting the colours right, it is all post process work, I do an 'uncoloured' test render where the object is not textured, to make sure my lights are okay (i look at light direction on the image, highlight colour and shadow colour, thickness and direction, especially on the clouds) then do another render. I correct the colours and increase brightness and contrast as needed.
Fun fact, for those who remember the image of the tornado
http://fc08.deviantart.net/fs70/f/2010/ ... Weevil.jpg"
Bonus points for those who can spot the fatal lighting flaw that has gone undetected until now!
An under rated tool is the 'shadows, highlight and midtones' tool, that is the tool that turned my images into high contrast 'wow' factors. Coupled with soft focus (or bloom) and then followed up by an unsharp mask, it does wonders.
Blending the plane onto the backing plate is easy, render each obejct as a seperate .png file. Import them onto the backing plate in photoshop or paintshop as a new layer, then use the magic tool to select the empty space of the layer an feather the selection, you may need a high feather depending on the image size. Then erase unti lthe edges have faded out sufficiently to 'anchor' or 'sink' it onto the backing plate, edges are notoriously sharp otherwise.
The contrails are simple, I have a splatter like brush and I paint with it, then I get a mottled eraser and erase random parts, then gaussian blur it. heat haze involves using the warp brush to distort certain parts on the backing plate, then on a new layer draw a subtle black haze and warping that, then smudge tooling the background.
- Attachments
-
-

-
Breech Block
- Master Chief Petty Officer
- Posts: 482
- Joined: 13 Jun 2009, 20:31
Re: Hornet again
Wow! That was a great read. Hey, you write the book and I'll be the first in-line to buy it! 
I must admit that I didn't realise you employed such a technical solution to getting your pics to look so good. But then again, perhaps I shouldn't have been so naive. I should know by now that the more natural a 3D image looks, the more and more hard work has been poured into it to get it to look that way. Gonna have to start brushing up on the Photoshop techniques you used and get some practice in. Thanks a bunch for sharing, much appreciated.
I must admit that I didn't realise you employed such a technical solution to getting your pics to look so good. But then again, perhaps I shouldn't have been so naive. I should know by now that the more natural a 3D image looks, the more and more hard work has been poured into it to get it to look that way. Gonna have to start brushing up on the Photoshop techniques you used and get some practice in. Thanks a bunch for sharing, much appreciated.
-
Steve
- Master Chief Petty Officer
- Posts: 394
- Joined: 29 Jun 2009, 10:20
- Type the number ten into the box: 0
- Location: Hiding (Like a ninja)
Re: Hornet again
I would say that I only employ technical knowledge when the image is not coming together nicely. I have merely reverse engineered my two latest images and dragged the subconscious into plain view (most likely kicking and screaming!). Your first few tries at this sort of thing will be very concsious, you will probably pour over everything meticulously to try and find out "why?". That's probably the most important aspect of any image I would say
"Why use that colour?"
"why not the other way around?"
"Why does the image exist?"
"Why that background"
Once asking why and how becomes autonomous, it's very easy to decompose images and find how they work.
As a side note:
Yes, I more than likely will write a 'book' on this sort of thing. But first I need to finish the writing project I'm working on at the moment
"The art of character creation, how not to mess it up"
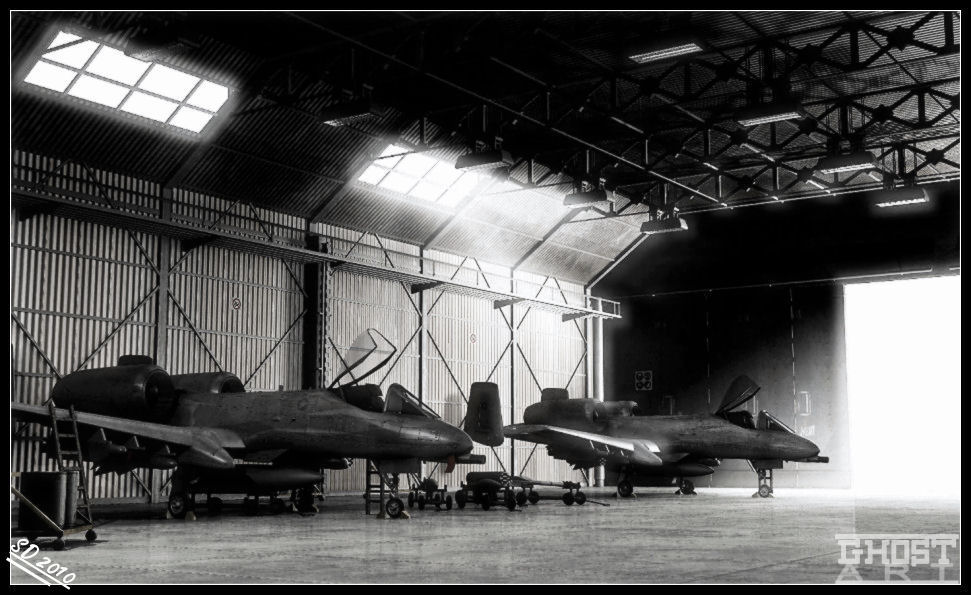
Also improved F-18 image from 2008 and thunderbolt images get, just to prove the soft focus high contrast approach
"Why use that colour?"
"why not the other way around?"
"Why does the image exist?"
"Why that background"
Once asking why and how becomes autonomous, it's very easy to decompose images and find how they work.
As a side note:
Yes, I more than likely will write a 'book' on this sort of thing. But first I need to finish the writing project I'm working on at the moment
"The art of character creation, how not to mess it up"
Also improved F-18 image from 2008 and thunderbolt images get, just to prove the soft focus high contrast approach
- Attachments
-
-

-
Steve
- Master Chief Petty Officer
- Posts: 394
- Joined: 29 Jun 2009, 10:20
- Type the number ten into the box: 0
- Location: Hiding (Like a ninja)
Jaguars
Did another quick one. Becuase you guys know I still do 3D
Right?
http://fc09.deviantart.net/fs71/f/2010/ ... Weevil.jpg"
Download that to get slapped in the face by 16000 square pixels
Right?
http://fc09.deviantart.net/fs71/f/2010/ ... Weevil.jpg"
Download that to get slapped in the face by 16000 square pixels
-
ranger0101

- Master Chief Petty Officer
- Posts: 363
- Joined: 22 May 2009, 13:15
- Type the number ten into the box: 0
- Location: Orrville Ohio U.S.A.
Re: Hornet again
17 Years old.....
You got no right to be so young and so good..
Just kidding... Rely nice work..
A few of your images make me think of
Air Force Recruitment Posters...
CHEERS
You got no right to be so young and so good..
Just kidding... Rely nice work..
A few of your images make me think of
Air Force Recruitment Posters...
CHEERS
In order to Create Art... You must first learn to See...
My Website http://www.theartoftimkoons.yolasite.com
My Website http://www.theartoftimkoons.yolasite.com
-
bitkar

- Captain
- Posts: 2089
- Joined: 16 Mar 2010, 07:14
- Type the number ten into the box: 0
- Location: Czech Republic
Re: Hornet again
10/10 points for some of that pics.. I love the hangar image.
Michal aka bitkar
tS freak since tS2 (1998) and forever (tS7.61 modeler)
tS freak since tS2 (1998) and forever (tS7.61 modeler)
-
Buzz

- Chief Petty Officer
- Posts: 150
- Joined: 05 Jul 2009, 12:46
- Type the number ten into the box: 0
- Location: Netherlands
Re: Hornet again
I agree with bitkar. The hangar scene has a really good mood.