Quick time VR Tutorial
by MC 'spacekdet' Horner
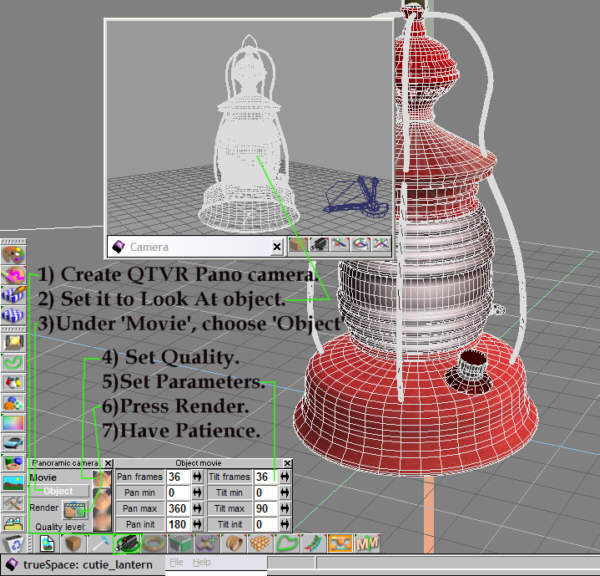
Attached is a visual minitut. (tS 6.x/ tS7.x-Model)Basically, here is the workflow for making a QTVR for an object:
* Load Object that you want to make a QTVR of. Normalize Location.
* Create QTVR Camera. Open small view window, and with camera selected click 'View From Object'. With the camera still selected, Click the 'Look At' icon. Now click the Object; the camera will 'focus' on the centered object. Using either window, move camera until you are satisfied with the view. You want to be able to see the entire object.
* Under 'Movie', Click and hold and then choose 'Object'.
* Adjust Quality slider. Obviously, higher= better quality output and larger .mov files.
* Set Parameters: Remember all these numbers represent degrees ( 0-360; can include negative numbers, i.e. -180) Pan is horizontal movement around your object, Tilt is vertical movement.
1. Pan Frames- How many frames to render to 'orbit' the object. More =smoother rotation and higher file size.
2. Pan Min- The minimum horizontal pan the object will rotate to. Usually 0.
3. Pan Max- Where the pan ends. A setting of 360 will orbit completely around the object, 180 will result in a 'half orbit', and only allow you to see one half of your object in the rendered QTVR.
4. Pan Init- Where the pan starts when the .mov file first opens.
5. Tilt Frames- How many frames to render to orbit vertically (so you can see the top or bottom of the object) Match the amount you set for pan.
6. Tilt Min and Max- The minimum/ maximum vertical tilt for the object. 0 is 'ground level', if you want to see both the top and bottom of your object, set Min to -90 and Max to 90. If you want to orbit completely around vertically set Min to 0 and max to 360. You can end up with an upside down camera view this way, however.
7. Tilt Init- Where the tilt view starts when the .mov file loads- 0 is grid or ground level.
* Lastly, Press the 'Render QTVR movie/ Panorama' button in the QTVR Options panel (not the usual 'Render Scene' icon) Choose a filename, and choose the desired rendered dimensions of the final .mov file. They can be quite large, so be forewarned. A 640 X 480 QTVR with the settings displayed in the image below resulted in a 24.7 MB QTVR .mov file.
* Have Patience... the status bar displays the message "this might take a while", and they aren't kidding. Depending on the lighting, complexity of the object, and your quality/pan/tilt settings, tS will be busy for a while. Like an animation, if you set 36 pan frames, it will need to render the scene 36 times. Just walk away, or set it to render overnight. You'll know it's finished when you can mouse over the tS window and get tooltips/ status bar activity.
* Open the resulting .mov file and enjoy the show. I'd post my results but it's almost 25 MB! <edit:> (Link to smaller 883k version )
Addendum:
* Panoramic mode: a Quicktime VR panoramic movie will be generated. This is where the camera is the center of the view and you can look all around, or as far as your settings allow. "A series of views are taken from the same spot but at slightly different angles. These images are then combined into a single image to allow dynamic viewing"
Object mode: a chosen object is the center of the view and the camera will 'orbit' around it depending on your settings.
"...they consist of a number of views of a static object taken from different points around the object. This allows the user to 'fly' around the object."
In the panel where you also set the quality, click and hold on the box labeled 'Panoramic' or 'Object' and choose the desired type.