For a duel from this thread.
I can't choose so what do you think?
- Model traditional old fashioned dueling pistols. (Seems closest to the theme.)
- Model my modern pistol. (Makes reference and measurements easy.)
- Science fiction or futuristic. (Klingon dueling disruptors maybe.)
- Something weird or humorous like leprechaun dueling instruments or a set of dueling tasers.
Dueling Pistol
-
Finis

- Captain
- Posts: 5410
- Joined: 21 May 2009, 18:26
- Type the number ten into the box: 0
- Location: America!
Dueling Pistol
I prefer dangerous freedom over peaceful servitude. -- Thomas Jefferson/Jean Jacques Rousseau
-
trueBlue

- Captain
- Posts: 5548
- Joined: 06 Jul 2009, 22:50
- Type the number ten into the box: 10

-
Breech Block

- Master Chief Petty Officer
- Posts: 482
- Joined: 13 Jun 2009, 20:31
Re: Dueling Pistol
Dueling Modeling Competitions, what a totaly brilliant idea! 
Personally, as Ye Olde type pistols will probably be the hardest to model, if your thinking of a pair of ornate custom jobs that is, I would think they would attract more votes.
Good luck.
Personally, as Ye Olde type pistols will probably be the hardest to model, if your thinking of a pair of ornate custom jobs that is, I would think they would attract more votes.
Good luck.

-
Finis
- Captain
- Posts: 5410
- Joined: 21 May 2009, 18:26
- Type the number ten into the box: 0
- Location: America!
Re: Dueling Pistol
I see that Weevil has yet to appear on the field of honor.
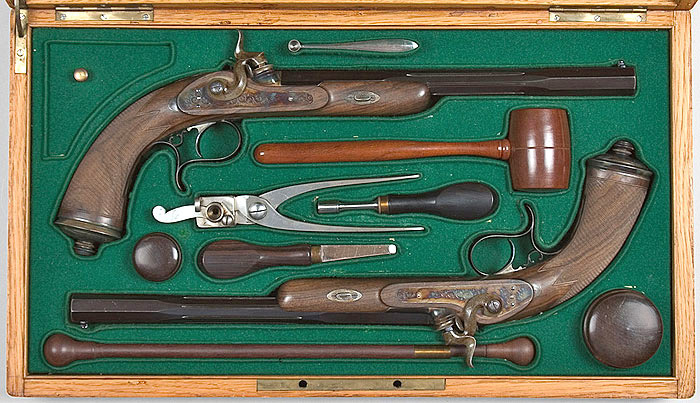
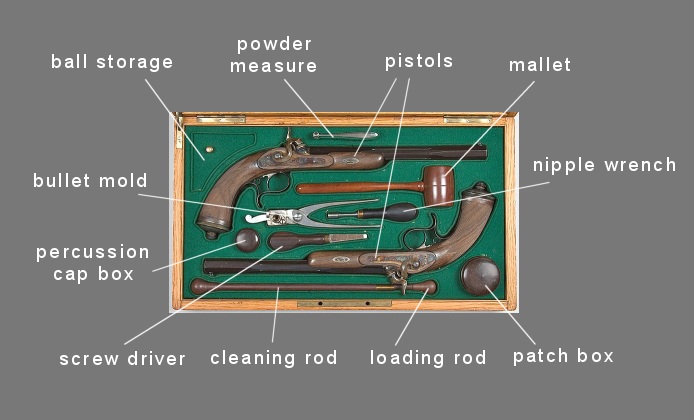
Old fashioned it is then. I'll do these since I like the way they look, there are numerous reference photos at http://www.aaawt.com/html/firearms/f90.html" , and they have some features that will be interesting to model.
I'll complete one gun first to have something done. Then I'll make a case for them. Then I'll make the tools hopefully before the due date.
Old fashioned it is then. I'll do these since I like the way they look, there are numerous reference photos at http://www.aaawt.com/html/firearms/f90.html" , and they have some features that will be interesting to model.
I'll complete one gun first to have something done. Then I'll make a case for them. Then I'll make the tools hopefully before the due date.
- Attachments
-
-
Last edited by Finis on 29 Dec 2009, 01:09, edited 3 times in total.
I prefer dangerous freedom over peaceful servitude. -- Thomas Jefferson/Jean Jacques Rousseau
-
Finis
- Captain
- Posts: 5410
- Joined: 21 May 2009, 18:26
- Type the number ten into the box: 0
- Location: America!
Re: Dueling Pistol
TS 7.6 Model Side
The Gun Barrel
The barrel is a tube with these characteristics:
- octagonal outside.
- the octagon is fluted along part of its length with grooves between the recessed areas.
- the corners of the octagon are slightly rounded.
- 6 rifling slots with 90 degree twist inside.
- 0.46 inches bore diameter (.46 caliber).
- The muzzle is tapered around the bore and outer edges.
The Barrel Plan
Prepare an octagonal rounded edge cylinder with edges to make the flute recesses and tapers. Make the cylinder so that point editing will be easy. Use Boolean subtraction to make the bore and rifling.
Making the Barrel
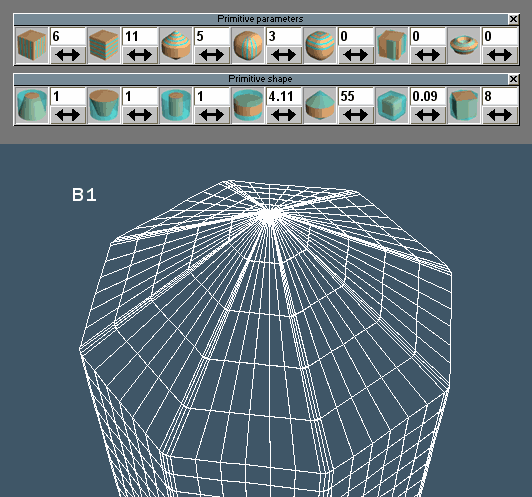
Figure B1. I made a cylinder primitive and used the primitive panels to adjust it to have the needed shape, edges, loops, and rounded corners. The ends are pointed so that edge loops can be selected with point edit rectangle select in side or top views.
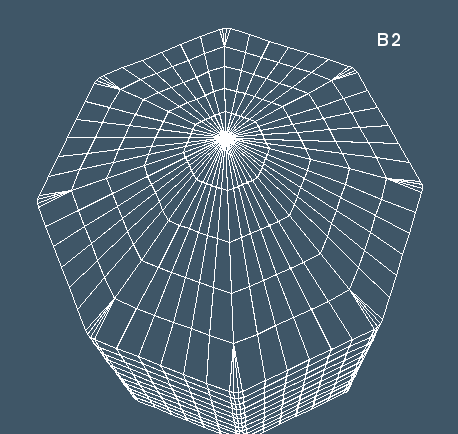
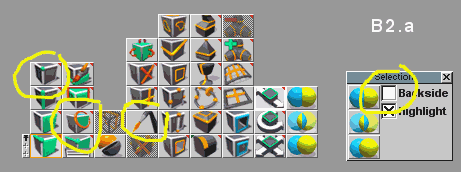
Figure B2. I want the edges that round the corners to converge before reaching the points. I selected each group of vertices and welded them in point edit mode. This needed the Vertices, Lasso Select, Weld tools and setting Backside off (B2.a) Right click on Lasso or Rectangle select to get the Backside panel.
The Gun Barrel
The barrel is a tube with these characteristics:
- octagonal outside.
- the octagon is fluted along part of its length with grooves between the recessed areas.
- the corners of the octagon are slightly rounded.
- 6 rifling slots with 90 degree twist inside.
- 0.46 inches bore diameter (.46 caliber).
- The muzzle is tapered around the bore and outer edges.
The Barrel Plan
Prepare an octagonal rounded edge cylinder with edges to make the flute recesses and tapers. Make the cylinder so that point editing will be easy. Use Boolean subtraction to make the bore and rifling.
Making the Barrel
Figure B1. I made a cylinder primitive and used the primitive panels to adjust it to have the needed shape, edges, loops, and rounded corners. The ends are pointed so that edge loops can be selected with point edit rectangle select in side or top views.
Figure B2. I want the edges that round the corners to converge before reaching the points. I selected each group of vertices and welded them in point edit mode. This needed the Vertices, Lasso Select, Weld tools and setting Backside off (B2.a) Right click on Lasso or Rectangle select to get the Backside panel.
- Attachments
-
-
- Barrel_tut2.gif (11.21 KiB) Viewed 5777 times
-
Last edited by Finis on 29 Dec 2009, 05:23, edited 4 times in total.
I prefer dangerous freedom over peaceful servitude. -- Thomas Jefferson/Jean Jacques Rousseau
-
Finis
- Captain
- Posts: 5410
- Joined: 21 May 2009, 18:26
- Type the number ten into the box: 0
- Location: America!
Re: Dueling Pistol
Making the Barrel (continued)
Figure B3. Using the scale tool and a reference photograph on a plane I scaled the object so that the bases of the cones are at the ends of the barrel and adjusted the diameter.
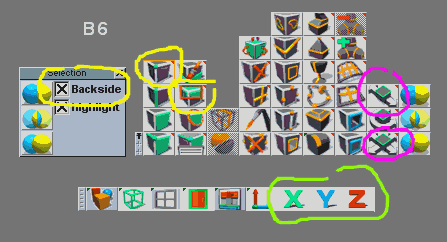
Then I selected edge loops on the cones (B4) and moved them into positions closer to the final shape (B5) and to prepare for the Boolean subtraction of the bore object. I used the top view for this. To select them I used the Vertices and Rectangle select point edit tools with Backside on (B6 yellow). The Point Move and Point Scale tools (B6 purple) and the axis navigation tools (B6 green) were used to move and scale the loops. By disabling movement on the Y axis I was able to move the loops without making them off center from the barrel.
Figure B3. Using the scale tool and a reference photograph on a plane I scaled the object so that the bases of the cones are at the ends of the barrel and adjusted the diameter.
Then I selected edge loops on the cones (B4) and moved them into positions closer to the final shape (B5) and to prepare for the Boolean subtraction of the bore object. I used the top view for this. To select them I used the Vertices and Rectangle select point edit tools with Backside on (B6 yellow). The Point Move and Point Scale tools (B6 purple) and the axis navigation tools (B6 green) were used to move and scale the loops. By disabling movement on the Y axis I was able to move the loops without making them off center from the barrel.
- Attachments
-
-
-


Last edited by Finis on 29 Dec 2009, 05:25, edited 5 times in total.
I prefer dangerous freedom over peaceful servitude. -- Thomas Jefferson/Jean Jacques Rousseau
-
Finis
- Captain
- Posts: 5410
- Joined: 21 May 2009, 18:26
- Type the number ten into the box: 0
- Location: America!
Re: Dueling Pistol
Making the Barrel (continued)
Now to make the bore drill object.
I made a 48 sided cylinder so its edges would match the edges at the barrel's ends. I used the numerical panel (right click arrow icon) to make it 0.46 inches in diameter.
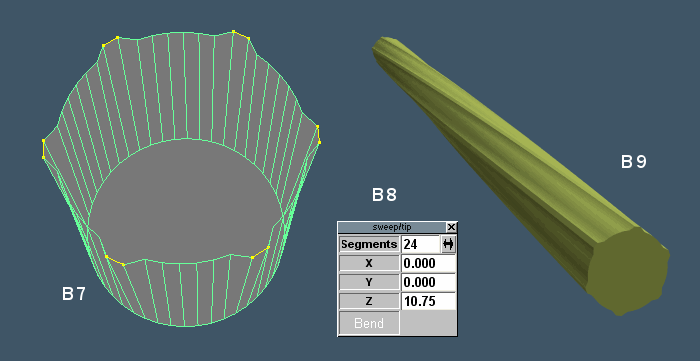
Then I selected every eighth edge along the top polygon. Using point edit scale I moved those edges outward a little (B7). This polygon will be the base for a sweep.
I selected the top polygon and swept it with point edit sweep and the settings shown (B8). To twist the shape for spiral rifling I clicked the point edit rotate tool while the top end of the sweep was still selected. Then I entered 90 in the Z rotation box on the numerical panel.
I selected and deleted the bottom of the shape to remove the original cylinder. The resulting shape is shown in Figure B9.
Now to make the bore drill object.
I made a 48 sided cylinder so its edges would match the edges at the barrel's ends. I used the numerical panel (right click arrow icon) to make it 0.46 inches in diameter.
Then I selected every eighth edge along the top polygon. Using point edit scale I moved those edges outward a little (B7). This polygon will be the base for a sweep.
I selected the top polygon and swept it with point edit sweep and the settings shown (B8). To twist the shape for spiral rifling I clicked the point edit rotate tool while the top end of the sweep was still selected. Then I entered 90 in the Z rotation box on the numerical panel.
I selected and deleted the bottom of the shape to remove the original cylinder. The resulting shape is shown in Figure B9.
- Attachments
-
Last edited by Finis on 29 Dec 2009, 05:14, edited 5 times in total.
I prefer dangerous freedom over peaceful servitude. -- Thomas Jefferson/Jean Jacques Rousseau
-
Finis
- Captain
- Posts: 5410
- Joined: 21 May 2009, 18:26
- Type the number ten into the box: 0
- Location: America!
Re: Dueling Pistol
Since this is a two person modeling duel it would be a POVBFGMD.trueBlue wrote:How about a POV from a BFG?
Work flow notes:
I make several working scenes each with a backup scene and save frequently. When all the components of a scene are done I make a production scene to position them and set up the lighting and camera. The production scene is the source of the finished image.
Work scenes often have a parts corral. It is a cube where I keep a copy of each important part and things used to make it. The copies are inside the cube so that they don't slow down test renders and I don't have to change visibility on them.
I am working in Model Side 4 view mode (top, side, front, perspective). Not the 4View tab but the one from older versions of TS circled below. I often work with 4 views.
- Attachments
-

- 4-view-icon.gif (4.35 KiB) Viewed 5793 times
Last edited by Finis on 28 Dec 2009, 23:03, edited 2 times in total.
I prefer dangerous freedom over peaceful servitude. -- Thomas Jefferson/Jean Jacques Rousseau
-
spacekdet

- Captain
- Posts: 1810
- Joined: 27 May 2009, 15:00
- Type the number ten into the box: 10
- Location: On the day shift at the Utility Muffin Research Kitchen
Re: Dueling Pistol
Shootout at the Cube Corral?
-
tahnoak

- Master Chief Petty Officer
- Posts: 339
- Joined: 02 Sep 2009, 01:31
Re: Dueling Pistol
Finis...this is going to be an incredible undertaking but I can see you are already off to a great start. Thank you for sharing the step by step process in how you did this. It shows me there are things that I can do which, again, I did not even consider in my scenes.
-
Finis
- Captain
- Posts: 5410
- Joined: 21 May 2009, 18:26
- Type the number ten into the box: 0
- Location: America!
Re: Dueling Pistol
"Shootout at the Cube Corral?" I imagine a strange western movie with Borg.
Thanks Tahnoak. I thought I'd document my methods to help folks and to get suggestions if there are better ways.
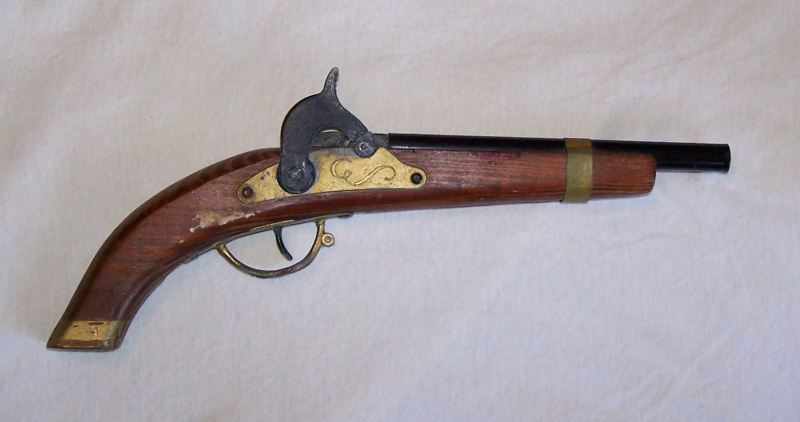
Here is an old toy of mine. The hammer strikes a paper cap and the gasses from the cap shoot a cork ball from it.
Thanks Tahnoak. I thought I'd document my methods to help folks and to get suggestions if there are better ways.
Here is an old toy of mine. The hammer strikes a paper cap and the gasses from the cap shoot a cork ball from it.
- Attachments
-
I prefer dangerous freedom over peaceful servitude. -- Thomas Jefferson/Jean Jacques Rousseau
-
Finis
- Captain
- Posts: 5410
- Joined: 21 May 2009, 18:26
- Type the number ten into the box: 0
- Location: America!
Re: Dueling Pistol
Some previous posts have been updated with new methods and info.
I prefer dangerous freedom over peaceful servitude. -- Thomas Jefferson/Jean Jacques Rousseau
-
Finis
- Captain
- Posts: 5410
- Joined: 21 May 2009, 18:26
- Type the number ten into the box: 0
- Location: America!
Re: Dueling Pistol
Making the Barrel (continued)
Figure B10. Before doing the Boolean for the bore I will move the edge loops along the barrel so that they will support making the fluted and grooved area later. I used rectangle select of vertices, backside on, in the side view to select a loop and then moved it with Y axis movement off. I arranged them so there is one at the ends of the details and to support making the curved areas.
This is why I gave the original pointed cylinder object these loops.
Figure B10. Before doing the Boolean for the bore I will move the edge loops along the barrel so that they will support making the fluted and grooved area later. I used rectangle select of vertices, backside on, in the side view to select a loop and then moved it with Y axis movement off. I arranged them so there is one at the ends of the details and to support making the curved areas.
This is why I gave the original pointed cylinder object these loops.
- Attachments
-

I prefer dangerous freedom over peaceful servitude. -- Thomas Jefferson/Jean Jacques Rousseau
-
Finis
- Captain
- Posts: 5410
- Joined: 21 May 2009, 18:26
- Type the number ten into the box: 0
- Location: America!
Re: Dueling Pistol
Making the Barrel (continued)
Now the Boolean subtraction for the bore.
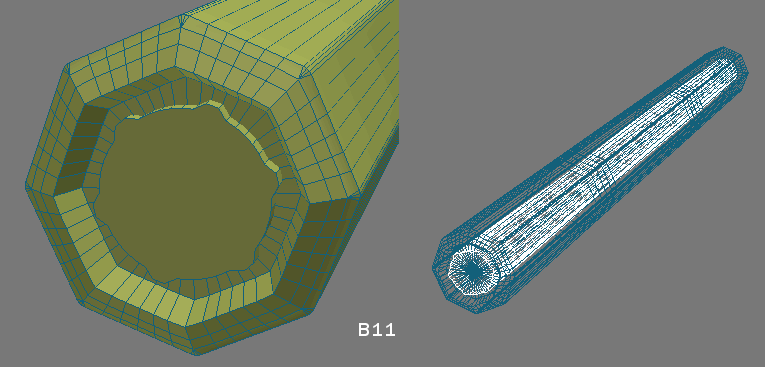
Figure B11. I used the numerical panel (object info) to precisely align the drill, the object that represents the bore, and the barrel. I changed the drill length to be slightly longer than the barrel's end faces. Then I observed the arrangement in DX solid wire mode to confirm that the edges aligned well.
I Boolean subtracted the drill from the barrel with settings: Identity = 50, On Fly Offset = 0.2, Delete Edges off, Triangulate off, and Keep Drill off. After subtraction I inspected the mesh for artifacts such as missing or extra edges. There were none.
The wire frame (B12) shows that the edges wrap around the shape well. On close inspection I see that the some edges are off a little at the junction of barrel and bore. Vertex welding in point edit mode will correct that.
To weld the vertices I move the view in for a close up. In point edit mode I use the Vertex, Lasso Select with backside off, and Vertex Weld tools.
An inside view can be seen in Figure B13. The spiral rifling makes the bullet spin which improves accuracy.
Now the Boolean subtraction for the bore.
Figure B11. I used the numerical panel (object info) to precisely align the drill, the object that represents the bore, and the barrel. I changed the drill length to be slightly longer than the barrel's end faces. Then I observed the arrangement in DX solid wire mode to confirm that the edges aligned well.
I Boolean subtracted the drill from the barrel with settings: Identity = 50, On Fly Offset = 0.2, Delete Edges off, Triangulate off, and Keep Drill off. After subtraction I inspected the mesh for artifacts such as missing or extra edges. There were none.
The wire frame (B12) shows that the edges wrap around the shape well. On close inspection I see that the some edges are off a little at the junction of barrel and bore. Vertex welding in point edit mode will correct that.
To weld the vertices I move the view in for a close up. In point edit mode I use the Vertex, Lasso Select with backside off, and Vertex Weld tools.
An inside view can be seen in Figure B13. The spiral rifling makes the bullet spin which improves accuracy.
- Attachments
-
-

I prefer dangerous freedom over peaceful servitude. -- Thomas Jefferson/Jean Jacques Rousseau
-
tahnoak
- Master Chief Petty Officer
- Posts: 339
- Joined: 02 Sep 2009, 01:31
Re: Dueling Pistol
So there is no way in he!! that mine is going to come out looking like this but I can't wait to give it a shot when you're finished. Thanks again for the step by step.
-
Finis
- Captain
- Posts: 5410
- Joined: 21 May 2009, 18:26
- Type the number ten into the box: 0
- Location: America!
Re: Dueling Pistol
tahnoak wrote:So there is no way in he!! that mine is going to come out looking like this but I can't wait to give it a shot when you're finished. Thanks again for the step by step.
Only in Heaven would my work equal yours, or Prodigy's, or Steinie's, or ...
You have the artist's eye. Your compositions, story telling, communication of mood or emotion, are excellent. You quickly learn new techniques and then apply them skillfully.
My effort here may have some technical merit. Some foresight, planning, attention to detail, and persistence are my primary strengths in this project. (If only I applied those in other parts of life.)
I'm trying to make this, and most future 3D projects, so it can be sold. Also, I want to compare my ability to Weevil's awesome ability. However ...
Weevil has not appeared on the field of honor. Perhaps I should question his courage or conviction.
I prefer dangerous freedom over peaceful servitude. -- Thomas Jefferson/Jean Jacques Rousseau
-
Steve

- Master Chief Petty Officer
- Posts: 394
- Joined: 29 Jun 2009, 10:20
- Type the number ten into the box: 0
- Location: Hiding (Like a ninja)
Re: Dueling Pistol
Hold your horses my good man, I'll get round to modelling something, even if it's only a Supersoaker, got a few other things that take president to do first
-
Finis
- Captain
- Posts: 5410
- Joined: 21 May 2009, 18:26
- Type the number ten into the box: 0
- Location: America!
Re: Dueling Pistol
Making the Barrel (continued)
Next is the fluted area in the middle of the barrel.
Fluting, or making grooves, valleys, etc. in a barrel, is alleged to have benefits. It certainly makes a barrel lighter, cost more, and look cool.
I made the original barrel object, the pointed cylinder, with loops and edges to support this. In Figure B10 I moved some loops into position to use in this step.
Goals:
GB_1. To draw outlines of the recessed features by adding edges.
GB_2. To add edges to support making the grooves.
GB_3. To move point or edges to create the needed geometry.
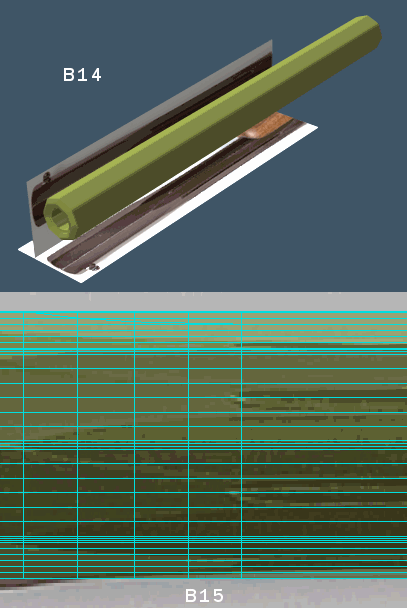
First I arranged the barrel and two planes with reference images (B14). By looking at side or top views in DX semi-transparent with wire mode I could align the barrel mesh with the reference image below (B15). Using this DX view mode shows only the closer side's wires so that helps avoid a cluttered working view.
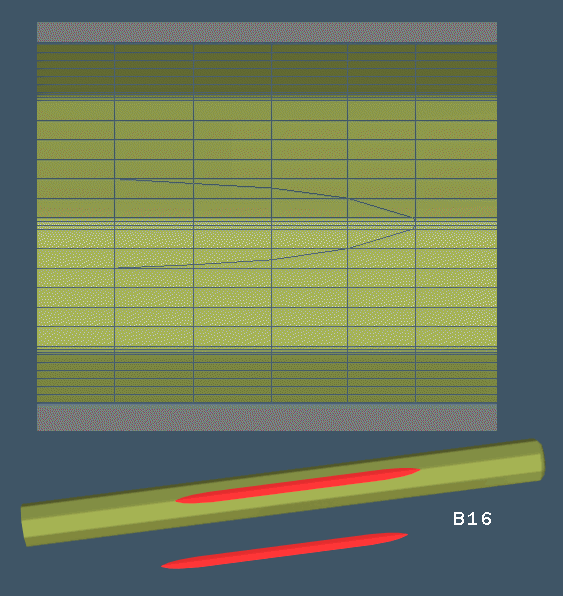
I added edges in point edit mode and used existing edges where possible to outline one of the long oval shapes. Figure B16 illustrates this. At this point the shape of the barrel has not changed.
The separate red object in Figure B16 will be used as a guide for the edges for the other ovals. I made this object from a copy of the barrel by selecting the oval's faces and using the separate selected items tool.
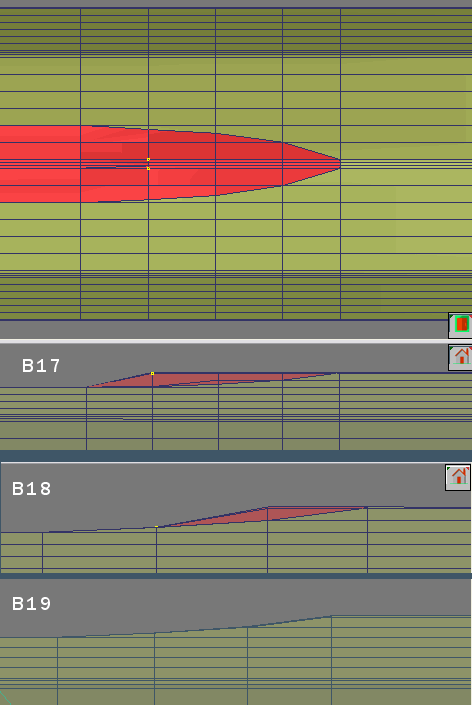
Figure B17. This shows a portion of the screen as I see it working with top and side views. To move the vertices I selected them in pairs on the top view and used point edit move in the side view with X axis off and backside off. Figure B18 shows it after more vertices have been moved and Figure B19 with one end complete.
I placed the red guide object, rotated the barrel 45 degrees, and repeated this process until all 8 ovals were made.
Next is the fluted area in the middle of the barrel.
Fluting, or making grooves, valleys, etc. in a barrel, is alleged to have benefits. It certainly makes a barrel lighter, cost more, and look cool.
I made the original barrel object, the pointed cylinder, with loops and edges to support this. In Figure B10 I moved some loops into position to use in this step.
Goals:
GB_1. To draw outlines of the recessed features by adding edges.
GB_2. To add edges to support making the grooves.
GB_3. To move point or edges to create the needed geometry.
First I arranged the barrel and two planes with reference images (B14). By looking at side or top views in DX semi-transparent with wire mode I could align the barrel mesh with the reference image below (B15). Using this DX view mode shows only the closer side's wires so that helps avoid a cluttered working view.
I added edges in point edit mode and used existing edges where possible to outline one of the long oval shapes. Figure B16 illustrates this. At this point the shape of the barrel has not changed.
The separate red object in Figure B16 will be used as a guide for the edges for the other ovals. I made this object from a copy of the barrel by selecting the oval's faces and using the separate selected items tool.
Figure B17. This shows a portion of the screen as I see it working with top and side views. To move the vertices I selected them in pairs on the top view and used point edit move in the side view with X axis off and backside off. Figure B18 shows it after more vertices have been moved and Figure B19 with one end complete.
I placed the red guide object, rotated the barrel 45 degrees, and repeated this process until all 8 ovals were made.
- Attachments
-
-
-
- Barrel_tut17-19.gif (11.71 KiB) Viewed 5091 times
Last edited by Finis on 01 Jan 2010, 01:32, edited 1 time in total.
I prefer dangerous freedom over peaceful servitude. -- Thomas Jefferson/Jean Jacques Rousseau
-
Finis
- Captain
- Posts: 5410
- Joined: 21 May 2009, 18:26
- Type the number ten into the box: 0
- Location: America!
Re: Dueling Pistol
Making the Barrel (continued)
Here is the barrel with all the ovals.
Here is the barrel with all the ovals.
- Attachments
-

- Barrel_tut20.gif (6.61 KiB) Viewed 5090 times
I prefer dangerous freedom over peaceful servitude. -- Thomas Jefferson/Jean Jacques Rousseau
-
Steinie

- Captain
- Posts: 2958
- Joined: 21 May 2009, 17:38
- Type the number ten into the box: 10
Re: Dueling Pistol
Excellent so far...! 
-
Finis
- Captain
- Posts: 5410
- Joined: 21 May 2009, 18:26
- Type the number ten into the box: 0
- Location: America!
Re: Dueling Pistol
Thanks Steinie.
Making the Barrel (continued)
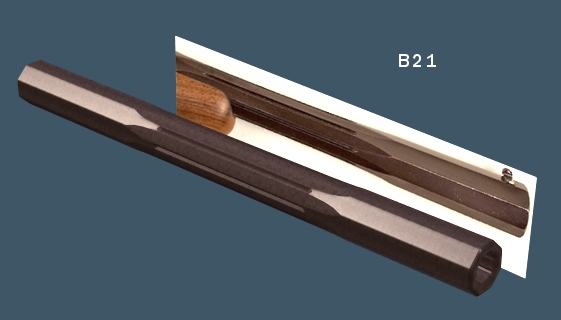
I added the grooves using similar methods to the ovals. They are simple V grooves using few edges. The muzzle is rounded now too.
I made the texture in Paint Shop Pro by copying a portion of a reference photo and using the convert to seamless pattern tool. Some more clone brushing and touch up is needed to avoid repetition and the color needs adjustment.
Making the Barrel (continued)
I added the grooves using similar methods to the ovals. They are simple V grooves using few edges. The muzzle is rounded now too.
I made the texture in Paint Shop Pro by copying a portion of a reference photo and using the convert to seamless pattern tool. Some more clone brushing and touch up is needed to avoid repetition and the color needs adjustment.
- Attachments
-
I prefer dangerous freedom over peaceful servitude. -- Thomas Jefferson/Jean Jacques Rousseau
-
Finis
- Captain
- Posts: 5410
- Joined: 21 May 2009, 18:26
- Type the number ten into the box: 0
- Location: America!
Re: Dueling Pistol
Making the Barrel (continued)
Now for the front sight.
The sight is dovetailed in to the barrel. It can be tapped to adjust the aim. It is bright and reflective.
Rather than model a dovetail slot into the barrel I will model the parts for the sight and just place them in position on the barrel. The barrel, and the gun, will be a group of parts.
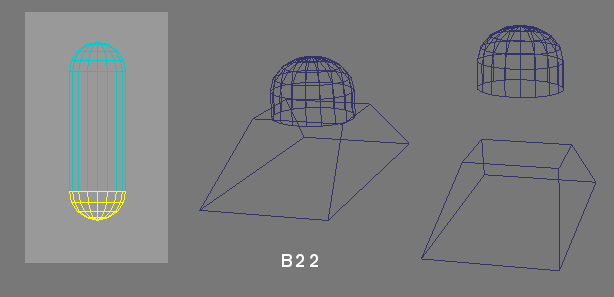
The sight has two parts -- the rounded upper part and the bar that connects it to the barrel. Figure B22 shows the rounded cylinder that became one part. I selected and deleted some portions of it and then repositioned the bottom polygon. The lower part is a modified cube.
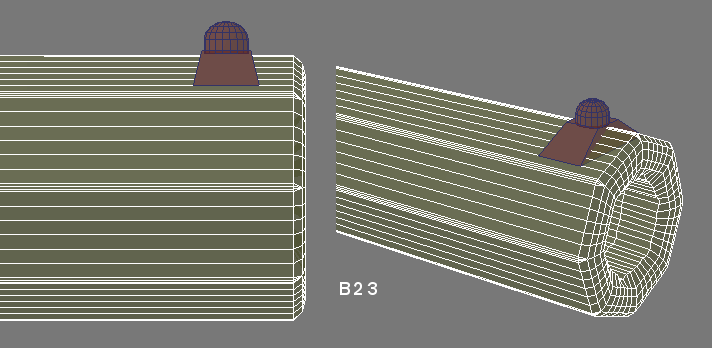
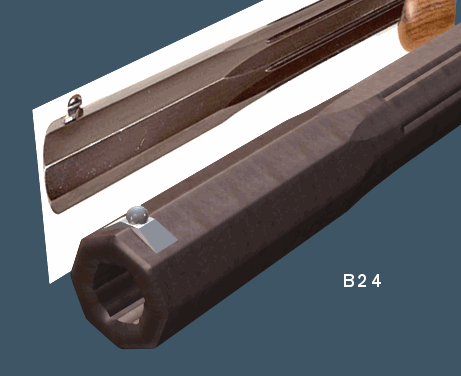
Figure B23 shows the placement on the barrel and the dovetail shape in the side view. Figure B24 shows a textured version. These textures are not final.
While the sight does not have to be a replica of the real one I do want it to have similar characteristics and to look good on the model. I think this one needs work to round the edges, close the lines on the bottom of the round part, and adjust its proportions.
Edit: There is a new front sight in later posts.
Now for the front sight.
The sight is dovetailed in to the barrel. It can be tapped to adjust the aim. It is bright and reflective.
Rather than model a dovetail slot into the barrel I will model the parts for the sight and just place them in position on the barrel. The barrel, and the gun, will be a group of parts.
The sight has two parts -- the rounded upper part and the bar that connects it to the barrel. Figure B22 shows the rounded cylinder that became one part. I selected and deleted some portions of it and then repositioned the bottom polygon. The lower part is a modified cube.
Figure B23 shows the placement on the barrel and the dovetail shape in the side view. Figure B24 shows a textured version. These textures are not final.
While the sight does not have to be a replica of the real one I do want it to have similar characteristics and to look good on the model. I think this one needs work to round the edges, close the lines on the bottom of the round part, and adjust its proportions.
Edit: There is a new front sight in later posts.
- Attachments
-
- Barrel_tut22.gif (6.8 KiB) Viewed 5287 times
-
-
Last edited by Finis on 03 Jan 2010, 18:35, edited 3 times in total.
I prefer dangerous freedom over peaceful servitude. -- Thomas Jefferson/Jean Jacques Rousseau
-
tahnoak
- Master Chief Petty Officer
- Posts: 339
- Joined: 02 Sep 2009, 01:31
Re: Dueling Pistol
The patience that you have for all this minute detail is amazing. I still struggle with that... excellent work and great tutorial!!!
-
Finis
- Captain
- Posts: 5410
- Joined: 21 May 2009, 18:26
- Type the number ten into the box: 0
- Location: America!
Re: Dueling Pistol
Thanks Tahnoak. The detail is for two reasons. First, I'm trying to earn a little money from my hobby by selling the models. So I'm trying for hopefully pro quality meshes. Second, I have had a week off from work (unfortunately unpaid) so I have too much time.
I'll learn to do UV mapping on this project too. I've never done that except for applying combinations of the simple ones like cylinder or cube.
If it was completely for fun then I would have done everything with easier methods like lots of Booleans and attention to detail only were there was a problem with the finished image. I may also do a quicker version to have it finished for the duel poll.
A new front sight coming soon.
I'll learn to do UV mapping on this project too. I've never done that except for applying combinations of the simple ones like cylinder or cube.
If it was completely for fun then I would have done everything with easier methods like lots of Booleans and attention to detail only were there was a problem with the finished image. I may also do a quicker version to have it finished for the duel poll.
A new front sight coming soon.
Last edited by Finis on 03 Jan 2010, 18:36, edited 1 time in total.
I prefer dangerous freedom over peaceful servitude. -- Thomas Jefferson/Jean Jacques Rousseau
-
Finis
- Captain
- Posts: 5410
- Joined: 21 May 2009, 18:26
- Type the number ten into the box: 0
- Location: America!
Re: Dueling Pistol
Making the Barrel (continued)
Here is a new front sight. The real one is not very clear in the reference photos. I think it is shaped similar to Figure B25 and isn't a hemisphere on top. There are more details in the real one.
I made the top shape in Figure B25 by adding and moving the edges of a cube. The curved part was extruded from a face using bevel. By adding edges and using a cylinder as a reference I made the curved top. It needs more edges on top to be smooth. I'll add them later for the final product.
This time I read the manual about filets and chamfers. I did not get satisfactory results but the chamfer tool's simple bevels were easy to neaten up. In figure B26 the left image shows some messy edges from the chamfer tool and the right image shows my neater edges.
Figure B27 shows a rendering of the barrel.
Here is a new front sight. The real one is not very clear in the reference photos. I think it is shaped similar to Figure B25 and isn't a hemisphere on top. There are more details in the real one.
I made the top shape in Figure B25 by adding and moving the edges of a cube. The curved part was extruded from a face using bevel. By adding edges and using a cylinder as a reference I made the curved top. It needs more edges on top to be smooth. I'll add them later for the final product.
This time I read the manual about filets and chamfers. I did not get satisfactory results but the chamfer tool's simple bevels were easy to neaten up. In figure B26 the left image shows some messy edges from the chamfer tool and the right image shows my neater edges.
Figure B27 shows a rendering of the barrel.
- Attachments
-
-

- Barrel_tut26.gif (6.57 KiB) Viewed 5260 times
-


I prefer dangerous freedom over peaceful servitude. -- Thomas Jefferson/Jean Jacques Rousseau
-
LeonRegis

- Captain
- Posts: 1946
- Joined: 18 Aug 2009, 17:36
- Type the number ten into the box: 0
- Location: Brazil/Earth/Orion Arm/Milky Way/4th Dimension/This Universe/Multiverse???/Singularity???
Re: Dueling Pistol
Great, god you are really painstaking! 
Be the change you want to see in the world. - Mohandas Gandhi
-
Tommy

- Master Chief Petty Officer
- Posts: 403
- Joined: 28 Jun 2009, 14:05
- Type the number ten into the box: 0
- Location: Sweden, Göteborg
Re: Dueling Pistol
Excellent work and it's also very interesting to follow your work with the gun. I'm learning a lot. I always go into this thread to look at the progress of your work.
Thanks a lot for your turorials.
Thanks a lot for your turorials.
"Carpe diem"
-
Finis
- Captain
- Posts: 5410
- Joined: 21 May 2009, 18:26
- Type the number ten into the box: 0
- Location: America!
Re: Dueling Pistol
Thanks Tahnoak, Leon, and Tommy.
Looks like I won't make the January 11 deadline. Weevil might agree to extending it to the end of February.
Looks like I won't make the January 11 deadline. Weevil might agree to extending it to the end of February.
I prefer dangerous freedom over peaceful servitude. -- Thomas Jefferson/Jean Jacques Rousseau
-
Finis
- Captain
- Posts: 5410
- Joined: 21 May 2009, 18:26
- Type the number ten into the box: 0
- Location: America!
Re: Dueling Pistol
The Gun Stock
- The stock is made of wood.
- It provides a grip.
- The grip is checkered.
- The stock holds the metal parts.
- There are raised flat areas on each side.
The Stock Plan
The stock will be a subdivision surface. I will sweep a round shape to roughly fit a reference image and use it as the basis of the SDS control mesh. Then I will edit and adjust the control mesh so that the SDS has the desired shape.
The finished product will include the control mesh and an extracted final mesh.
The checkering will be a bump map.
Making the Stock
I am working in TS5 for this part. TS7.6 model side requires the use of a 3D widget (the colored balls) to access the control mesh while viewing the resulting mesh. I prefer the TS5 style for that.
To transfer the needed items to TS5 I grouped them and saved the group as a TS5 cob file.
Figure B28. I made a cylinder and positioned it near one end of the stock.
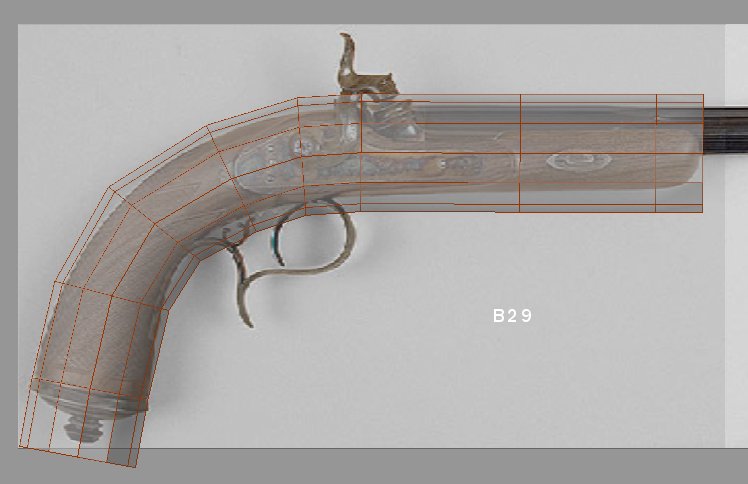
Figure B29. I swept the top polygon of the cylinder into this shape. Some loops were placed near features such as the flat sides.
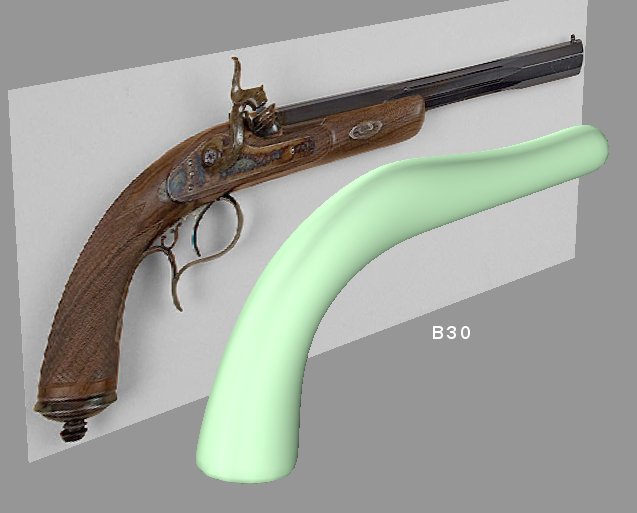
Figure B30. This is the SDS shape after editing the control mesh. To edit the control mesh I used the lasso and rectangle select to select loops. Then I moved and scaled them to fit the reference image.
Next I will add loops and refine the shape.
- The stock is made of wood.
- It provides a grip.
- The grip is checkered.
- The stock holds the metal parts.
- There are raised flat areas on each side.
The Stock Plan
The stock will be a subdivision surface. I will sweep a round shape to roughly fit a reference image and use it as the basis of the SDS control mesh. Then I will edit and adjust the control mesh so that the SDS has the desired shape.
The finished product will include the control mesh and an extracted final mesh.
The checkering will be a bump map.
Making the Stock
I am working in TS5 for this part. TS7.6 model side requires the use of a 3D widget (the colored balls) to access the control mesh while viewing the resulting mesh. I prefer the TS5 style for that.
To transfer the needed items to TS5 I grouped them and saved the group as a TS5 cob file.
Figure B28. I made a cylinder and positioned it near one end of the stock.
Figure B29. I swept the top polygon of the cylinder into this shape. Some loops were placed near features such as the flat sides.
Figure B30. This is the SDS shape after editing the control mesh. To edit the control mesh I used the lasso and rectangle select to select loops. Then I moved and scaled them to fit the reference image.
Next I will add loops and refine the shape.
- Attachments
-
-
-

I prefer dangerous freedom over peaceful servitude. -- Thomas Jefferson/Jean Jacques Rousseau
-
Steve
- Master Chief Petty Officer
- Posts: 394
- Joined: 29 Jun 2009, 10:20
- Type the number ten into the box: 0
- Location: Hiding (Like a ninja)
Re: Dueling Pistol
well
You win
You win
-
Finis
- Captain
- Posts: 5410
- Joined: 21 May 2009, 18:26
- Type the number ten into the box: 0
- Location: America!
Re: Dueling Pistol
I win!
"...to crush your enemies, to see them fall at your feet, to take their horses and goods and hear the lamentation of their women. That is best."
-- Genghis Kahn
Weevil, seeing what you are doing with Broken Skies I'd rather you worked on that.
"...to crush your enemies, to see them fall at your feet, to take their horses and goods and hear the lamentation of their women. That is best."
-- Genghis Kahn
Weevil, seeing what you are doing with Broken Skies I'd rather you worked on that.
I prefer dangerous freedom over peaceful servitude. -- Thomas Jefferson/Jean Jacques Rousseau
-
marcel

- Captain
- Posts: 2247
- Joined: 21 May 2009, 19:52
- Type the number ten into the box: 0
- Location: paris - France
Re: Dueling Pistol
Genghis Kahn was a very cool guy! 
Design - illustration - Animation
http://www.crea-vision.fr
http://www.crea-vision.fr
-
Finis
- Captain
- Posts: 5410
- Joined: 21 May 2009, 18:26
- Type the number ten into the box: 0
- Location: America!
Re: Dueling Pistol
Still working on this just not much time for it. Updates whenever.
I prefer dangerous freedom over peaceful servitude. -- Thomas Jefferson/Jean Jacques Rousseau
-
lothissen

- Petty Officer First Class
- Posts: 68
- Joined: 07 Jun 2009, 14:31
- Type the number ten into the box: 0
Re: Dueling Pistol
I thought that was Conan!Finis wrote:I win!
"...to crush your enemies, to see them fall at your feet, to take their horses and goods and hear the lamentation of their women. That is best."
-- Genghis Kahn
--------------------===============AKA Jayr===============--------------------
------------------=========3D Coat -Lightwave- Messiah=========------------------
------------------=========3D Coat -Lightwave- Messiah=========------------------
-
marcel
- Captain
- Posts: 2247
- Joined: 21 May 2009, 19:52
- Type the number ten into the box: 0
- Location: paris - France
Re: Dueling Pistol
Here is the answer about your doubt:lothissen wrote: I thought that was Conan!
http://www.barbariankeep.com/ctbsecrets.html

Design - illustration - Animation
http://www.crea-vision.fr
http://www.crea-vision.fr
-
compPanda
- Senior Chief Petty Officer
- Posts: 275
- Joined: 21 May 2009, 21:15
- Type the number ten into the box: 0
Re: Dueling Pistol
Well, he was at least very successful with the women since he left a genetic trail that scientist claim makes 8% of all Asian and 0.5% of all men to be descendant to him...marcel wrote:Genghis Kahn was a very cool guy!
-
marcel
- Captain
- Posts: 2247
- Joined: 21 May 2009, 19:52
- Type the number ten into the box: 0
- Location: paris - France
Re: Dueling Pistol
Maybe Saddam, Hitler, ben laden and many more...
Design - illustration - Animation
http://www.crea-vision.fr
http://www.crea-vision.fr
-
Tommy
- Master Chief Petty Officer
- Posts: 403
- Joined: 28 Jun 2009, 14:05
- Type the number ten into the box: 0
- Location: Sweden, Göteborg
Re: Dueling Pistol
I have a very unusual bloodgroup. Pure swedish with no asian looks. But my bloodtype is like the asian sort. Maybee I'm an ancester. But I dont care. Just a thought.
"Carpe diem"
-
Breech Block
- Master Chief Petty Officer
- Posts: 482
- Joined: 13 Jun 2009, 20:31
Re: Dueling Pistol
Nice thread and the model is looking really good even at this early stage, hope you perservere with this.
-
Finis
- Captain
- Posts: 5410
- Joined: 21 May 2009, 18:26
- Type the number ten into the box: 0
- Location: America!
Re: Dueling Pistol
Still working on it. Just busy with other stuff like finding a better job. I intend to sell this on Turbosquid or such.
I'm planning to use a bump map for the checkering on the grip. Anyone have advice about bump mapping that pattern or other methods?
I'm planning to use a bump map for the checkering on the grip. Anyone have advice about bump mapping that pattern or other methods?
I prefer dangerous freedom over peaceful servitude. -- Thomas Jefferson/Jean Jacques Rousseau
-
LeonRegis
- Captain
- Posts: 1946
- Joined: 18 Aug 2009, 17:36
- Type the number ten into the box: 0
- Location: Brazil/Earth/Orion Arm/Milky Way/4th Dimension/This Universe/Multiverse???/Singularity???
Re: Dueling Pistol
there is displacement map but it increases the geometry and I don't know if can cause bad geometry... but can cast shadows and it's good for closes but in a normal scene would occupy too much space since it will become a HD object.
Be the change you want to see in the world. - Mohandas Gandhi
-
Finis
- Captain
- Posts: 5410
- Joined: 21 May 2009, 18:26
- Type the number ten into the box: 0
- Location: America!
Re: Dueling Pistol
Thanks Leon. I think displacement mapping would make the geometry unnecessarily complex and high poly since the checkering isn't very deep. It would be hard to remove the checkering if user wanted it smooth too.
I prefer dangerous freedom over peaceful servitude. -- Thomas Jefferson/Jean Jacques Rousseau
-
Finis
- Captain
- Posts: 5410
- Joined: 21 May 2009, 18:26
- Type the number ten into the box: 0
- Location: America!
Re: Dueling Pistol
Making the Stock (continued)
I've started a different method on the stock subdivision surface.
Remember that I'm working in TS5 on this part. These things can be done in TS6.6 and TS7.6 model side too. Workspace supports SDS as well.
Editing of the control mesh is done using the point edit tools. Mostly rectangle and lasso and vertex select, add edges, and scale and move vertex. Often I have limited the the moving or scaling to particular axes.
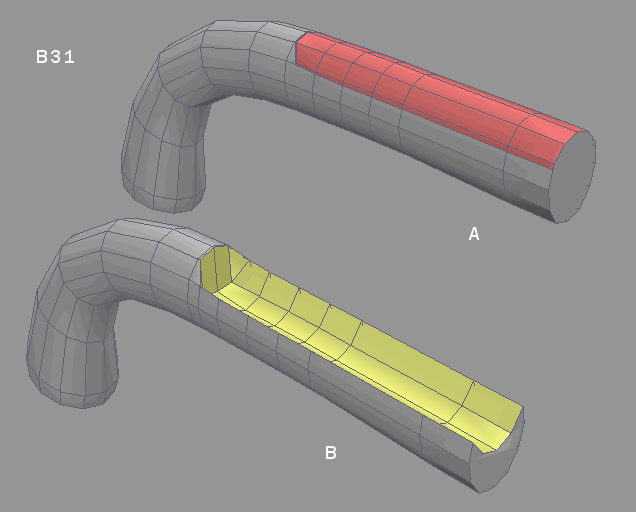
Starting with the swept cylinder from earlier, I added edges (B31-A) to outline the red area. The red area will be reshaped to make the cut out part that holds the barrel. Then I added another loop and moved vertices of the yellow area to produce the reshaped part (B31-B).
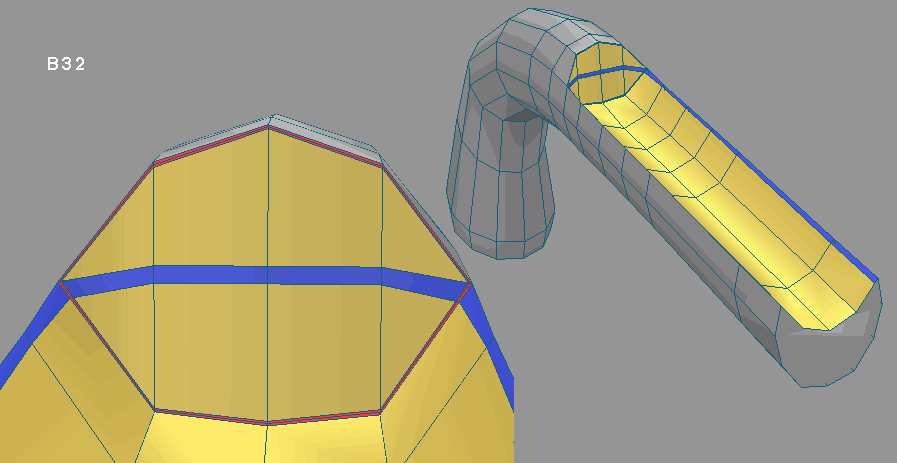
Figure B32. Here I moved the loop behind the barrel area back some and simplified the mesh by removing some unnecessary edges. Then I added the blue loop to support rounding and shaping the top near the barrel and the red loops. I moved some edges to fit the shape to the reference image.
The red edges are close so that a sharp corner will be made in the SDS mesh. You can also use weights to sharpen edges. That has the advantage of fewer edges needed. Erpax is doing that with his Batmobile.
I've started a different method on the stock subdivision surface.
Remember that I'm working in TS5 on this part. These things can be done in TS6.6 and TS7.6 model side too. Workspace supports SDS as well.
Editing of the control mesh is done using the point edit tools. Mostly rectangle and lasso and vertex select, add edges, and scale and move vertex. Often I have limited the the moving or scaling to particular axes.
Starting with the swept cylinder from earlier, I added edges (B31-A) to outline the red area. The red area will be reshaped to make the cut out part that holds the barrel. Then I added another loop and moved vertices of the yellow area to produce the reshaped part (B31-B).
Figure B32. Here I moved the loop behind the barrel area back some and simplified the mesh by removing some unnecessary edges. Then I added the blue loop to support rounding and shaping the top near the barrel and the red loops. I moved some edges to fit the shape to the reference image.
The red edges are close so that a sharp corner will be made in the SDS mesh. You can also use weights to sharpen edges. That has the advantage of fewer edges needed. Erpax is doing that with his Batmobile.
- Attachments
-
-
I prefer dangerous freedom over peaceful servitude. -- Thomas Jefferson/Jean Jacques Rousseau
-
Finis
- Captain
- Posts: 5410
- Joined: 21 May 2009, 18:26
- Type the number ten into the box: 0
- Location: America!
Re: Dueling Pistol
Making the Stock (continued)
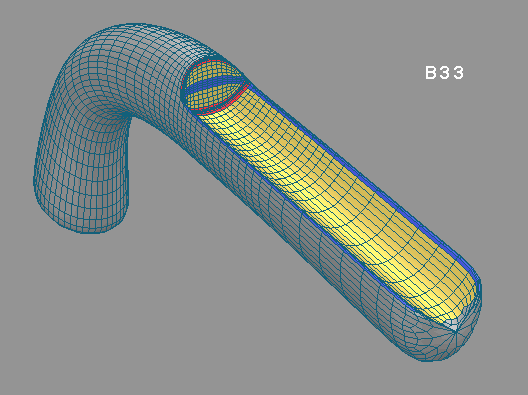
Figure B33. This shows 2 levels of SDS.
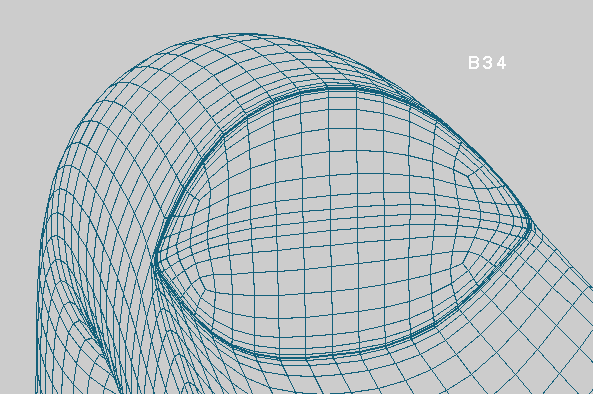
Figure B34. This shows the SDS mesh in the complex area.
Figure B33. This shows 2 levels of SDS.
Figure B34. This shows the SDS mesh in the complex area.
- Attachments
-
-
I prefer dangerous freedom over peaceful servitude. -- Thomas Jefferson/Jean Jacques Rousseau
-
Finis
- Captain
- Posts: 5410
- Joined: 21 May 2009, 18:26
- Type the number ten into the box: 0
- Location: America!
Re: Dueling Pistol
Making the Stock (continued)
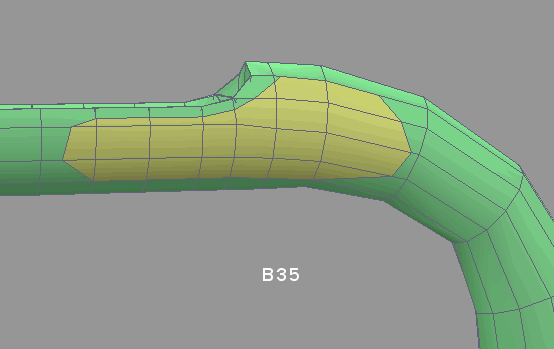
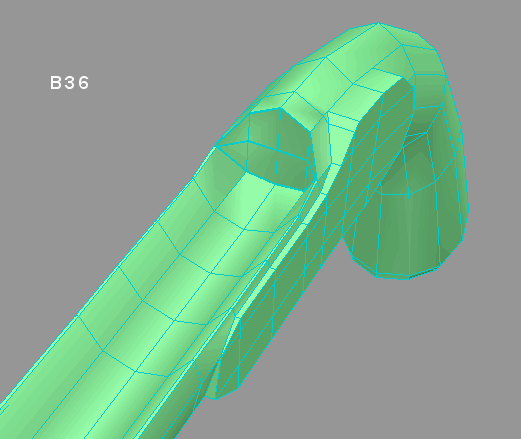
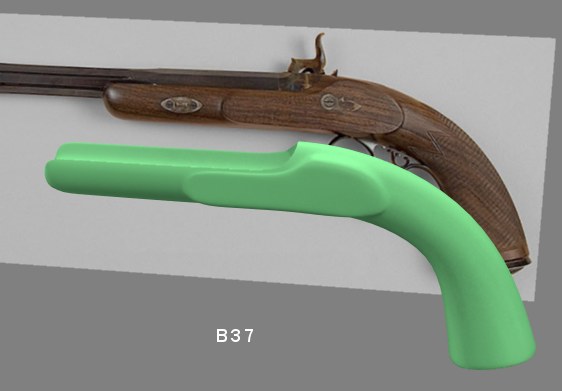
In Figure B35 I have added some edges to outline the yellow area. This is for the flat parts of the stock. I also added edges to the ends of the stock to wrap the loops around it. Then I selected the yellow faces and used the bevel tool on them. Then I copy/pasted the coordinate on one axis among the vertices using the numerical panel to flatten the side. That made the shape in Figure B36. The SDS shape that makes is shown in Figure B37.
Since I'll use half of this with a mirror tool later I'll do the flat part on one side.
Next is fitting the barrel part to the barrel and fine tuning the transition to the flat part.
In Figure B35 I have added some edges to outline the yellow area. This is for the flat parts of the stock. I also added edges to the ends of the stock to wrap the loops around it. Then I selected the yellow faces and used the bevel tool on them. Then I copy/pasted the coordinate on one axis among the vertices using the numerical panel to flatten the side. That made the shape in Figure B36. The SDS shape that makes is shown in Figure B37.
Since I'll use half of this with a mirror tool later I'll do the flat part on one side.
Next is fitting the barrel part to the barrel and fine tuning the transition to the flat part.
- Attachments
-
-
-
I prefer dangerous freedom over peaceful servitude. -- Thomas Jefferson/Jean Jacques Rousseau
-
Finis
- Captain
- Posts: 5410
- Joined: 21 May 2009, 18:26
- Type the number ten into the box: 0
- Location: America!
Re: Dueling Pistol
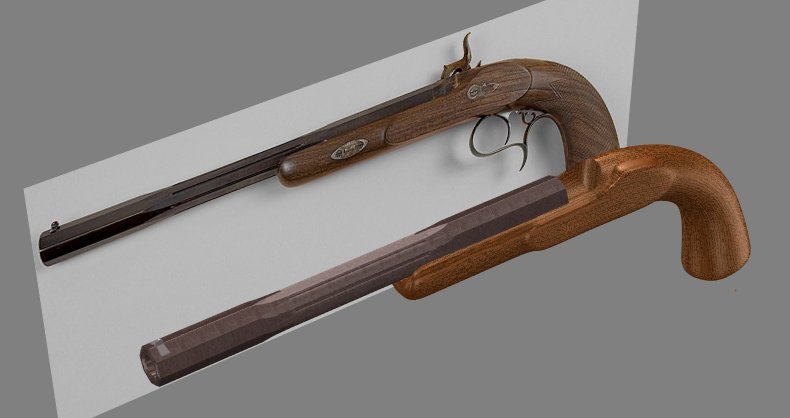
Here is a picture with textures. I've been working on the grip/stock to make a cleaner mesh, fit it to the barrel, and make the flat area on the side. Details later.
- Attachments
-
I prefer dangerous freedom over peaceful servitude. -- Thomas Jefferson/Jean Jacques Rousseau
-
marcel
- Captain
- Posts: 2247
- Joined: 21 May 2009, 19:52
- Type the number ten into the box: 0
- Location: paris - France
Re: Dueling Pistol
Good work finis.
try to add these white edge, i think you will have a better SDS. It is all quad.
try to add these white edge, i think you will have a better SDS. It is all quad.
- Attachments
-

Design - illustration - Animation
http://www.crea-vision.fr
http://www.crea-vision.fr
-
Finis
- Captain
- Posts: 5410
- Joined: 21 May 2009, 18:26
- Type the number ten into the box: 0
- Location: America!
Re: Dueling Pistol
Excellent advice Marcel. Thanks. I've been having trouble there. I did work on that end since that picture but your edges are much better. Mine had triangles. Since this object is not flexible like a face I don't mind having triangles but want to avoid them when I can. That's to get a clean mesh and to develop good habits for flexible items. Of course I want no N>4 gons anywhere.
I prefer dangerous freedom over peaceful servitude. -- Thomas Jefferson/Jean Jacques Rousseau
-
Finis
- Captain
- Posts: 5410
- Joined: 21 May 2009, 18:26
- Type the number ten into the box: 0
- Location: America!
Re: Dueling Pistol
Just busy. I'll get back to this.
I prefer dangerous freedom over peaceful servitude. -- Thomas Jefferson/Jean Jacques Rousseau
-
Finis
- Captain
- Posts: 5410
- Joined: 21 May 2009, 18:26
- Type the number ten into the box: 0
- Location: America!
Re: Dueling Pistol
I want to get back to this but it will have to wait until I get or create a job. I'm hoping to finish my unfinished TS projects before starting any more.
I prefer dangerous freedom over peaceful servitude. -- Thomas Jefferson/Jean Jacques Rousseau
-
lycheesack2
- Seaman Recruit
- Posts: 3
- Joined: 11 Mar 2010, 01:22
Re: Dueling Pistol
That's very interesting
-
Finis
- Captain
- Posts: 5410
- Joined: 21 May 2009, 18:26
- Type the number ten into the box: 0
- Location: America!
Re: Dueling Pistol
Thanks lycheesack2 and welcome to the forum. Still too busy to get back to TS.
I prefer dangerous freedom over peaceful servitude. -- Thomas Jefferson/Jean Jacques Rousseau
-
Finis
- Captain
- Posts: 5410
- Joined: 21 May 2009, 18:26
- Type the number ten into the box: 0
- Location: America!
Re: Dueling Pistol
I'm going to work on unfinished projects like this instead of MMC's and SMC's, when I have time, for a while. Then modeling challenges again.
I prefer dangerous freedom over peaceful servitude. -- Thomas Jefferson/Jean Jacques Rousseau
-
BNG

- Chief Warrant Officer
- Posts: 684
- Joined: 16 Oct 2009, 03:26
- Type the number ten into the box: 0
- Location: Texas
Re: Dueling Pistol
Very cool Finis. Thanks for posting the tutorial. I wouldn't mind making a few weapons myself. BNG.
Casual Truespace 3D modeling hobbyist. My Truespace blog and simple 3d Modeling Tutorials for Casual Model Makers.
-
MikomDude

- Captain
- Posts: 1930
- Joined: 04 Oct 2010, 11:12
- Type the number ten into the box: 0
- Location: The Hague, Netherlands
Re: Dueling Pistol
That looks very nice!
-
Steinie
- Captain
- Posts: 2958
- Joined: 21 May 2009, 17:38
- Type the number ten into the box: 10
Re: Dueling Pistol
I'm glad your back on this project!
Looking good!
Looking good!
-
Breech Block
- Master Chief Petty Officer
- Posts: 482
- Joined: 13 Jun 2009, 20:31
Re: Dueling Pistol
I always wondered what happened to this. Glad you decided to continue as I think the model will really rock if you continue in the same vein.
-
Steve
- Master Chief Petty Officer
- Posts: 394
- Joined: 29 Jun 2009, 10:20
- Type the number ten into the box: 0
- Location: Hiding (Like a ninja)
Re: Dueling Pistol
One year on and you STILL haven't shot me with this gun while I go ahead and build one that walks
Bad show sir
Bad show sir
-
Finis
- Captain
- Posts: 5410
- Joined: 21 May 2009, 18:26
- Type the number ten into the box: 0
- Location: America!
Re: Dueling Pistol
If we could get these models into a game we could fight the duel! Black powder vs. mech.Steve wrote:One year on and you STILL haven't shot me with this gun while I go ahead and build one that walks
I prefer dangerous freedom over peaceful servitude. -- Thomas Jefferson/Jean Jacques Rousseau