Hi all
Still having some UV editing issues. As suggested in an earlier thread I tried out the Workspace UV Editor and it is, indeed, rather good. Not as good as UV Cow but until I can find my tS5 CD to find out if it's tS6 or Windows10 it doesn't like I will stick with the Workspace one.
Now, the problem I have is that not all faces are showing up. I can select them and they get the box around them in the editor but there is nothing actually shown. As if in the editor all they are invisible. Which I'm sure you'll agree is not very helpful!
I've tried all sorts but I'm stumped. Would anyone be willing to have a look and see if they can see what's wrong? I have attached an example mesh saved as both Workspace and Modelside format. In this particular mesh you will see that the top and bottom faces don't show, for example. many thanks for any advice.
UV Editing
-
WickedWitchOfTheWeb
- Petty Officer Second Class
- Posts: 36
- Joined: 29 May 2009, 00:12
UV Editing
- Attachments
-
- shoulders.cob
- (12.56 KiB) Downloaded 229 times
-
- Cylinder.RsObj
- (69.14 KiB) Downloaded 252 times
-
trueBlue

- Captain
- Posts: 5548
- Joined: 06 Jul 2009, 22:50
- Type the number ten into the box: 10
Re: UV Editing
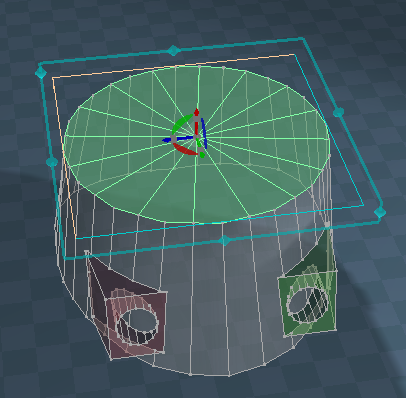
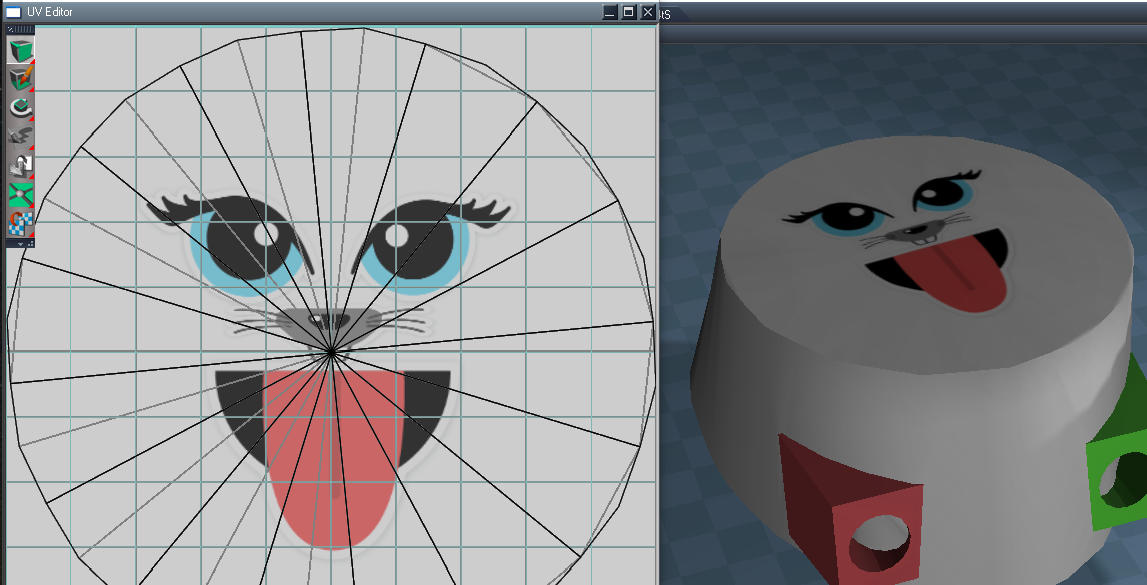
In trueSpace 761 Workspace, I applied a Planar UV projection to the Top faces and then to the Bottom face
BTW... I believe that trueSpace 761 Workspace UV Editor has an updated version
-
WickedWitchOfTheWeb
- Petty Officer Second Class
- Posts: 36
- Joined: 29 May 2009, 00:12
Re: UV Editing
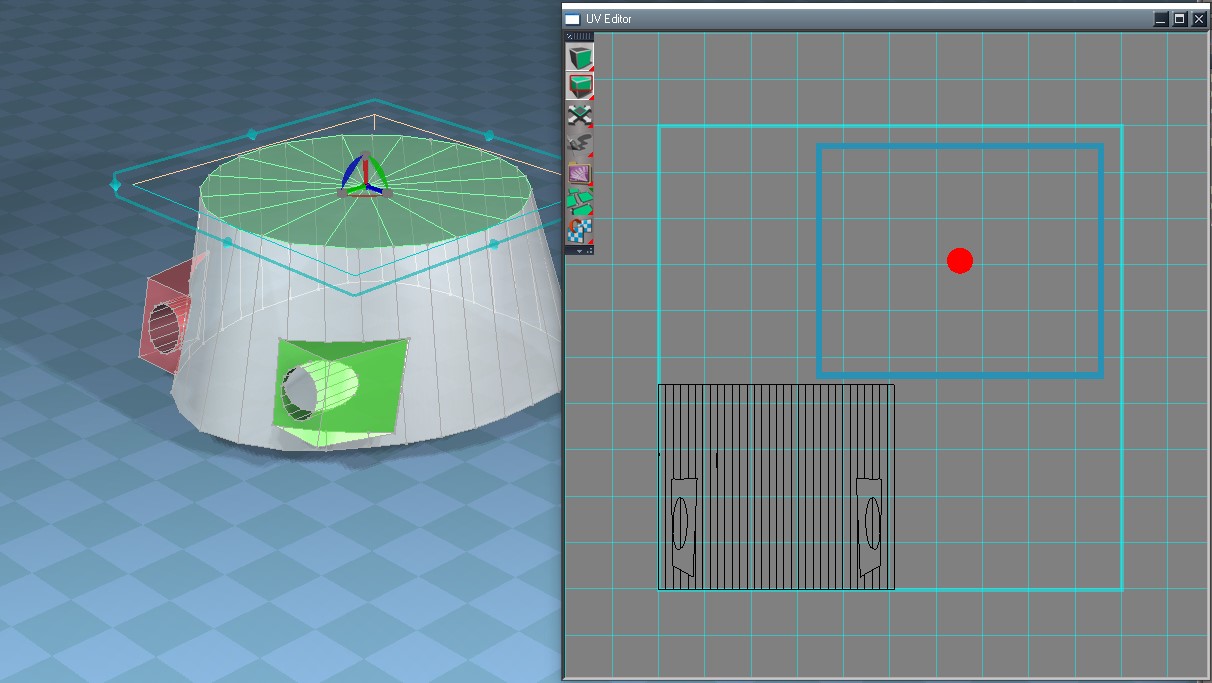
Thanks for checking. Still having issues: default/cylindrical applied to object, planar applied to top and, in the UV editor, it is invisible as you can see in the screenshot. Even if I export the bmp template, it doesn't show. Same for bottom, and any of the faces on the side boxes. Can you recreate that?
Thanks for your help
Thanks for your help
- Attachments
-
-
trueBlue
- Captain
- Posts: 5548
- Joined: 06 Jul 2009, 22:50
- Type the number ten into the box: 10
Re: UV Editing
Steps
1.) Select your object and open the UV Editor
2.) Select the Next button in the UV Editor Preferences panel.
That should show an empty UV view
3.) Point Edit, select the top faces. and apply a Planar UV projection
1.) Select your object and open the UV Editor
2.) Select the Next button in the UV Editor Preferences panel.
That should show an empty UV view
3.) Point Edit, select the top faces. and apply a Planar UV projection

-
WickedWitchOfTheWeb
- Petty Officer Second Class
- Posts: 36
- Joined: 29 May 2009, 00:12
Re: UV Editing
Thanks. Next question is... what next button? I don’t see one. I’m clearly missing something obvious but how do I get that panel up? Thank you for your patience!
-
trueBlue
- Captain
- Posts: 5548
- Joined: 06 Jul 2009, 22:50
- Type the number ten into the box: 10
Re: UV Editing
The Next button is in the UV Editor Preferences panel
Note: Right click the UV Editor icon, opens the UV Editor Preferences panel
Ctrl + Drag the UV Editor Preferences panel's title bar out from the Stack/Panel
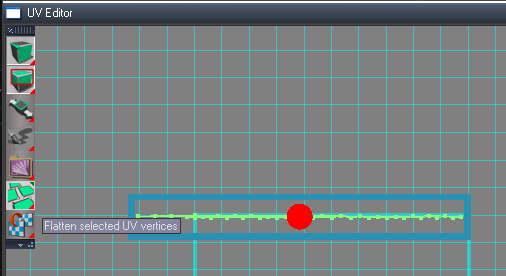
This screen shot is from trueSpace 7.6
I applied a Cylindrical UV projection
Selected the Next button
Selected the elements in the UV Editor
Results not shown, but you can select the Flatten selected UV vertices icon
Note: Right click the UV Editor icon, opens the UV Editor Preferences panel
Ctrl + Drag the UV Editor Preferences panel's title bar out from the Stack/Panel
This screen shot is from trueSpace 7.6
Selected the Next button
Selected the elements in the UV Editor
Results not shown, but you can select the Flatten selected UV vertices icon
-
WickedWitchOfTheWeb
- Petty Officer Second Class
- Posts: 36
- Joined: 29 May 2009, 00:12
Re: UV Editing
Hi
I was just coming on here to shout, "found it"!! and now I can bounce through the various faces and UV map sections. Last question (promise!) how do I get it to show all to allow laying out of the texture map? Output to bmp also on shows what's selected rather than everything and I can't find the option to show all.
Thank you so much for your help, really appreciate it.
I was just coming on here to shout, "found it"!! and now I can bounce through the various faces and UV map sections. Last question (promise!) how do I get it to show all to allow laying out of the texture map? Output to bmp also on shows what's selected rather than everything and I can't find the option to show all.
Thank you so much for your help, really appreciate it.
-
trueBlue
- Captain
- Posts: 5548
- Joined: 06 Jul 2009, 22:50
- Type the number ten into the box: 10
Re: UV Editing
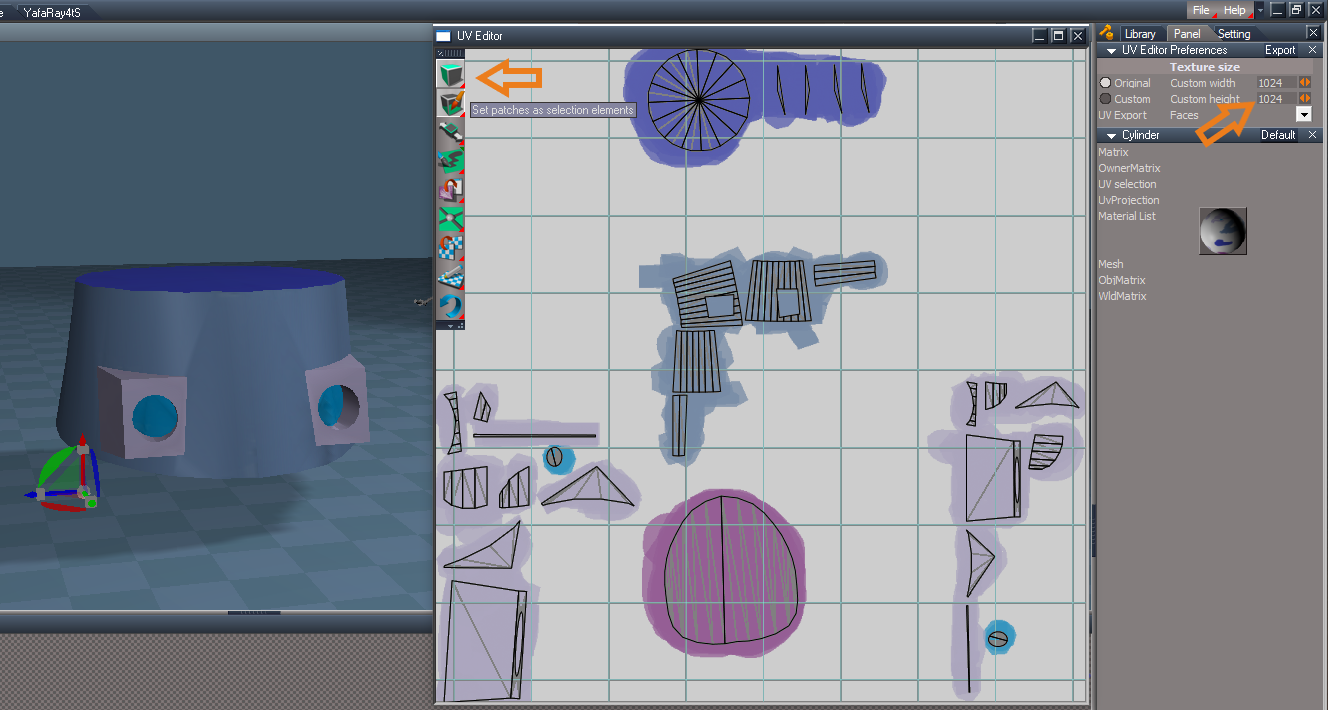
I painted your whole object with a 1024x1024 white image and then Flattened each set of elements.WickedWitchOfTheWeb wrote: 20 May 2020, 11:31 Hi
I was just coming on here to shout, "found it"!! and now I can bounce through the various faces and UV map sections. Last question (promise!) how do I get it to show all to allow laying out of the texture map? Output to bmp also on shows what's selected rather than everything and I can't find the option to show all.
Thank you so much for your help, really appreciate it.
I then resized and moved each set
Note: I missed some elements on the top faces. (Top Middle)

The Set Patches As Selection Element is a great selection tool!
-
WickedWitchOfTheWeb
- Petty Officer Second Class
- Posts: 36
- Joined: 29 May 2009, 00:12
Re: UV Editing
I'm clearly missing a vital step. I can select the area I want, apply whatever UV Mapping needed, resize/move, flip flop between the various selections with the next/previous buttons but I can't work out how to have them all show at the same time as you have for fine tuning (and proper painting of texture map).
Please tell me the secret to this final step!
Please tell me the secret to this final step!
-
trueBlue
- Captain
- Posts: 5548
- Joined: 06 Jul 2009, 22:50
- Type the number ten into the box: 10
Re: UV Editing
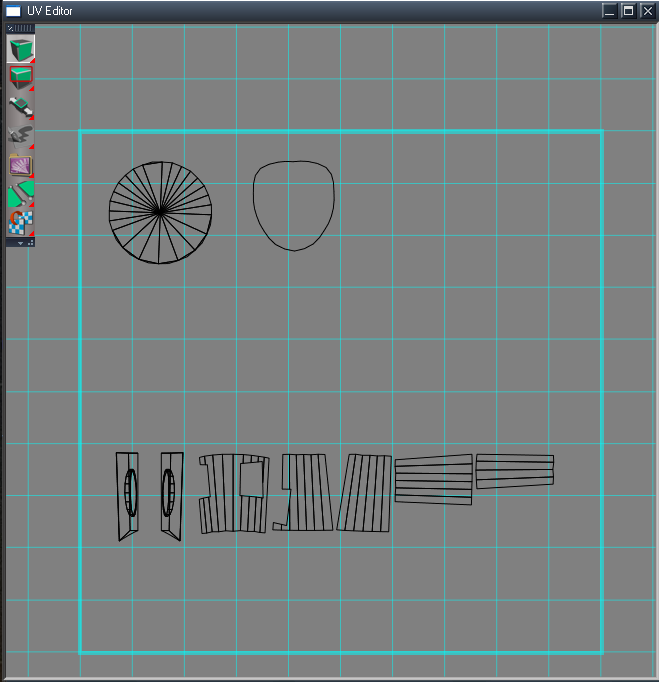
In my last post, I was using trueSpace 7.61 and the UV Editor works as expected.
In trueSpace 7.6, the UV Editor is not working/showing the 1024x1024 white texture applied to the object.
Guessing white is transparent
Here is your object saved from trueSpace 7.6
I guess what you are missing, is that you need to apply a 1024x1024 image to your whole object.
Try a flesh color or anything other then white in tS76
In trueSpace 7.6, the UV Editor is not working/showing the 1024x1024 white texture applied to the object.
Guessing white is transparent
I guess what you are missing, is that you need to apply a 1024x1024 image to your whole object.
Try a flesh color or anything other then white in tS76
- Attachments
-
- Cylinder2.RsObj
- (36.66 KiB) Downloaded 240 times
-
WickedWitchOfTheWeb
- Petty Officer Second Class
- Posts: 36
- Joined: 29 May 2009, 00:12
Re: UV Editing
Ah! So, has to be one colour/material to start with and it all shows as expected. Have any parts painted in different colours and it's all separated never to meet? Annoying but easy enough to work around.
Got it! Many, many thanks.
Got it! Many, many thanks.
-
spacekdet

- Captain
- Posts: 1810
- Joined: 27 May 2009, 15:00
- Type the number ten into the box: 10
- Location: On the day shift at the Utility Muffin Research Kitchen
Re: UV Editing
Might be helpful: (watch video)
http://www.spacekdet.com/tutorials/graysho/
http://www.spacekdet.com/tutorials/graysho/
-
WickedWitchOfTheWeb
- Petty Officer Second Class
- Posts: 36
- Joined: 29 May 2009, 00:12
Re: UV Editing
Thanks spacekdet, that was useful. Only real difference between that and the Workspace version is that once all the initial separations and scaling downs are done selecting by material (which is super useful) that there is no way it will show them all at the same time to be able to fine tune and export the UV template. A work around seems to be to do the initial work, then paint the whole thing the default colour and then they all appear together to enable you to do the fine tuning. A small issue but what's trueSpace without some weird quirks? !!
-
trueBlue
- Captain
- Posts: 5548
- Joined: 06 Jul 2009, 22:50
- Type the number ten into the box: 10
Re: UV Editing
Makes sense that you would want one image painted on a object in order to create a texture map.WickedWitchOfTheWeb wrote: 20 May 2020, 18:38 Ah! So, has to be one colour/material to start with and it all shows as expected. Have any parts painted in different colours and it's all separated never to meet? Annoying but easy enough to work around.
Got it! Many, many thanks.
The Material Previous and Next buttons are for an object that has several materials.
trueSpace 7.61 UV Editor is way BETTER then trueSpace 7.6
-
WickedWitchOfTheWeb
- Petty Officer Second Class
- Posts: 36
- Joined: 29 May 2009, 00:12
Re: UV Editing
I'm used to (or was back when I was doing this stuff regularly!) painting the mesh to define areas and using Split by Materials in UV Cow. That's what I was trying to achieve this time but that's not how things are done now it would seem and that's what was really throwing me off. Now have a workable solution so can crack on with texturing. Many thanks to all of you for your help
-
Finis

- Captain
- Posts: 5410
- Joined: 21 May 2009, 18:26
- Type the number ten into the box: 0
- Location: America!
Re: UV Editing
Paint areas then split by materials. That sounds like a good method. I'll have to see if that can be done in Blender.
I prefer dangerous freedom over peaceful servitude. -- Thomas Jefferson/Jean Jacques Rousseau