The old wagon revisited

compPanda
Senior Chief Petty Officer
Posts: 275
Joined: 21 May 2009, 21:15
Type the number ten into the box: 0

Re: The old wagon revisited

Post by compPanda »

JimB wrote:I took some railway photos this summer,maybe these two will help.
I have reduced them down as the originals are 3648 x 2738 which I can make available if really needed.
Thanks for your pictures but they shows a different way of putting brakes on trains - an older way which mean that you only have one break on each wheel. My wagon has a break on each side of the wheel as you see. What I am unsure of is how they connects the thing to the frame - I know how they are connected between each other. You actually only uses one break cylinder so you have leavers from that one to each of the wheel. But they have to be able to move and yet be fastened to the frame... I will probably need to put my head under a wagon but I will have to wait to this weekend.

Of course, a even newer way is to have discs brakes instead but that is still uncommon on freight cars. :)
JimB
Chief Petty Officer
Posts: 114
Joined: 21 May 2009, 20:34

Re: The old wagon revisited

Post by JimB »

Ok spyfrog no problem good luck sticking your head under a truck :)
compPanda
Senior Chief Petty Officer
Posts: 275
Joined: 21 May 2009, 21:15
Type the number ten into the box: 0

Re: The old wagon revisited

Post by compPanda »

This shows a part of the brake assembly of the later model Gbs wagon.
Unfortunately it doesn't show how it fits into the frame... I guess it is some kind of hinge.
bromsdetalj.jpg
compPanda
Senior Chief Petty Officer
Posts: 275
Joined: 21 May 2009, 21:15
Type the number ten into the box: 0

Re: The old wagon revisited

Post by compPanda »

JimB wrote:Ok spyfrog no problem good luck sticking your head under a truck :)
Yeah, the reason why I will have to wait to weekend to put my head under it is that I will like to do that in the railway museum and not an active truck which would be both illegal and dangerous... ;-)
JimB
Chief Petty Officer
Posts: 114
Joined: 21 May 2009, 20:34

Re: The old wagon revisited

Post by JimB »

I just checked again and this one is the nearest I have on the breaking system you're looking for.
Attachments
Picture 120small.jpg
compPanda
Senior Chief Petty Officer
Posts: 275
Joined: 21 May 2009, 21:15
Type the number ten into the box: 0

Re: The old wagon revisited

Post by compPanda »

JimB wrote:I just checked again and this one is the nearest I have on the breaking system you're looking for.
Yep, that is the correct system. I think it is the most common one for freight wagons as long as they don't have boogies. This way mean you can use one break cylinder and yet have a effective brake on each wheel. You can also apply the breaks harder when the wheel is squeezed from each side instead of only one brake shoe.

I think I have a solution that I will go with until I know how it looks now. It is probably only a hinge like thing bolted to the frame.
compPanda
Senior Chief Petty Officer
Posts: 275
Joined: 21 May 2009, 21:15
Type the number ten into the box: 0

Re: The old wagon revisited

Post by compPanda »

New brake made and mounted to the wagon.
I really love the spring that Marcel (I think) helped to tell me how to do.
ge_underredehjul.jpg
Next thing is to add the second wheel, an axle between them and then add the brake on the other side and then mirror the whole thing to the other side.
compPanda
Senior Chief Petty Officer
Posts: 275
Joined: 21 May 2009, 21:15
Type the number ten into the box: 0

Rivet problem

Post by compPanda »

Hi

I have encountered several problems.

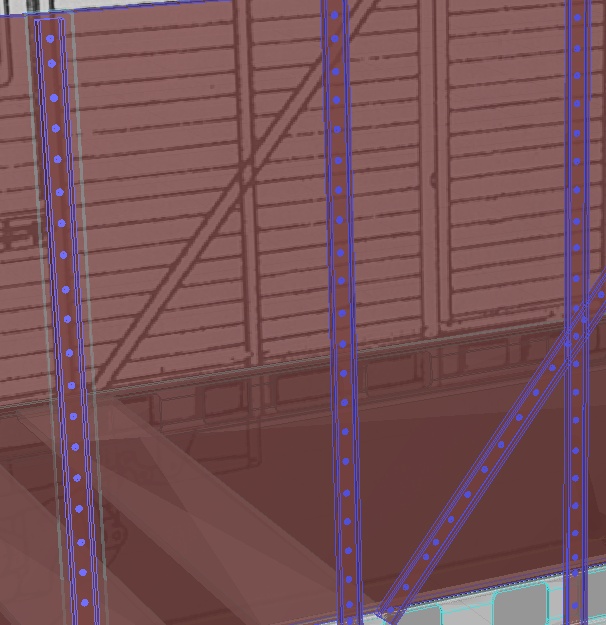
First, I have began to add the superstructure of the wagon. On it, it has riveted steel bars that are riveted to the boards that makes the walls.
rivet_problem_polycount.jpg
The problem is that this increases the polycount to much. My solution was simply to cut a sphere in half and then add several spheres to each steel bar. This put the vertice count for each steel bar to 1768 and face count to 1474. Since I need quite many of these bars, the polygons begin to be to many for TS 6.6 to handle.

Do you have any suggestion of how to save on polygons here? Can I make it with a lower resolution for each spehere or should I use a bump map?

The problem with the bump map solution is that I suck at texturing (and lightning). I tried to texture the spring and wheel and it looks awful. I don't know how to make this look good. Practice needed!
compPanda
Senior Chief Petty Officer
Posts: 275
Joined: 21 May 2009, 21:15
Type the number ten into the box: 0

Re: The old wagon revisited

Post by compPanda »

Ok, I managed to remove polygons from each sphere and cut vertices count down to 588 for each steel bar.
I think I can live with that number.
compPanda
Senior Chief Petty Officer
Posts: 275
Joined: 21 May 2009, 21:15
Type the number ten into the box: 0

Re: The old wagon revisited

Post by compPanda »

I am feeling a bit depressed over the lack of progress my project has.
I really can't get this texturing business to work...

Also, I found this image in a forum on the net.. someone is a so much better that it isn't funny...
Image

I would like to point out that this ISN'T my image. This is how I would like my to look when it is finished but this image is done by the much more talented "Mazz" who you can find at the web page banbyggarna.se

I have to admit I am a bit jealous of Mazz. I wish I was as good as him. :oops:
User avatar
tahnoak
Master Chief Petty Officer
Posts: 339
Joined: 02 Sep 2009, 01:31

Re: The old wagon revisited

Post by tahnoak »

Incredible details on the brakes and the overall train. It is motivating to me to want to do more detailed work when I see that it is possible by what you and others have put forth.
User avatar
marcel
Captain
Posts: 2247
Joined: 21 May 2009, 19:52
Type the number ten into the box: 0
Location: paris - France

Re: The old wagon revisited

Post by marcel »

To reduce the polycount you can use a half cube. Erase the face at the bottom. glue all the cubes when they are on the steel bar. When you need a render you can use the SDS to smooth all the cubes in one clic. When the cam are very near you can use an other level of SDS.
Attachments
sds.jpg
Design - illustration - Animation
http://www.crea-vision.fr
compPanda
Senior Chief Petty Officer
Posts: 275
Joined: 21 May 2009, 21:15
Type the number ten into the box: 0

Re: The old wagon revisited

Post by compPanda »

marcel wrote:To reduce the polycount you can use a half cube. Erase the face at the bottom. glue all the cubes when they are on the steel bar. When you need a render you can use the SDS to smooth all the cubes in one clic. When the cam are very near you can use an other level of SDS.
Kan you use subdivision on selected parts only? Many parts is already quite polygon heavy and I don't think SDS will make them look so good.
User avatar
LeonRegis
Captain
Posts: 1946
Joined: 18 Aug 2009, 17:36
Type the number ten into the box: 0
Location: Brazil/Earth/Orion Arm/Milky Way/4th Dimension/This Universe/Multiverse???/Singularity???

Re: The old wagon revisited

Post by LeonRegis »

Yes, you can use even just in one face... ;)
Be the change you want to see in the world. - Mohandas Gandhi
User avatar
marcel
Captain
Posts: 2247
Joined: 21 May 2009, 19:52
Type the number ten into the box: 0
Location: paris - France

Re: The old wagon revisited

Post by marcel »

You can use SDS only on the selected cubes to do spheres. The level 1 create a half sphere with 20 faces. and the quad are better for the render than a low standard sphere with triangles at the top. You can work easily with low polycount and do a good render with SDS.
Design - illustration - Animation
http://www.crea-vision.fr
compPanda
Senior Chief Petty Officer
Posts: 275
Joined: 21 May 2009, 21:15
Type the number ten into the box: 0

Re: The old wagon revisited

Post by compPanda »

marcel wrote:To reduce the polycount you can use a half cube. Erase the face at the bottom. glue all the cubes when they are on the steel bar. When you need a render you can use the SDS to smooth all the cubes in one clic. When the cam are very near you can use an other level of SDS.
A question - how can I use a half cube? Doesn't a cube cut in half result in two cubes? :D
I see that you mention that I should delete the face at the bottom - should I glue it to the steel bar then? What is the purpose of deleting this face?
User avatar
marcel
Captain
Posts: 2247
Joined: 21 May 2009, 19:52
Type the number ten into the box: 0
Location: paris - France

Re: The old wagon revisited

Post by marcel »

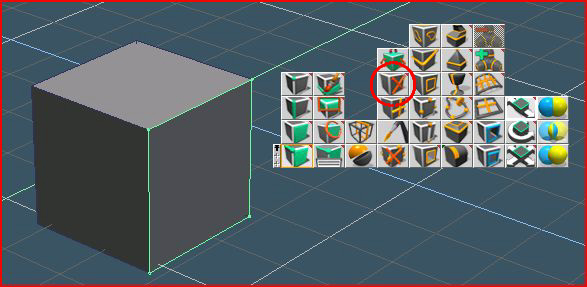
Here is the delete face tool. Just glue the cube together to use the sds in one clic. It is not recommended to glue the cubes with other objects witch can't need sds.
I am a little surprised about these simple questions from you. It is a very basic tool and essential for the modeling. A cube with sds become a sphere. A cube with one face erased become a half sphere. When I said a half cube, it is for the size: 1 x 1 x 0.5 ;)
Attachments
delete.jpg
Design - illustration - Animation
http://www.crea-vision.fr
compPanda
Senior Chief Petty Officer
Posts: 275
Joined: 21 May 2009, 21:15
Type the number ten into the box: 0

Re: The old wagon revisited

Post by compPanda »

marcel wrote:Here is the delete face tool. Just glue the cube together to use the sds in one clic. It is not recommended to glue the cubes with other objects witch can't need sds.
I am a little surprised about these simple questions from you. It is a very basic tool and essential for the modeling. A cube with sds become a sphere. A cube with one face erased become a half sphere. When I said a half cube, it is for the size: 1 x 1 x 0.5 ;)
Thank you Marcel.
I did know how to erase a face. I didn't know however that a cube with a face erased and SDS applied become a half sphere - I have only tried to SDS a hole cube and as you say, that turns into a sphere.
I had actually never thought of the possibility to remove one face and get a different outcome. :-)

Return to “Work in Progress”