Dark Grunge

Post Reply
User avatar
Finis
Captain
Posts: 5259
Joined: 21 May 2009, 18:26
Type the number ten into the box: 0
Location: North Venezuela or West Korea
Contact:

Dark Grunge

Post by Finis »

DarkGrungeTEMP1.jpg
Child's voice singing:
Heads or Tails
Heads or Tails
Knives and Nails
Heads or Tails

This is possibly an entry for the grunge challenge https://www.united3dartists.com/forum/v ... =66&t=5907. I hope to add more to the setting but time to work on it is limited.

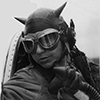
Blender 2.82. I put a Daz character head in the bag and let the cloth simulation run. This did not reveal the face enough so I used a shrink wrap modifier on part of the bag to fit the cloth to the face better. Maybe too much but artistically it must be clear that there is a head in the bag. The blood stains need work. The bag would have been oriented in two directions. Upright while carried and on its side on the surface. Drips and soaked parts should show that.

For the setting I will probably create the derelict back porch of an orphanage. That gives the opportunity for much grunge and options for placement of the bag, lighting, and storytelling with the objects.
Mice die in traps because they don't know why the cheese is free. -- seen on a bumper sticker
User avatar
Finis
Captain
Posts: 5259
Joined: 21 May 2009, 18:26
Type the number ten into the box: 0
Location: North Venezuela or West Korea
Contact:

Re: Dark Grunge

Post by Finis »

Abandoned orphanage wip. The head will be on a table near steps for the porch. Needs a sign to show it is an orphanage. Maybe one fallen near the gate or as part of the iron work of the gate. It will get grunged with crumbling walls, bent gate, dead plants.
HeadsOrTails.jpg
Leaves and trash piled up on walls. Make an object. Use particle system to spread copies on the ground. Make particles real. Apply rigid body physics. Make walls and ground passive rigid physics objects. Apply wind force field to blow to walls and turbulence force field for swirls to make it look realistic. Stop the animation when the stuff is piled and turn off the force fields. Let gravity settle the leaves.
leafpilewind.jpg
Physics Notes
- Use small Collision Margins for the passive physics objects, obstacles, or the active items will pass through.
- You must set the end frame for rigid body physics in Scene Tab->Rigid Body Physics or the sim will stop at 250.

Blender 2.82
Mice die in traps because they don't know why the cheese is free. -- seen on a bumper sticker
User avatar
Finis
Captain
Posts: 5259
Joined: 21 May 2009, 18:26
Type the number ten into the box: 0
Location: North Venezuela or West Korea
Contact:

Re: Dark Grunge

Post by Finis »

More textures. Probably best to do physical destruction/grunge first and then textures due to UV maps changing but I'm doing textures.

To do: finish modeling porch rails, trash leaves junk, dead grass and plants, orphanage sign.

Where could I put a wrought iron orphanage sign? Near the gate but how and where?

I want the bag to be on an outdoor cast metal table like this (link). That gives a shape for blood drips with the fluid sim and looks old fashioned for a long deserted look. I want a floral pattern rather that a geometrical one. To model the table top I'd like to use a photo of one to create the geometry of the Blender object. The many holes would be time consuming to do by hand. Any suggestions how to do that?
DG.jpg
Mice die in traps because they don't know why the cheese is free. -- seen on a bumper sticker
User avatar
spacekdet
Captain
Posts: 1799
Joined: 27 May 2009, 15:00
Type the number ten into the box: 10
Location: On the day shift at the Utility Muffin Research Kitchen
Contact:

Re: Dark Grunge

Post by spacekdet »

Finis wrote: 19 Apr 2020, 17:42

Where could I put a wrought iron orphanage sign? Near the gate but how and where?

I want the bag to be on an outdoor cast metal table like this (link). That gives a shape for blood drips with the fluid sim and looks old fashioned for a long deserted look. I want a floral pattern rather that a geometrical one. To model the table top I'd like to use a photo of one to create the geometry of the Blender object. The many holes would be time consuming to do by hand. Any suggestions how to do that?

DG.jpg
An archway with the lettering on it . Would be a tight squeeze and we would be looking at reverse lettering.
Simplify the text, maybe 'Orphan's Home' rather than 'Finis' Dormitory For Wayward Artists, Chattanooga, Tennesee'

The tabletop I would fudge with an alpha map.
If you wanted it geometry does Blender have the Displacement / Height Map equivalent to create it?
User avatar
Finis
Captain
Posts: 5259
Joined: 21 May 2009, 18:26
Type the number ten into the box: 0
Location: North Venezuela or West Korea
Contact:

Re: Dark Grunge

Post by Finis »

Thanks. An arch sounds good. Yeah, simple text. The gate will be bent or have a loose hinge.

The blood should drip through the holes in the table so the geometry needs holes. Displacement. That should do it. I could exaggerate the depth so the middle of the holes sticks out under the main part in side view. Then I can select and delete those polygons. Scale the whole thing in Z to get normal proportions.
Mice die in traps because they don't know why the cheese is free. -- seen on a bumper sticker
User avatar
Finis
Captain
Posts: 5259
Joined: 21 May 2009, 18:26
Type the number ten into the box: 0
Location: North Venezuela or West Korea
Contact:

Re: Dark Grunge

Post by Finis »

Need to finish this and get back to the Christmas movie. I'll make the porch floor with separate boards so they can be warped. Some success using subdivision, displacement, retopology modifiers to make a cast metal table top from an image. Needs improvement.

PorchD.jpg
Mice die in traps because they don't know why the cheese is free. -- seen on a bumper sticker
User avatar
Finis
Captain
Posts: 5259
Joined: 21 May 2009, 18:26
Type the number ten into the box: 0
Location: North Venezuela or West Korea
Contact:

Re: Dark Grunge

Post by Finis »

Blender 2.83

Update June 11, 2020 A wall done with this technique. Object Info node, wall factory, bevel, bump map, cell fracture.
CrackedWall.jpg

I will build the stone walls with individual blocks because that gives more opportunity to move and crack them for grunge. The cell fracture add on is good for breaking into pieces. Moving several blocks can create cracks in the wall along the joints. There is a wall factory tool in the extra meshes add on that might be useful.

I want to give the blocks a displacement or bump map so they are rough hewn. Make one and copy and rotate is one method. What if I could use one image to give each block its own displacement? This material node setup does that.
displacement.jpg
nodes.jpg
These blocks are cubes with a simple subdivision modifier and duplicated with Shift-D. Set up the material to use an image as a displacement map the typical way but add the Object Info node. Connect its Random output to location on the Vector Mapping node. Now each duplicate has a different displacement pattern.

Connect to the rotation or scale Mapping inputs for interesting effects. Use Location output from Object Info and the material will change when you move the object. Many effects are possible connecting different output/inputs and changing the Mapping type.

This technique works for particles too.
Mice die in traps because they don't know why the cheese is free. -- seen on a bumper sticker
Post Reply